Super Smash Bros. Ultimate

Peach (SSBU)/Neutral attack/Hit 1: Difference between revisions

From SmashWiki, the Super Smash Bros. wiki
Jump to navigationJump to search
No edit summary
No edit summary
 
(2 intermediate revisions by the same user not shown)
Line 3: Line 3:


==Overview==
==Overview==
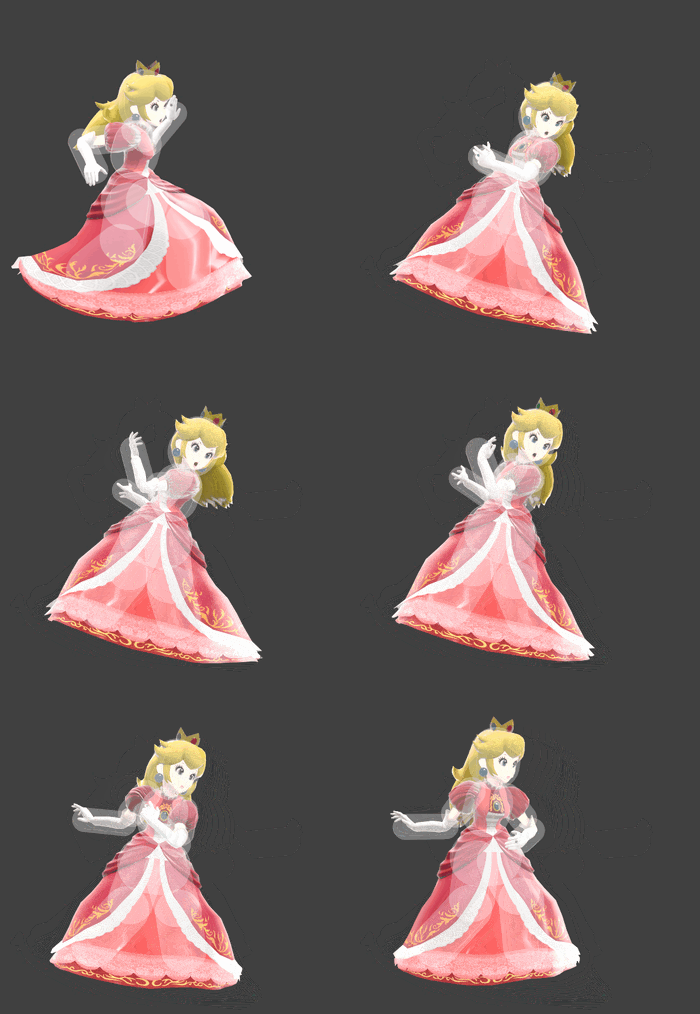
Peach slaps inwards with the {{rollover|leading arm|left arm if facing right, vice versa|?}}. The first hit of neutral attack deals 2.0% damage.
<onlyinclude>{{#ifeq:1|{{{p|1}}}|{{{1|Peach}}} slaps inwards with the {{rollover|leading arm|left arm if facing right, vice versa|?}}. The first hit of neutral attack deals 2.0% damage.}}</onlyinclude>


While pressuring the opponent's shield, neutral attack's first hit can be used to attack the opponent before they act [[out of shield]] along with the second hit. However this option can be countered if the opponent continues shield. The first hit of neutral attack is one of Peach's fastest out of shield options. It can be used after performing a [[perfect shield]]. If two attacks collide to each other, Peach can immediately perform neutral attack. Peach can perform neutral attack after mashing out of the opponent's grab.
<onlyinclude>{{#ifeq:2|{{{p|2}}}|While pressuring the opponent's shield, neutral attack's first hit can be used to attack the opponent before they act [[out of shield]] along with the second hit. However this option can be countered if the opponent continues shield. The first hit of neutral attack is one of {{{1|Peach}}}'s fastest out of shield options. It can be used after performing a [[perfect shield]]. If two attacks collide to each other, {{{1|Peach}}} can immediately perform neutral attack. {{{1|Peach}}} can perform neutral attack after mashing out of the opponent's grab.}}</onlyinclude>
 
At low percentages, neutral aerial can combo into neutral attack. The move can set up [[jab reset]]s.


<onlyinclude>{{#ifeq:3|{{{p|3}}}|At low percentages, neutral aerial can combo into neutral attack. The move can set up [[jab reset]]s.}}</onlyinclude>
==Update History==
==Update History==
'''{{GameIcon|ssbu}} {{SSBU|3.1.0}}'''

Latest revision as of 07:44, January 3, 2024

Hitbox visualization showing Peach's first jab.

Overview[edit]

Peach slaps inwards with the leading arm. The first hit of neutral attack deals 2.0% damage.

While pressuring the opponent's shield, neutral attack's first hit can be used to attack the opponent before they act out of shield along with the second hit. However this option can be countered if the opponent continues shield. The first hit of neutral attack is one of Peach's fastest out of shield options. It can be used after performing a perfect shield. If two attacks collide to each other, Peach can immediately perform neutral attack. Peach can perform neutral attack after mashing out of the opponent's grab.

At low percentages, neutral aerial can combo into neutral attack. The move can set up jab resets.

Update History[edit]

Super Smash Bros. Ultimate 3.1.0

  • Buff Neutral attack 1 connects into neutral attack 2 more reliably.

Hitboxes[edit]

ID Part Rehit rate Damage SD Angle Angle type BK KS FKV Set weight Radius Bone Offset SDI× T% Clang Rebound Effect Type G A Sound Direct Hit bits Hit part Blockable Reflectable Absorbable Flinchless No GFX Heedless
0 0 0 2.0% 0 Sakurai angle Forward 30 25 0 HitboxTableIcon(False).png 2.0 top 0.0 9.0 5.0 1.2× 1.0× 0% HitboxTableIcon(Clang).png HitboxTableIcon(Rebound).png Normal (effect) Hand (type) HitboxTableIcon(GroundedTrue).png HitboxTableIcon(AerialTrue).png S Peach Slap SpecialsDirect.png All All HitboxTableIcon(Blockable).png HitboxTableIcon(Unreflectable).png HitboxTableIcon(Unabsorbable).png HitboxTableIcon(False).png HitboxTableIcon(False).png HitboxTableIcon(False).png
1 0 0 2.0% 0 AngleIcon180.png Forward 20 15 0 HitboxTableIcon(False).png 2.0 top 0.0 9.0 8.0 1.2× 1.0× 0% HitboxTableIcon(Clang).png HitboxTableIcon(Rebound).png Normal (effect) Hand (type) HitboxTableIcon(GroundedTrue).png HitboxTableIcon(AerialTrue).png S Peach Slap SpecialsDirect.png Fighter only All HitboxTableIcon(Blockable).png HitboxTableIcon(Unreflectable).png HitboxTableIcon(Unabsorbable).png HitboxTableIcon(False).png HitboxTableIcon(False).png HitboxTableIcon(False).png
2 0 0 2.0% 0 AngleIcon180.png Forward 20 15 0 HitboxTableIcon(False).png 2.4 top 0.0 9.0 10.5 1.2× 1.0× 0% HitboxTableIcon(Clang).png HitboxTableIcon(Rebound).png Normal (effect) Hand (type) HitboxTableIcon(GroundedTrue).png HitboxTableIcon(AerialTrue).png S Peach Slap SpecialsDirect.png Fighter only All HitboxTableIcon(Blockable).png HitboxTableIcon(Unreflectable).png HitboxTableIcon(Unabsorbable).png HitboxTableIcon(False).png HitboxTableIcon(False).png HitboxTableIcon(False).png
3 0 0 2.0% 0 Sakurai angle Forward 30 25 0 HitboxTableIcon(False).png 2.0 top 0.0 9.0 8.0 1.2× 1.0× 0% HitboxTableIcon(Clang).png HitboxTableIcon(Rebound).png Normal (effect) Hand (type) HitboxTableIcon(GroundedTrue).png HitboxTableIcon(AerialTrue).png S Peach Slap SpecialsDirect.png All All HitboxTableIcon(Blockable).png HitboxTableIcon(Unreflectable).png HitboxTableIcon(Unabsorbable).png HitboxTableIcon(False).png HitboxTableIcon(False).png HitboxTableIcon(False).png
4 0 0 2.0% 0 Sakurai angle Forward 20 15 0 HitboxTableIcon(False).png 2.4 top 0.0 9.0 10.5 1.2× 1.0× 0% HitboxTableIcon(Clang).png HitboxTableIcon(Rebound).png Normal (effect) Hand (type) HitboxTableIcon(GroundedTrue).png HitboxTableIcon(AerialTrue).png S Peach Slap SpecialsDirect.png All All HitboxTableIcon(Blockable).png HitboxTableIcon(Unreflectable).png HitboxTableIcon(Unabsorbable).png HitboxTableIcon(False).png HitboxTableIcon(False).png HitboxTableIcon(False).png

Timing[edit]

Hitboxes 2
Continuability Held on hit or tapped 7-30
Held without hitting 14
Interruptible 28
Animation length 37
FrameIcon(Lag).png FrameIcon(Hitbox).png FrameIcon(Lag).png FrameIcon(Lag).png FrameIcon(Lag).png FrameIcon(LagContinuableS).png FrameIcon(LagContinuableE).png FrameIcon(Lag).png FrameIcon(Lag).png FrameIcon(Lag).png FrameIcon(Lag).png FrameIcon(Lag).png FrameIcon(LagContinuableS).png FrameIcon(LagContinuableE).png FrameIcon(Lag).png FrameIcon(Lag).png FrameIcon(Lag).png FrameIcon(Lag).png FrameIcon(Lag).png FrameIcon(Lag).png FrameIcon(Lag).png FrameIcon(Lag).png FrameIcon(Lag).png FrameIcon(Lag).png FrameIcon(Lag).png FrameIcon(Lag).png FrameIcon(Lag).png FrameIcon(Interruptible).png FrameIcon(Interruptible).png FrameIcon(Interruptible).png FrameIcon(Interruptible).png FrameIcon(Interruptible).png FrameIcon(Interruptible).png FrameIcon(Interruptible).png FrameIcon(Interruptible).png FrameIcon(Interruptible).png FrameIcon(Interruptible).png
FrameIcon(Blank).png FrameIcon(Blank).png FrameIcon(Blank).png FrameIcon(Blank).png FrameIcon(Blank).png FrameIcon(Blank).png FrameIcon(Continuable).png FrameIcon(Continuable).png FrameIcon(Continuable).png FrameIcon(Continuable).png FrameIcon(Continuable).png FrameIcon(Continuable).png FrameIcon(Continuable).png FrameIcon(Continuable).png FrameIcon(Continuable).png FrameIcon(Continuable).png FrameIcon(Continuable).png FrameIcon(Continuable).png FrameIcon(Continuable).png FrameIcon(Continuable).png FrameIcon(Continuable).png FrameIcon(Continuable).png FrameIcon(Continuable).png FrameIcon(Continuable).png FrameIcon(Continuable).png FrameIcon(Continuable).png FrameIcon(Continuable).png FrameIcon(Continuable).png FrameIcon(Continuable).png FrameIcon(Continuable).png FrameIcon(Blank).png FrameIcon(Blank).png FrameIcon(Blank).png FrameIcon(Blank).png FrameIcon(Blank).png FrameIcon(Blank).png FrameIcon(Blank).png
Legend (1 square = 1 frame)
Lag
Lag time
Hitbox
Hitbox
FrameIcon(Continuable).png
Continuable
FrameIcon(BlankContinuableS).pngFrameIcon(BlankContinuableE).png
Earliest continuable point
Interruptibility
Interruptible