Marth (SSBU)/Forward smash: Difference between revisions
m (Forgot about weak nair f-smash until writing the nair article.) |
|||
| Line 18: | Line 18: | ||
|sd=0 | |sd=0 | ||
|angle=361 | |angle=361 | ||
|af=3 | |||
|bk=48 | |bk=48 | ||
|ks=75 | |ks=75 | ||
| Line 37: | Line 38: | ||
|sd=0 | |sd=0 | ||
|angle=361 | |angle=361 | ||
|af=3 | |||
|bk=48 | |bk=48 | ||
|ks=75 | |ks=75 | ||
| Line 56: | Line 58: | ||
|sd=0 | |sd=0 | ||
|angle=361 | |angle=361 | ||
|af=3 | |||
|bk=48 | |bk=48 | ||
|ks=75 | |ks=75 | ||
| Line 75: | Line 78: | ||
|sd=0 | |sd=0 | ||
|angle=361 | |angle=361 | ||
|af=3 | |||
|bk=80 | |bk=80 | ||
|ks=80 | |ks=80 | ||
Latest revision as of 20:13, June 19, 2022
Overview[edit]
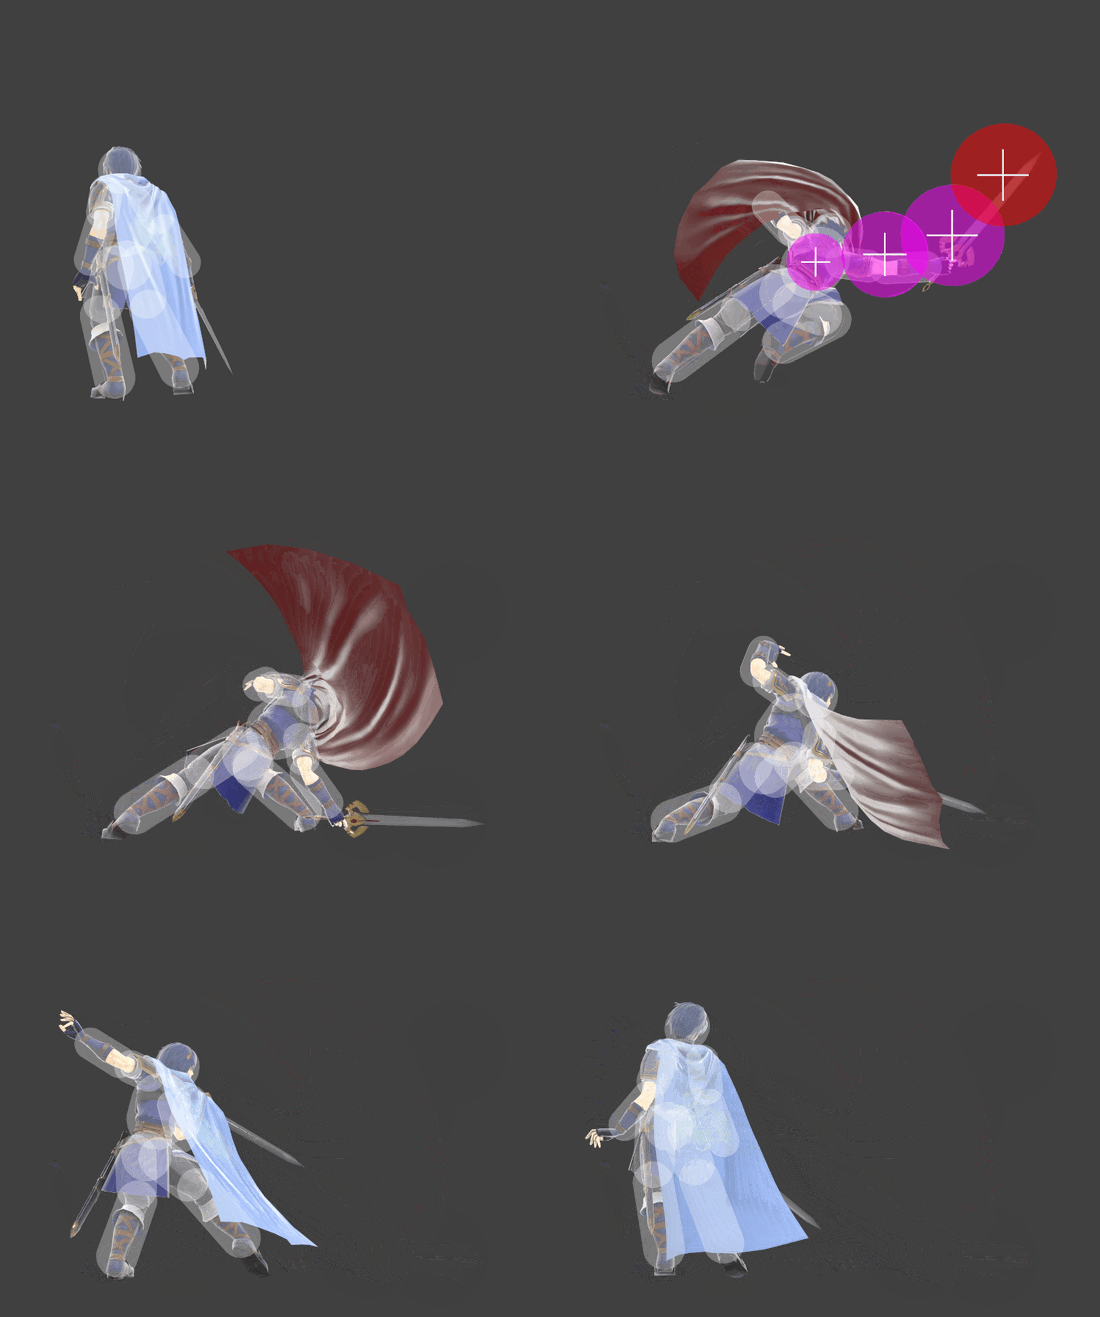
While traditionally a move that can be used to fish for kills in other games, Marth's forward smash in this game is a very high risk move with potentially middling reward. While it is true a tipper will kill very early, the move has high end lag and tippers are generally inconsistent in this game. The most reliable setup is to fast fall the first hit of Marth's neutral aerial first before using forward smash. Moves that can combo less reliably into tipper forward smash are non-tipper forward air or tipper down air, but even these can be inconsistent given the variable nature of combos and defensive mechanics in modern Smash.
There is a temptation to use forward smash as an anti-air, particularly to catch opponents trying to jump directly over Marth. In this situation, Marth should strongly consider repositioning instead, as the highest hitbox frame of forward smash will barely hit above his head. The next frame places Marth's sword diagonally upwards, and the maximum height of any hitbox is noticeably lower than in the first active frame. To protect yourself in the meantime, fast falling Marth's up air can be used instead of forward smash.
Another use Marth's forward smash initially appears to have is hitting opponents on middle height platforms (such as the ones on Battlefield). However, forward smash has deceptively low vertical reach. It is extremely difficult to use this to catch opponents that are squarely on the platform, especially if they are not doing anything that shifts their hurtboxes around. Consider using forward tilt or short hop up air instead. On the other hand, it is very common for (novice) opponents to simply run off the sides of platforms in order to return to ground level. In this case, Marth's forward smash is at a much more appropriate height. A player whose style is more gambling-heavy can expect to see better results trying forward smash in these situations instead. Furthermore, when opponents improve and learn techniques such as [Isai Drops], "random" forward smashes can acquire success even then. Just avoid using forward smash to catch opponents on middle platforms who show no intent of immediately lowering themselves further.
There is also a temptation to use forward smash against opponents who are recovering from below the stage, perhaps to use the fact part of the hitbox is below Marth's sword itself. Marth's lowest hitting forward smash hitbox is not quite at the tip, but slightly before it, so position accordingly. The most favorable matchups utilizing forward smash edgeguards are those against rising opponents with little control over their trajectory, and who also do not often wall-ride because of their lack of vertical momentum. The classic examples are Donkey Kong and Bowser. However, given Marth's above-average aerial mobility, it is more advisable to directly challenge opponents offstage using Marth's aerials, all of which are far superior to forward smash in terms of any reward that is not simply highest possible damage. If one is content to remain on-stage, repeated usage of forward tilt and down tilt can be an advisable alternative, as well as using ledge trumps followed by back air.
Hitboxes[edit]
Timing[edit]
| Charges between | 2-3 |
|---|---|
| Hitboxes | 10-13 |
| Interruptible | 52 |
| Animation length | 69 |
Lag time |
Charge interval |
Hitbox |
Interruptible |
|

