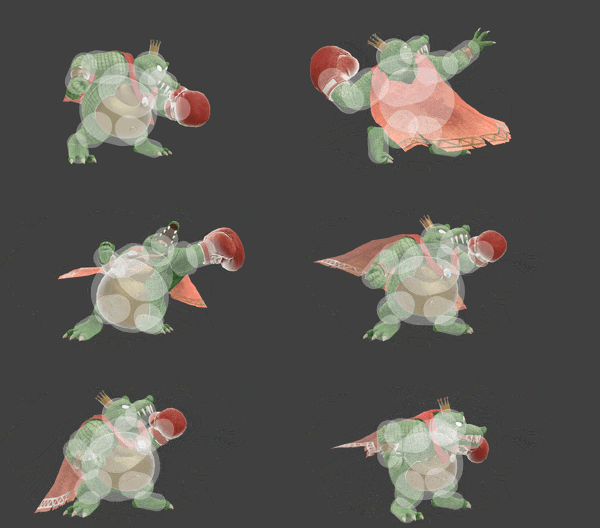
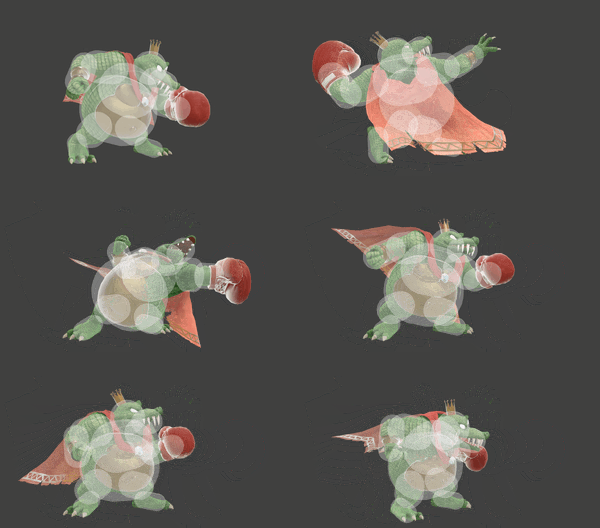
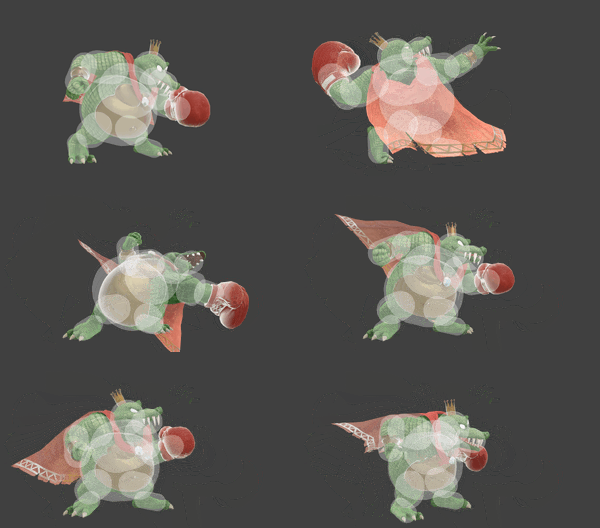
King K. Rool (SSBU)/Forward smash: Difference between revisions
(restructured, more precise explanations) |
No edit summary |
||
| (4 intermediate revisions by 2 users not shown) | |||
| Line 15: | Line 15: | ||
==Overview== | ==Overview== | ||
A heavy hitting, straight punch. It's one of the strongest forward smashes in the game power-wise, KOing as soon as 70% from center-stage. On top of this, forward smash's glove is a disjoint, enabling the move to function as a hard punish for poor spacing on the opponent's part. Forward smash has unusual damage numbers, as well as sourspots and sweetspots; despite this, the sourspots are near-impossible to connect due to the sweetspots having higher hitbox priority, adding to the move's overall consistency. However, they do exist and can rarely connect, in which the move is noticeably less powerful on hit. | A heavy hitting, straight punch. It's one of the strongest forward smashes in the game power-wise, KOing as soon as 70% from center-stage. On top of this, forward smash's glove is a disjoint, enabling the move to function as a hard punish for poor spacing on the opponent's part. Forward smash has unusual damage numbers, as well as sourspots and sweetspots; despite this, the sourspots are near-impossible to connect due to the sweetspots having higher hitbox priority, adding to the move's overall consistency. However, they do exist and can rarely connect, in which the move is noticeably less powerful on hit. Out of all the angles, the upward direction will KO the earliest, making it K. Rool's strongest [[shield break]] punish that doesn't involve a [[combo]]. | ||
However, at the | An upward-angled forward smash can be confirmed out of a [[../Down aerial|down aerial]] [[meteor smash]] at around 60%, with the sweetspot being somewhat consistent. This can be set up through [[../Down tilt|down tilt]] at around 40%, which can make use of [[bury]] storage mechanics to more easily connect the forward smash. This is often referred to as the "Kremling Kombo" by the K. Rool playerbase<ref>[https://twitter.com/raphy_lux/status/1363199146740641793 this is just a really good clip]</ref> and can be used to take stocks at monumentally low percentages. However, outside of down tilt setups, down aerial into forward smash tends to fail to connect properly, as the move's blindspot up-close causes it to whiff and lead to massive [[punishment]] due to the long endlag. Consequently, it is often ignored in favour of [[grab]]s, further [[tech chase]]s with down aerial, or [[../Up smash|up smash]] at later [[percentage]]s. | ||
Forward smash's low angled hit is a strong ledgehang punish, hitting poor hurtboxes such as {{SSBU|Ivysaur}}'s; {{SSBU|13.0.0}} has made this consistent against the greater roster as well. Naturally, it can also 2-frame characters such as {{SSBU|Joker}}, but due to the charge hold being a bit early—mandating the charge release is timed 8 frames in advance—it is generally seen as inferior to [[../Forward tilt|forward tilt]]. Its 3 active frames do give it some leverage, making it more likely to land if timing is not an issue. | |||
However, forward smash is considered to be one of King K. Rool's worst moves, and for good reason. This is due to its poor frame data (coming out frame 19), blindspot up close, poor shield safety, FAF of 62, and lack of reliable confirms. As a result, the move is frequently relegated to being a punish for opponents being hit by [[../Down tilt|down tilt]], or a [[shield break]] punish. It can be used as a mixup out of [[../Down throw|down throw]] should the opponent not mash to escape up smash for a very early stock. An upward angled forward smash can hit {{SSBU|Charizard}} and {{SSBU|Ganondorf}}, changing a 33/33/33 situation into a 50/50<ref>https://docs.google.com/spreadsheets/d/1mRJlTcb260JBwbyOTdrs63SrNPY_a6Vat13kkH7QMnY/edit?usp=sharing</ref>. | |||
==Update History== | |||
'''{{GameIcon|ssbu}} {{SSBU|13.0.0}}''' | |||
*{{buff|Forward smash has a longer hitbox duration (frames 19-20 → 19-21), and its sweetspot is larger during the first active frame (5.2u → 5.8u).}} | |||
==Hitboxes== | ==Hitboxes== | ||
{{UltimateHitboxTableHeader}} | {{UltimateHitboxTableHeader}} | ||
{{HitboxTableTitle|Angled | {{HitboxTableTitle|Angled up|42}} | ||
{{UltimateHitboxTableRow | {{UltimateHitboxTableRow | ||
|id=0 | |id=0 | ||
|damage={{ChargedSmashDmgSSBU|19. | |damage={{ChargedSmashDmgSSBU|19.95}} | ||
|angle=361 | |angle=361 | ||
|af=3 | |||
|bk=40 | |bk=40 | ||
|ks=96 | |ks=96 | ||
|fkv=0 | |fkv=0 | ||
|r=5. | |r=5.8 | ||
|bn=arml | |bn=arml | ||
|xpos=6.5 | |xpos=6.5 | ||
| Line 42: | Line 51: | ||
{{UltimateHitboxTableRow | {{UltimateHitboxTableRow | ||
|id=1 | |id=1 | ||
|damage={{ChargedSmashDmgSSBU|17. | |damage={{ChargedSmashDmgSSBU|17.325}} | ||
|angle=361 | |angle=361 | ||
|af=3 | |||
|bk=40 | |bk=40 | ||
|ks=96 | |ks=96 | ||
| Line 58: | Line 68: | ||
|slvl=L | |slvl=L | ||
}} | }} | ||
{{HitboxTableTitle|Angled | {{HitboxTableTitle|Angled forward|42}} | ||
{{UltimateHitboxTableRow | {{UltimateHitboxTableRow | ||
|id=0 | |id=0 | ||
|damage={{ChargedSmashDmgSSBU|19.0}} | |damage={{ChargedSmashDmgSSBU|19.0}} | ||
|angle=361 | |angle=361 | ||
|af=3 | |||
|bk=40 | |bk=40 | ||
|ks=96 | |ks=96 | ||
|fkv=0 | |fkv=0 | ||
|r=5. | |r=5.8 | ||
|bn=arml | |bn=arml | ||
|xpos=6.5 | |xpos=6.5 | ||
| Line 81: | Line 92: | ||
|damage={{ChargedSmashDmgSSBU|16.5}} | |damage={{ChargedSmashDmgSSBU|16.5}} | ||
|angle=361 | |angle=361 | ||
|af=3 | |||
|bk=40 | |bk=40 | ||
|ks=96 | |ks=96 | ||
| Line 95: | Line 107: | ||
|slvl=L | |slvl=L | ||
}} | }} | ||
{{HitboxTableTitle|Angled | {{HitboxTableTitle|Angled down|42}} | ||
{{UltimateHitboxTableRow | {{UltimateHitboxTableRow | ||
|id=0 | |id=0 | ||
|damage={{ChargedSmashDmgSSBU|19.57}} | |damage={{ChargedSmashDmgSSBU|19.57}} | ||
|angle=361 | |angle=361 | ||
|af=3 | |||
|bk=40 | |bk=40 | ||
|ks=96 | |ks=96 | ||
|fkv=0 | |fkv=0 | ||
|r=5. | |r=5.8 | ||
|bn=arml | |bn=arml | ||
|xpos=6.5 | |xpos=6.5 | ||
| Line 116: | Line 129: | ||
{{UltimateHitboxTableRow | {{UltimateHitboxTableRow | ||
|id=1 | |id=1 | ||
|damage={{ChargedSmashDmgSSBU|16. | |damage={{ChargedSmashDmgSSBU|16.995}} | ||
|angle=361 | |angle=361 | ||
|af=3 | |||
|bk=40 | |bk=40 | ||
|ks=96 | |ks=96 | ||
| Line 132: | Line 146: | ||
|slvl=L | |slvl=L | ||
}} | }} | ||
{{HitboxTableRowNote|The late hit for all angles reduces the ID 0 hitbox's radius to 5.2.|42}} | |||
|} | |} | ||
==Timing== | ==Timing== | ||
{|class="wikitable" | {|class="wikitable" | ||
!Charges between | !Charges between | ||
|10 | |9-10 | ||
|- | |- | ||
!Hitboxes | !Hitboxes (early, late) | ||
|19- | |19, 20-21 | ||
|- | |- | ||
!Interruptible | !Interruptible | ||
| Line 152: | Line 163: | ||
|84 | |84 | ||
|} | |} | ||
{{FrameStripStart}} | {{FrameStripStart}} | ||
{{FrameStrip|t=Lag|c=9|e=LagChargeS}}{{FrameStrip|t=Lag|c=9|s=LagChargeE}}{{FrameStrip|t=Hitbox|c=1|e=HitboxChangeS}}{{FrameStrip|t=Hitbox|c=2|s=HitboxChangeE}}{{FrameStrip|t=Lag|c=40}}{{FrameStrip|t=Interruptible|c=23}} | |||
{{FrameStripEnd}} | {{FrameStripEnd}} | ||
{{FrameIconLegend|lag=y|charge=y|hitbox=y|hitboxchange=y|interruptible=y}} | |||
{{FrameIconLegend|lag=y|hitbox=y| | |||
{{MvSubNavKingKRool|g=SSBU}} | {{MvSubNavKingKRool|g=SSBU}} | ||
Latest revision as of 08:46, August 8, 2022
| King K. Rool forward smash hitbox visualizations | ||||
|---|---|---|---|---|
| ↗ | 
| |||
| → | 
| |||
| ↘ | 
| |||
Overview[edit]
A heavy hitting, straight punch. It's one of the strongest forward smashes in the game power-wise, KOing as soon as 70% from center-stage. On top of this, forward smash's glove is a disjoint, enabling the move to function as a hard punish for poor spacing on the opponent's part. Forward smash has unusual damage numbers, as well as sourspots and sweetspots; despite this, the sourspots are near-impossible to connect due to the sweetspots having higher hitbox priority, adding to the move's overall consistency. However, they do exist and can rarely connect, in which the move is noticeably less powerful on hit. Out of all the angles, the upward direction will KO the earliest, making it K. Rool's strongest shield break punish that doesn't involve a combo.
An upward-angled forward smash can be confirmed out of a down aerial meteor smash at around 60%, with the sweetspot being somewhat consistent. This can be set up through down tilt at around 40%, which can make use of bury storage mechanics to more easily connect the forward smash. This is often referred to as the "Kremling Kombo" by the K. Rool playerbase[1] and can be used to take stocks at monumentally low percentages. However, outside of down tilt setups, down aerial into forward smash tends to fail to connect properly, as the move's blindspot up-close causes it to whiff and lead to massive punishment due to the long endlag. Consequently, it is often ignored in favour of grabs, further tech chases with down aerial, or up smash at later percentages.
Forward smash's low angled hit is a strong ledgehang punish, hitting poor hurtboxes such as Ivysaur's; 13.0.0 has made this consistent against the greater roster as well. Naturally, it can also 2-frame characters such as Joker, but due to the charge hold being a bit early—mandating the charge release is timed 8 frames in advance—it is generally seen as inferior to forward tilt. Its 3 active frames do give it some leverage, making it more likely to land if timing is not an issue.
However, forward smash is considered to be one of King K. Rool's worst moves, and for good reason. This is due to its poor frame data (coming out frame 19), blindspot up close, poor shield safety, FAF of 62, and lack of reliable confirms. As a result, the move is frequently relegated to being a punish for opponents being hit by down tilt, or a shield break punish. It can be used as a mixup out of down throw should the opponent not mash to escape up smash for a very early stock. An upward angled forward smash can hit Charizard and Ganondorf, changing a 33/33/33 situation into a 50/50[2].
Update History[edit]
 Forward smash has a longer hitbox duration (frames 19-20 → 19-21), and its sweetspot is larger during the first active frame (5.2u → 5.8u).
Hitboxes[edit]
Timing[edit]
| Charges between | 9-10 |
|---|---|
| Hitboxes (early, late) | 19, 20-21 |
| Interruptible | 62 |
| Animation length | 84 |
Lag time |
Charge interval |
Hitbox |
Hitbox change |
Interruptible |
|