Absorption: Difference between revisions
m (please) |
Gligar2007 (talk | contribs) mNo edit summary |
||
| (16 intermediate revisions by 8 users not shown) | |||
| Line 1: | Line 1: | ||
{{ArticleIcons|series=y|unofficial=y}} | {{ArticleIcons|series=y|unofficial=y}} | ||
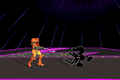
[[File:PSI Magnet Ness Absorption Brawl.gif|thumb | [[File:PSI Magnet Ness Absorption Brawl.gif|thumb|250px|{{SSBB|Ness}} absorbing {{SSBB|Charizard}}'s Flamethrower in ''Brawl''.]] | ||
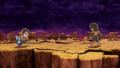
[[File:Oil Spill Absorption Brawl.gif|thumb|250px | [[File:Oil Spill Absorption Brawl.gif|thumb|250px|{{SSBB|Mr. Game & Watch}} absorbing {{SSBB|Bowser}}'s Fire Breath and counter-attacking in ''Brawl''.]] | ||
{{redirect|Energy-based attack|the attack type|Energy}} | {{redirect|Energy-based attack|the attack type|Energy}} | ||
:''For the technique referred to as "absorbing damage" by the Twinkle Toes [[bonus points|bonus]] in [[Super Smash Bros. Melee]], see [[tech]].'' | :''For the technique referred to as "absorbing damage" by the Twinkle Toes [[bonus points|bonus]] in [[Super Smash Bros. Melee]], see [[tech]].'' | ||
'''Absorption''' is | '''Absorption''' is a property of certain moves that allows them to capture a certain kind of [[projectile]] (or just a general [[hitbox]] in rare cases), usually described as "energy-based". It then provides a benefit to the character absorbing it based on the damage output of the absorbed attack. The absorption property has currently only applied to [[down special move]]s, though it can theoretically apply to any attack. What constitutes an absorbable attack other than being labeled as energy-based is not consistent throughout the ''Smash'' series, and has no relation with move [[type]]s or [[effect]]s. ''[[Super Smash Bros. 4]]'' allowed some, but not all [[explosive]] attacks to be absorbable when they were not in previous games. | ||
Only four characters in the ''Super Smash Bros.'' series have | Only four characters in the ''Super Smash Bros.'' series have moves that can absorb attacks, namely [[Ness]], [[Lucas]], [[Mii Gunner]], and [[Mr. Game & Watch]]. Ness and Lucas' absorbing special move is [[PSI Magnet]], Mr. Game & Watch's is [[Oil Panic]], and the Mii Gunner's is [[Absorbing Vortex]]. PSI Magnet and Absorbing Vortex heal the user based on the absorbed attack's power, while Oil Panic stores the strength of up to three projectiles for unleashing a single attack later. Absorption is not to be confused with [[Villager]] and [[Isabelle]]'s [[neutral special]], [[Pocket]], or any other form of collecting items. | ||
In [[The Subspace Emissary]] in ''[[Super Smash Bros. Brawl]]'', [[Floow]]s are also capable of absorbing attacks, though they do not appear to do anything with the absorbed energy. In [[Smash Run]] in | In [[The Subspace Emissary]] in ''[[Super Smash Bros. Brawl]]'', [[Floow]]s are also capable of absorbing attacks, though they do not appear to do anything with the absorbed energy. In [[Smash Run]] in {{for3ds}}, [[Chandelure]] appears to be capable of absorbing [[flame]] and [[darkness]] attacks to power up its own attacks, but absorbs all attacks with these effects, including non-projectile attacks. | ||
In '' | In ''Super Smash Bros. 4'' from version [[1.1.3]] onward, and ''[[Super Smash Bros. Ultimate]]'', absorbed attacks from allies in [[team battle]]s with [[team attack]] turned on have their damage reduced by half. For example, Ness' PSI Magnet, which increases the damage of absorbed projectiles by 1.6× in both games, decreases it instead by 0.8× for teammates' projectiles. This hinders the effectiveness of moves with absorption properties in [[doubles]], as they were initially quite potent in earlier games/versions when combined with strong projectiles (such as [[Samus]]' fully charged [[Charge Shot]], which could bring Oil Panic's attack close to [[one-hit KO]] potential). | ||
==List of moves with absorption properties== | ==List of moves with absorption properties== | ||
| Line 43: | Line 43: | ||
==List of absorbable attacks== | ==List of absorbable attacks== | ||
===By fighters=== | |||
For playable characters, if an attack has only one hitbox, the Part of the Move section is defined as the "Entire move" for this list. For example, in ''Smash 4'', for certain bomb attacks the explosion is the only hitbox, so if the explosion is absorbable it is listed as "Entire move" for this list. If a move has multiple parts that are all able to be absorbed, it is noted as the entire move. | |||
{| class="wikitable" | {| class="wikitable" | ||
|- | |- | ||
! | !Fighter | ||
!Move | |||
!Part of move | |||
!Game(s) | |||
|- | |- | ||
|{{SSBU|Banjo & Kazooie}} || [[Rear Egg]] || Explosion || | |||
{{GameIcon|SSBU}} | |||
|- | |- | ||
| | |[[Bowser]] ([[Giga Bowser]]) || [[Fire Breath]] || Entire move || | ||
{{GameIcon|SSBU | {{GameIcon|SSBM}} | ||
{{GameIcon|SSBB}} | |||
{{GameIcon|SSB4}} | |||
{{GameIcon|SSBU}} | |||
|- | |- | ||
|{{SSBU|Byleth}} || [[Failnaught]]|| {{rollover|Entire move|Fully Charged|?}} || | |||
{{GameIcon|SSBU}} | |||
{{GameIcon|SSBU | |||
|- | |- | ||
| rowspan=2|[[Charizard]] || [[Flamethrower]] || Entire move || | | rowspan=2|[[Charizard]] || [[Flamethrower]] || Entire move || | ||
{{GameIcon|SSBB | {{GameIcon|SSBB}} | ||
{{GameIcon|SSB4 | {{GameIcon|SSB4}} | ||
{{GameIcon|SSBU | {{GameIcon|SSBU}} | ||
|- | |- | ||
| [[Flare Blitz]] || Explosion<ref> Must strike the stage or a different opponent first. An active hitbox will connect otherwise.</ref> || | | [[Flare Blitz]] || Explosion<ref> Must strike the stage or a different opponent first. An active hitbox will connect otherwise.</ref> || | ||
{{GameIcon|SSB4 | {{GameIcon|SSB4}} | ||
{{GameIcon|SSBU | {{GameIcon|SSBU}} | ||
|- | |- | ||
|[[Cloud]] || [[Blade Beam]] || Entire move || | |||
{{GameIcon|SSB4 | {{GameIcon|SSB4}} | ||
{{GameIcon|SSBU | {{GameIcon|SSBU}} | ||
|- | |- | ||
|[[Corrin]] || [[Dragon Fang Shot]] || Energy Shot || | |||
{{GameIcon|SSB4 | {{GameIcon|SSB4}} | ||
{{GameIcon|SSBU | {{GameIcon|SSBU}} | ||
|- | |- | ||
|{{SSBU|Daisy}} || {{b|Toad|move}} || Spores || | |||
{{GameIcon|SSBU | {{GameIcon|SSBU}} | ||
|- | |- | ||
|[[Dark Pit]] || [[Silver Bow]] || Entire move || | |||
{{GameIcon|SSB4 | {{GameIcon|SSB4}} | ||
{{GameIcon|SSBU | {{GameIcon|SSBU}} | ||
|- | |- | ||
| rowspan=2|{{SSBU|Dark Samus}} || {{b|Bomb|Samus}} || Explosion || | | rowspan=2|{{SSBU|Dark Samus}} || {{b|Bomb|Samus}} || Explosion || | ||
{{GameIcon|SSBU | {{GameIcon|SSBU}} | ||
|- | |- | ||
| [[Charge Shot]] || Entire move || | | [[Charge Shot]] || Entire move || | ||
{{GameIcon|SSBU | {{GameIcon|SSBU}} | ||
|- | |- | ||
|[[Diddy Kong]] || [[Rocketbarrel Boost]] || Explosion<ref> Either when the barrels are free-roaming and crash into the stage, or if Diddy rams directly into the stage. The barrels have active hitboxes before it explodes.</ref> || | |||
{{GameIcon|SSB4 | {{GameIcon|SSB4}} | ||
{{GameIcon|SSBU | {{GameIcon|SSBU}} | ||
|- | |- | ||
|{{SSBM|Dr. Mario}} || [[Megavitamin]] || Entire move || | |||
{{GameIcon|SSBM | {{GameIcon|SSBM}} | ||
|- | |- | ||
| rowspan=2|[[Duck Hunt]] || [[Trick Shot]] || Explosion || | | rowspan=2|[[Duck Hunt]] || [[Trick Shot]] || Explosion || | ||
{{GameIcon|SSB4 | {{GameIcon|SSB4}} | ||
{{GameIcon|SSBU | {{GameIcon|SSBU}} | ||
|- | |- | ||
| [[Clay Shooting]] || Explosion (from reticle shots) || | | [[Clay Shooting]] || Explosion (from reticle shots) || | ||
{{GameIcon|SSB4 | {{GameIcon|SSB4}} | ||
{{GameIcon|SSBU | {{GameIcon|SSBU}} | ||
|- | |- | ||
| [[Falco]] || {{b|Blaster|Falco}}|| {{rollover|Entire move|Used as Backward Throw, Up Throw, or Down Throw|?}} || | | [[Falco]] || {{b|Blaster|Falco}}|| {{rollover|Entire move|Used as Backward Throw, Up Throw, or Down Throw|?}} || | ||
{{GameIcon|SSBM | {{GameIcon|SSBM}} | ||
{{GameIcon|SSBB | {{GameIcon|SSBB}} | ||
{{GameIcon|SSB4 | {{GameIcon|SSB4}} | ||
{{GameIcon|SSBU | {{GameIcon|SSBU}} | ||
|- | |- | ||
| [[Fox]] || {{b|Blaster|Fox}}|| {{rollover|Entire move|Used as Backward Throw, Up Throw, or Down Throw|?}} || | | [[Fox]] || {{b|Blaster|Fox}}|| {{rollover|Entire move|Used as Backward Throw, Up Throw, or Down Throw|?}} || | ||
{{GameIcon|SSB | {{GameIcon|SSB}} | ||
{{GameIcon|SSBM | {{GameIcon|SSBM}} | ||
{{GameIcon|SSBB | {{GameIcon|SSBB}} | ||
{{GameIcon|SSB4 | {{GameIcon|SSB4}} | ||
{{GameIcon|SSBU | {{GameIcon|SSBU}} | ||
|- | |- | ||
|rowspan=2|{{SSBU|Hero}} || [[Frizz/Frizzle/Kafrizz]] || {{rollover|Entire move|All stages|?}} || | |rowspan=2|{{SSBU|Hero}} || [[Frizz/Frizzle/Kafrizz]] || {{rollover|Entire move|All stages|?}} || | ||
{{GameIcon|SSBU | {{GameIcon|SSBU}} | ||
|- | |- | ||
| [[Command Selection]] || Sizz, Sizzle, Bang, Kaboom, Snooze, Whack, Thwack, and Hocus Pocus (when using before mentioned moves) || | | [[Command Selection]] || Sizz, Sizzle, Bang, Kaboom, Snooze, Whack, Thwack, and Hocus Pocus (when using before mentioned moves) || | ||
{{GameIcon|SSBU | {{GameIcon|SSBU}} | ||
|- | |- | ||
| rowspan=2|[[Ice Climbers]] || [[Blizzard]] || Entire move || | | rowspan=2|[[Ice Climbers]] || [[Blizzard]] || Entire move || | ||
{{GameIcon|SSBM | {{GameIcon|SSBM}} | ||
{{GameIcon|SSBB | {{GameIcon|SSBB}} | ||
{{GameIcon|SSBU | {{GameIcon|SSBU}} | ||
|- | |- | ||
| [[Ice Shot]] || Ice block || | | [[Ice Shot]] || Ice block || | ||
{{GameIcon|SSBM | {{GameIcon|SSBM}} | ||
|- | |- | ||
| rowspan=2|{{SSBU|Inkling}} || [[Splattershot]] || Entire move || | | rowspan=2|{{SSBU|Inkling}} || [[Splattershot]] || Entire move || | ||
{{GameIcon|SSBU | {{GameIcon|SSBU}} | ||
|- | |- | ||
| [[Splat Bomb]] || Explosion || | | [[Splat Bomb]] || Explosion || | ||
{{GameIcon|SSBU | {{GameIcon|SSBU}} | ||
|- | |- | ||
|{{SSB4|Jigglypuff}} || [[Wakie Wakie]] || Entire move || | |||
{{GameIcon|SSB4 | {{GameIcon|SSB4}} | ||
|- | |- | ||
|{{SSBU|Joker}} || [[Eiha / Eigaon]] || Entire move || | |||
{{GameIcon|SSBU | {{GameIcon|SSBU}} | ||
|- | |- | ||
|{{SSBU|Ken}} || [[Hadoken]] || Entire move || | |||
{{GameIcon|SSBU | {{GameIcon|SSBU}} | ||
|- | |- | ||
| rowspan=2|[[King Dedede]] || [[Super Dedede Jump]] || Stars || | | rowspan=2|[[King Dedede]] || [[Super Dedede Jump]] || Stars || | ||
{{GameIcon|SSBB | {{GameIcon|SSBB}} | ||
{{GameIcon|SSB4 | {{GameIcon|SSB4}} | ||
{{GameIcon|SSBU | {{GameIcon|SSBU}} | ||
|- | |- | ||
| [[Waddle Dee Toss]] || Waddle Doo's beam attack || | | [[Waddle Dee Toss]] || Waddle Doo's beam attack || | ||
{{GameIcon|SSBB | {{GameIcon|SSBB}} | ||
|- | |- | ||
| rowspan=2|[[Kirby]] || [[Copy Ability]] || Some [[neutral special move]]s<ref>Kirby's version of Chef in ''Brawl'' can be absorbed while the original version cannot.</ref>|| | | rowspan=2|[[Kirby]] || [[Copy Ability]] || Some [[neutral special move]]s<ref>Kirby's version of Chef in ''Brawl'' can be absorbed while the original version cannot.</ref>|| | ||
{{GameIcon|SSB | {{GameIcon|SSB}} | ||
{{GameIcon|SSBM | {{GameIcon|SSBM}} | ||
{{GameIcon|SSBB | {{GameIcon|SSBB}} | ||
{{GameIcon|SSB4 | {{GameIcon|SSB4}} | ||
{{GameIcon|SSBU | {{GameIcon|SSBU}} | ||
|- | |- | ||
| [[Final Cutter]] || Wave || | | [[Final Cutter]] || Wave || | ||
{{GameIcon|SSB | {{GameIcon|SSB}} | ||
{{GameIcon|SSBM | {{GameIcon|SSBM}} | ||
{{GameIcon|SSBB | {{GameIcon|SSBB}} | ||
{{GameIcon|SSB4 | {{GameIcon|SSB4}} | ||
{{GameIcon|SSBU | {{GameIcon|SSBU}} | ||
|- | |- | ||
| rowspan=3|[[Link]] || {{b|Bomb|Link}} || Explosion || | | rowspan=3|[[Link]] || {{b|Bomb|Link}} || Explosion || | ||
{{GameIcon|SSB4 | {{GameIcon|SSB4}} | ||
|- | |- | ||
| [[Remote Bomb]] || Explosion || | | [[Remote Bomb]] || Explosion || | ||
{{GameIcon|SSBU | {{GameIcon|SSBU}} | ||
|- | |- | ||
| [[Forward smash]] || Sword Beam || | | [[Forward smash]] || Sword Beam || | ||
{{GameIcon|SSBU | {{GameIcon|SSBU}} | ||
|- | |- | ||
| rowspan=2|[[Lucario]] || [[Aura Sphere]] || Entire move || | | rowspan=2|[[Lucario]] || [[Aura Sphere]] || Entire move || | ||
{{GameIcon|SSBB | {{GameIcon|SSBB}} | ||
{{GameIcon|SSB4 | {{GameIcon|SSB4}} | ||
{{GameIcon|SSBU | {{GameIcon|SSBU}} | ||
|- | |- | ||
| [[Force Palm]] || Aura burst || | | [[Force Palm]] || Aura burst || | ||
{{GameIcon|SSBB | {{GameIcon|SSBB}} | ||
{{GameIcon|SSB4 | {{GameIcon|SSB4}} | ||
{{GameIcon|SSBU | {{GameIcon|SSBU}} | ||
|- | |- | ||
| rowspan=3|[[Lucas]] || [[PK Fire]] || Entire move || | | rowspan=3|[[Lucas]] || [[PK Fire]] || Entire move || | ||
{{GameIcon|SSBB | {{GameIcon|SSBB}} | ||
{{GameIcon|SSB4 | {{GameIcon|SSB4}} | ||
{{GameIcon|SSBU | {{GameIcon|SSBU}} | ||
|- | |- | ||
| [[PK Freeze]] || Entire move || | | [[PK Freeze]] || Entire move || | ||
{{GameIcon|SSBB | {{GameIcon|SSBB}} | ||
{{GameIcon|SSB4 | {{GameIcon|SSB4}} | ||
{{GameIcon|SSBU | {{GameIcon|SSBU}} | ||
|- | |- | ||
| [[PK Thunder]] || Projectile only || | | [[PK Thunder]] || Projectile only || | ||
{{GameIcon|SSBB | {{GameIcon|SSBB}} | ||
{{GameIcon|SSB4 | {{GameIcon|SSB4}} | ||
{{GameIcon|SSBU | {{GameIcon|SSBU}} | ||
|- | |- | ||
| [[Luigi]] || [[Fireball]] || Entire move || | |||
{{GameIcon|SSB | {{GameIcon|SSB}} | ||
{{GameIcon|SSBM | {{GameIcon|SSBM}} | ||
{{GameIcon|SSBB | {{GameIcon|SSBB}} | ||
{{GameIcon|SSB4 | {{GameIcon|SSB4}} | ||
{{GameIcon|SSBU | {{GameIcon|SSBU}} | ||
|- | |- | ||
|[[Mario]] || [[Fireball]] || Entire move || | |||
{{GameIcon|SSB | {{GameIcon|SSB}} | ||
{{GameIcon|SSBM | {{GameIcon|SSBM}} | ||
{{GameIcon|SSBB | {{GameIcon|SSBB}} | ||
{{GameIcon|SSB4 | {{GameIcon|SSB4}} | ||
{{GameIcon|SSBU | {{GameIcon|SSBU}} | ||
|- | |- | ||
| rowspan=7|[[Mega Man]] || [[Crash Bomber]] || Explosion || | | rowspan=7|[[Mega Man]] || [[Crash Bomber]] || Explosion || | ||
{{GameIcon|SSB4 | {{GameIcon|SSB4}} | ||
{{GameIcon|SSBU | {{GameIcon|SSBU}} | ||
|- | |- | ||
|[[Hyper Bomb]] || Explosion || | |[[Hyper Bomb]] || Explosion || | ||
{{GameIcon|SSB4 | {{GameIcon|SSB4}} | ||
|- | |- | ||
|[[Danger Wrap]] || Explosion || | |[[Danger Wrap]] || Explosion || | ||
{{GameIcon|SSB4 | {{GameIcon|SSB4}} | ||
|- | |- | ||
| [[Forward smash]] || Entire move || | | [[Forward smash]] || Entire move || | ||
{{GameIcon|SSB4 | {{GameIcon|SSB4}} | ||
{{GameIcon|SSBU | {{GameIcon|SSBU}} | ||
|- | |- | ||
| [[Forward tilt]] || Entire move || | | [[Forward tilt]] || Entire move || | ||
{{GameIcon|SSB4 | {{GameIcon|SSB4}} | ||
{{GameIcon|SSBU | {{GameIcon|SSBU}} | ||
|- | |- | ||
| [[Neutral attack]] || Shots || | | [[Neutral attack]] || Shots || | ||
{{GameIcon|SSB4 | {{GameIcon|SSB4}} | ||
{{GameIcon|SSBU | {{GameIcon|SSBU}} | ||
|- | |- | ||
| [[Neutral aerial]] || Shots || | | [[Neutral aerial]] || Shots || | ||
{{GameIcon|SSB4 | {{GameIcon|SSB4}} | ||
{{GameIcon|SSBU | {{GameIcon|SSBU}} | ||
|- | |- | ||
| rowspan=2|[[Mewtwo]] || [[Forward throw]] || Shots || | | rowspan=2|[[Mewtwo]] || [[Forward throw]] || Shots || | ||
{{GameIcon|SSBM | {{GameIcon|SSBM}} | ||
{{GameIcon|SSB4 | {{GameIcon|SSB4}} | ||
{{GameIcon|SSBU | {{GameIcon|SSBU}} | ||
|- | |- | ||
|[[Shadow Ball]] || Entire Move || | |[[Shadow Ball]] || Entire Move || | ||
{{GameIcon|SSBM | {{GameIcon|SSBM}} | ||
{{GameIcon|SSB4 | {{GameIcon|SSB4}} | ||
{{GameIcon|SSBU | {{GameIcon|SSBU}} | ||
|- | |- | ||
| rowspan=8|[[Mii Gunner]] || [[Forward aerial]] || Entire move || | | rowspan=8|[[Mii Gunner]] || [[Forward aerial]] || Entire move || | ||
{{GameIcon|SSB4 | {{GameIcon|SSB4}} | ||
{{GameIcon|SSBU | {{GameIcon|SSBU}} | ||
|- | |- | ||
|[[Charge Blast]] || Entire Move || | |[[Charge Blast]] || Entire Move || | ||
{{GameIcon|SSB4 | {{GameIcon|SSB4}} | ||
{{GameIcon|SSBU | {{GameIcon|SSBU}} | ||
|- | |- | ||
|- | |- | ||
|[[Laser Blaze]] || Entire Move || | |[[Laser Blaze]] || Entire Move || | ||
{{GameIcon|SSB4 | {{GameIcon|SSB4}} | ||
{{GameIcon|SSBU | {{GameIcon|SSBU}} | ||
|- | |- | ||
|[[Grenade Launch]] || Explosion || | |[[Grenade Launch]] || Explosion || | ||
{{GameIcon|SSB4 | {{GameIcon|SSB4}} | ||
{{GameIcon|SSBU | {{GameIcon|SSBU}} | ||
|- | |- | ||
|[[Flame Pillar]] || Entire Move || | |[[Flame Pillar]] || Entire Move || | ||
{{GameIcon|SSB4 | {{GameIcon|SSB4}} | ||
{{GameIcon|SSBU | {{GameIcon|SSBU}} | ||
|- | |- | ||
|[[Stealth Burst]] || Entire Move || | |[[Stealth Burst]] || Entire Move || | ||
{{GameIcon|SSB4 | {{GameIcon|SSB4}} | ||
{{GameIcon|SSBU | {{GameIcon|SSBU}} | ||
|- | |- | ||
|[[Lunar Launch]] || Entire Move || | |[[Lunar Launch]] || Entire Move || | ||
{{GameIcon|SSB4 | {{GameIcon|SSB4}} | ||
{{GameIcon|SSBU | {{GameIcon|SSBU}} | ||
|- | |- | ||
|[[Bomb Drop]] || Explosion || | |[[Bomb Drop]] || Explosion || | ||
{{GameIcon|SSB4 | {{GameIcon|SSB4}} | ||
{{GameIcon|SSBU | {{GameIcon|SSBU}} | ||
|- | |- | ||
| rowspan=2|[[Mr. Game & Watch]] || [[Chef]] || Sausages || | | rowspan=2|[[Mr. Game & Watch]] || [[Chef]] || Sausages || | ||
{{GameIcon|SSBM | {{GameIcon|SSBM}} | ||
|- | |- | ||
|[[Forward aerial]] || Bomb || | |[[Forward aerial]] || Bomb || | ||
{{GameIcon|SSBU | {{GameIcon|SSBU}} | ||
|- | |- | ||
|[[Mythra]] || [[Ray of Punishment / Chroma Dust]] || Projectile || | |||
{{GameIcon|SSBU | {{GameIcon|SSBU}} | ||
|- | |- | ||
| rowspan=3|[[Ness]] || [[PK Fire]] || Bolt only (SSB and Melee), entire move (Brawl onwards) || | | rowspan=3|[[Ness]] || [[PK Fire]] || Bolt only (SSB and Melee), entire move (Brawl onwards) || | ||
{{GameIcon|SSB | {{GameIcon|SSB}} | ||
{{GameIcon|SSBM | {{GameIcon|SSBM}} | ||
{{GameIcon|SSBB | {{GameIcon|SSBB}} | ||
{{GameIcon|SSB4 | {{GameIcon|SSB4}} | ||
{{GameIcon|SSBU | {{GameIcon|SSBU}} | ||
|- | |- | ||
| [[PK Flash]] || Entire move || | | [[PK Flash]] || Entire move || | ||
{{GameIcon|SSBM | {{GameIcon|SSBM}} | ||
{{GameIcon|SSBB | {{GameIcon|SSBB}} | ||
{{GameIcon|SSB4 | {{GameIcon|SSB4}} | ||
{{GameIcon|SSBU | {{GameIcon|SSBU}} | ||
|- | |- | ||
| [[PK Thunder]] || Projectile only || | | [[PK Thunder]] || Projectile only || | ||
{{GameIcon|SSB | {{GameIcon|SSB}} | ||
{{GameIcon|SSBM | {{GameIcon|SSBM}} | ||
{{GameIcon|SSBB | {{GameIcon|SSBB}} | ||
{{GameIcon|SSB4 | {{GameIcon|SSB4}} | ||
{{GameIcon|SSBU | {{GameIcon|SSBU}} | ||
|- | |- | ||
|{{SSB4|Pac-Man}} || [[Dire Hydrant]] || Explosion || | |||
{{GameIcon|SSB4 | {{GameIcon|SSB4}} | ||
|- | |- | ||
| rowspan=2|[[Palutena]] || [[Autoreticle]] || Shots || | | rowspan=2|[[Palutena]] || [[Autoreticle]] || Shots || | ||
{{GameIcon|SSB4 | {{GameIcon|SSB4}} | ||
{{GameIcon|SSBU | {{GameIcon|SSBU}} | ||
|- | |- | ||
| [[Explosive Flame]] || Entire move || | | [[Explosive Flame]] || Entire move || | ||
{{GameIcon|SSBU | {{GameIcon|SSBU}} | ||
|- | |- | ||
|[[Peach]] || {{b|Toad|move}} || Spores || | |||
{{GameIcon|SSBM | {{GameIcon|SSBM}} | ||
{{GameIcon|SSBB | {{GameIcon|SSBB}} | ||
{{GameIcon|SSB4 | {{GameIcon|SSB4}} | ||
{{GameIcon|SSBU | {{GameIcon|SSBU}} | ||
|- | |- | ||
| rowspan=2|[[Pichu]] || {{b|Thunder|Pokémon}} || Bolt || | | rowspan=2|[[Pichu]] || {{b|Thunder|Pokémon}} || Bolt || | ||
{{GameIcon|SSBM | {{GameIcon|SSBM}} | ||
{{GameIcon|SSBU | {{GameIcon|SSBU}} | ||
|- | |- | ||
| [[Thunder Jolt]] || Entire move || | | [[Thunder Jolt]] || Entire move || | ||
{{GameIcon|SSBM | {{GameIcon|SSBM}} | ||
{{GameIcon|SSBU | {{GameIcon|SSBU}} | ||
|- | |- | ||
| rowspan=2|[[Pikachu]] || {{b|Thunder|Pokémon}} || Bolt || | | rowspan=2|[[Pikachu]] || {{b|Thunder|Pokémon}} || Bolt || | ||
{{GameIcon|SSBM | {{GameIcon|SSBM}} | ||
{{GameIcon|SSBB | {{GameIcon|SSBB}} | ||
{{GameIcon|SSB4 | {{GameIcon|SSB4}} | ||
{{GameIcon|SSBU | {{GameIcon|SSBU}} | ||
|- | |- | ||
| [[Thunder Jolt]] || Entire move || | | [[Thunder Jolt]] || Entire move || | ||
{{GameIcon|SSB | {{GameIcon|SSB}} | ||
{{GameIcon|SSBM | {{GameIcon|SSBM}} | ||
{{GameIcon|SSBB | {{GameIcon|SSBB}} | ||
{{GameIcon|SSB4 | {{GameIcon|SSB4}} | ||
{{GameIcon|SSBU | {{GameIcon|SSBU}} | ||
|- | |- | ||
|[[Pit]] || [[Palutena's Bow]] || Entire move || | |||
{{GameIcon|SSBB | {{GameIcon|SSBB}} | ||
{{GameIcon|SSB4 | {{GameIcon|SSB4}} | ||
{{GameIcon|SSBU | {{GameIcon|SSBU}} | ||
|- | |- | ||
|[[R.O.B.]] || [[Robo Beam]] || Entire move || | |||
{{GameIcon|SSBB | {{GameIcon|SSBB}} | ||
{{GameIcon|SSB4 | {{GameIcon|SSB4}} | ||
{{GameIcon|SSBU | {{GameIcon|SSBU}} | ||
|- | |- | ||
|{{SSBU|Richter}} || [[Holy Water]] || Entire move || | |||
{{GameIcon|SSBU | {{GameIcon|SSBU}} | ||
|- | |- | ||
|{{SSBU|Ridley}} || [[Plasma Breath]] || Entire move || | |||
{{GameIcon|SSBU | {{GameIcon|SSBU}} | ||
|- | |- | ||
| rowspan=3|[[Robin]] || [[Arcfire]] || Entire move || | | rowspan=3|[[Robin]] || [[Arcfire]] || Entire move || | ||
{{GameIcon|SSB4 | {{GameIcon|SSB4}} | ||
{{GameIcon|SSBU | {{GameIcon|SSBU}} | ||
|- | |- | ||
| [[Elwind]] || Entire move || | | [[Elwind]] || Entire move || | ||
{{GameIcon|SSB4 | {{GameIcon|SSB4}} | ||
{{GameIcon|SSBU | {{GameIcon|SSBU}} | ||
|- | |- | ||
| {{b|Thunder|Robin}} || {{rollover|Entire move|All stages|?}}|| | | {{b|Thunder|Robin}} || {{rollover|Entire move|All stages|?}}|| | ||
{{GameIcon|SSB4 | {{GameIcon|SSB4}} | ||
{{GameIcon|SSBU | {{GameIcon|SSBU}} | ||
|- | |- | ||
| rowspan=2|{{SSB4|Rosalina}} || [[Floaty Star Bit]] || Entire move || | | rowspan=2|{{SSB4|Rosalina}} || [[Floaty Star Bit]] || Entire move || | ||
{{GameIcon|SSB4 | {{GameIcon|SSB4}} | ||
|- | |- | ||
| [[Shooting Star Bit]] || Entire Move || | | [[Shooting Star Bit]] || Entire Move || | ||
{{GameIcon|SSB4 | {{GameIcon|SSB4}} | ||
|- | |- | ||
|[[Ryu]] || [[Hadoken]] || Entire move || | |||
{{GameIcon|SSB4 | {{GameIcon|SSB4}} | ||
{{GameIcon|SSBU | {{GameIcon|SSBU}} | ||
|- | |- | ||
| rowspan=2|[[Samus]] || {{b|Bomb|Samus}} || Explosion || | | rowspan=2|[[Samus]] || {{b|Bomb|Samus}} || Explosion || | ||
{{GameIcon|SSB4 | {{GameIcon|SSB4}}{{GameIcon|SSBU}} | ||
|- | |- | ||
| [[Charge Shot]] || Entire Move || | | [[Charge Shot]] || Entire Move || | ||
{{GameIcon|SSB | {{GameIcon|SSB}} | ||
{{GameIcon|SSBM | {{GameIcon|SSBM}} | ||
{{GameIcon|SSBB | {{GameIcon|SSBB}} | ||
{{GameIcon|SSB4 | {{GameIcon|SSB4}} | ||
{{GameIcon|SSBU | {{GameIcon|SSBU}} | ||
|- | |- | ||
| rowspan=2|[[Sephiroth]] || [[Flare / Megaflare / Gigaflare]] || | | rowspan=2|[[Sephiroth]] || [[Flare / Megaflare / Gigaflare]] || {{rollover|Projectile|The explosions cannot be absorbed|?}} || | ||
{{GameIcon|SSBU | {{GameIcon|SSBU}} | ||
|- | |- | ||
|[[Shadow Flare]] || Balls exploding || | |[[Shadow Flare]] || Balls exploding || | ||
{{GameIcon|SSBU | {{GameIcon|SSBU}} | ||
|- | |- | ||
| rowspan=2|[[Sheik]] || [[Burst Grenade]] || Explosion || | | rowspan=2|[[Sheik]] || [[Burst Grenade]] || Explosion || | ||
{{GameIcon|SSB4 | {{GameIcon|SSB4}} | ||
{{GameIcon|SSBU | {{GameIcon|SSBU}} | ||
|- | |- | ||
|[[Vanish]] || Entire move || | |[[Vanish]] || Entire move || | ||
{{GameIcon|SSB4 | {{GameIcon|SSB4}} | ||
{{GameIcon|SSBU | {{GameIcon|SSBU}} | ||
|- | |- | ||
|{{SSBU|Simon}} || [[Holy Water]] || Entire move || | |||
{{GameIcon|SSBU | {{GameIcon|SSBU}} | ||
|- | |- | ||
| rowspan=5|{{SSBU|Snake}} || [[Hand Grenade]] || Explosion || | | rowspan=5|{{SSBU|Snake}} || [[Hand Grenade]] || Explosion || | ||
{{GameIcon|SSBU | {{GameIcon|SSBU}} | ||
|- | |- | ||
|[[Remote Missile]] || Missile || | |[[Remote Missile]] || Missile || | ||
{{GameIcon|SSBU | {{GameIcon|SSBU}} | ||
|- | |- | ||
| [[C4]] || Explosion || | | [[C4]] || Explosion || | ||
{{GameIcon|SSBU | {{GameIcon|SSBU}} | ||
|- | |- | ||
|[[Forward smash]] || Entire move || | |[[Forward smash]] || Entire move || | ||
{{GameIcon|SSBU | {{GameIcon|SSBU}} | ||
|- | |- | ||
|[[Up smash]] || Shell || | |[[Up smash]] || Shell || | ||
{{GameIcon|SSBU | {{GameIcon|SSBU}} | ||
|- | |- | ||
| rowspan= | |{{SSBU|Sora}} || [[Magic]] || {{rollover|Projectile|All spells|?}}|| | ||
{{GameIcon|SSBU | {{GameIcon|SSBU}} | ||
|- | |||
| rowspan=3|[[Steve]] || [[Down tilt]] || Fire || | |||
{{GameIcon|SSBU}} | |||
|- | |- | ||
| [[TNT]] || Explosion || | | [[TNT]] || Explosion || | ||
{{GameIcon|SSBU | {{GameIcon|SSBU}} | ||
|- | |- | ||
| [[Down smash]] || Entire move || | |||
{{GameIcon|SSBU | {{GameIcon|SSBU}} | ||
|- | |- | ||
|[[Terry]] || [[Power Wave]] || Entire move || | |||
{{GameIcon|SSBU}} | |||
{{GameIcon|SSBU | |||
|- | |- | ||
| | |[[Toon Link]] || {{b|Bomb|Link}} || Explosion || | ||
{{GameIcon|SSB4 | {{GameIcon|SSB4}} | ||
{{GameIcon|SSBU | {{GameIcon|SSBU}} | ||
|- | |||
|[[Villager]] || [[Lloid Rocket]] || Explosion || | |||
{{GameIcon|SSB4}} | |||
{{GameIcon|SSBU}} | |||
|- | |- | ||
| rowspan=2|[[Wii Fit Trainer]] || [[Sun Salutation]] || While charging; entire move || | | rowspan=2|[[Wii Fit Trainer]] || [[Sun Salutation]] || While charging; entire move || | ||
{{GameIcon|SSB4 | {{GameIcon|SSB4}} | ||
{{GameIcon|SSBU | {{GameIcon|SSBU}} | ||
|- | |- | ||
| [[Volatile Breathing]] || Entire move || | | [[Volatile Breathing]] || Entire move || | ||
{{GameIcon|SSB4 | {{GameIcon|SSB4}} | ||
|- | |- | ||
|[[Wolf]] || {{b|Blaster|Wolf}} || Shot || | |||
{{GameIcon|SSBB | {{GameIcon|SSBB}} | ||
{{GameIcon|SSBU | {{GameIcon|SSBU}} | ||
|- | |- | ||
|[[Yoshi]] || [[Yoshi Bomb]] || Stars || | |||
{{GameIcon|SSB | {{GameIcon|SSB}} | ||
{{GameIcon|SSBM | {{GameIcon|SSBM}} | ||
{{GameIcon|SSBB | {{GameIcon|SSBB}} | ||
{{GameIcon|SSB4 | {{GameIcon|SSB4}} | ||
{{GameIcon|SSBU | {{GameIcon|SSBU}} | ||
|- | |- | ||
|{{SSBU|Young Link}} || {{b|Bomb|Link}} || Explosion || | |||
{{GameIcon|SSBU | {{GameIcon|SSBU}} | ||
|- | |- | ||
|[[Zelda]] || [[Din's Fire]] || Entire move || | |||
{{GameIcon|SSBM | {{GameIcon|SSBM}} | ||
{{GameIcon|SSBB | {{GameIcon|SSBB}} | ||
{{GameIcon|SSB4 | {{GameIcon|SSB4}} | ||
{{GameIcon|SSBU | {{GameIcon|SSBU}} | ||
|- | |- | ||
| rowspan=2|[[Zero Suit Samus]] || [[Down smash]] || Entire move || | | rowspan=2|[[Zero Suit Samus]] || [[Down smash]] || Entire move || | ||
{{GameIcon|SSBB | {{GameIcon|SSBB}} | ||
{{GameIcon|SSB4 | {{GameIcon|SSB4}} | ||
{{GameIcon|SSBU | {{GameIcon|SSBU}} | ||
|- | |- | ||
| [[Paralyzer]] || Entire move || | | [[Paralyzer]] || Entire move || | ||
{{GameIcon|SSBB | {{GameIcon|SSBB}} | ||
{{GameIcon|SSB4 | {{GameIcon|SSB4}} | ||
{{GameIcon|SSBU| | {{GameIcon|SSBU}} | ||
|} | |||
{{reflist}} | |||
===By items=== | |||
{| class="wikitable" | |||
|- | |- | ||
! | !Item | ||
!Part | |||
!Game(s) | |||
|- | |- | ||
|[[Blast Box]] || Explosion || | |||
{{GameIcon|SSB4 | {{GameIcon|SSB4}} | ||
{{GameIcon|SSBU | {{GameIcon|SSBU}} | ||
|- | |- | ||
|[[Bob-omb]] || Explosion || | |||
{{GameIcon|SSB4 | {{GameIcon|SSB4}} | ||
{{GameIcon|SSBU | {{GameIcon|SSBU}} | ||
|- | |- | ||
|[[Bombchu]] || Explosion || | |||
{{GameIcon|SSB4 | {{GameIcon|SSB4}} | ||
{{GameIcon|SSBU | {{GameIcon|SSBU}} | ||
|- | |- | ||
|[[Fire Flower]] || Flames || | |||
{{GameIcon|SSB | {{GameIcon|SSB}} | ||
{{GameIcon|SSBM | {{GameIcon|SSBM}} | ||
{{GameIcon|SSBB | {{GameIcon|SSBB}} | ||
{{GameIcon|SSB4 | {{GameIcon|SSB4}} | ||
{{GameIcon|SSBU | {{GameIcon|SSBU}} | ||
|- | |- | ||
|[[Gooey Bomb]] || Explosion || | |||
{{GameIcon|SSB4 | {{GameIcon|SSB4}} | ||
{{GameIcon|SSBU | {{GameIcon|SSBU}} | ||
|- | |- | ||
|[[Lip's Stick]] || Spores || | |||
{{GameIcon|SSBM | {{GameIcon|SSBM}} | ||
{{GameIcon|SSBB | {{GameIcon|SSBB}} | ||
{{GameIcon|SSB4 | {{GameIcon|SSB4}} | ||
{{GameIcon|SSBU | {{GameIcon|SSBU}} | ||
|- | |- | ||
|[[Motion-Sensor Bomb]] || Explosion || | |||
{{GameIcon|SSB4 | {{GameIcon|SSB4}} | ||
{{GameIcon|SSBU | {{GameIcon|SSBU}} | ||
|- | |- | ||
|[[Rage Blaster]] || Shots || | |||
{{GameIcon|SSBU | {{GameIcon|SSBU}} | ||
|- | |- | ||
|[[Ray Gun]] || Shots || | |||
{{GameIcon|SSB | {{GameIcon|SSB}} | ||
{{GameIcon|SSBM | {{GameIcon|SSBM}} | ||
{{GameIcon|SSBB | {{GameIcon|SSBB}} | ||
{{GameIcon|SSB4 | {{GameIcon|SSB4}} | ||
{{GameIcon|SSBU | {{GameIcon|SSBU}} | ||
|- | |- | ||
|[[Staff]] || Shots || | |||
{{GameIcon|SSBU | {{GameIcon|SSBU}} | ||
|- | |- | ||
|[[Star Rod]] || Stars || | |||
{{GameIcon|SSB | {{GameIcon|SSB}} | ||
{{GameIcon|SSBM | {{GameIcon|SSBM}} | ||
{{GameIcon|SSBB | {{GameIcon|SSBB}} | ||
{{GameIcon|SSB4 | {{GameIcon|SSB4}} | ||
{{GameIcon|SSBU | {{GameIcon|SSBU}} | ||
|- | |- | ||
|[[Steel Diver]] || Shots || | |||
{{GameIcon|SSB4 | {{GameIcon|SSB4}} | ||
{{GameIcon|SSBU | {{GameIcon|SSBU}} | ||
|- | |- | ||
|[[Super Scope]] || Shots || | |||
{{GameIcon|SSBM | {{GameIcon|SSBM}} | ||
{{GameIcon|SSBB | {{GameIcon|SSBB}} | ||
{{GameIcon|SSB4 | {{GameIcon|SSB4}} | ||
{{GameIcon|SSBU | {{GameIcon|SSBU}} | ||
|- | |- | ||
|[[Superspicy Curry]] || Flames || | |||
{{GameIcon|SSBB | {{GameIcon|SSBB}} | ||
{{GameIcon|SSB4 | {{GameIcon|SSB4}} | ||
{{GameIcon|SSBU| | {{GameIcon|SSBU}} | ||
|} | |||
===By Assist Trophies=== | |||
{| class="wikitable" | |||
|- | |- | ||
! | !Assist Trophy | ||
!Move | |||
!Game(s) | |||
|- | |- | ||
|[[Guile]] || Sonic Boom || | |||
{{GameIcon|SSBU | {{GameIcon|SSBU}} | ||
|- | |- | ||
|[[Krystal]] || Ice Blast || | |||
{{GameIcon|SSBU | {{GameIcon|SSBU}} | ||
|- | |- | ||
|[[Mother Brain]] || Rinkas || | |||
{{GameIcon|SSB4 | {{GameIcon|SSB4}} | ||
{{GameIcon|SSBU | {{GameIcon|SSBU}} | ||
|- | |- | ||
|[[Phosphora]] || All attacks || | |||
{{GameIcon|SSB4 | {{GameIcon|SSB4}} | ||
{{GameIcon|SSBU | {{GameIcon|SSBU}} | ||
|- | |- | ||
|[[Starman]] || PK Beam || | |||
{{GameIcon|SSB4 | {{GameIcon|SSB4}} | ||
{{GameIcon|SSBU | {{GameIcon|SSBU}} | ||
|- | |- | ||
|{{b|Zero|Mega Man}} || Genmu Zero || | |||
{{GameIcon|SSBU| | {{GameIcon|SSBU}} | ||
|} | |||
===By Pokémon=== | |||
{| class="wikitable" | |||
|- | |- | ||
! | !Pokémon | ||
!Move | |||
!Part of move | |||
!Game(s) | |||
|- | |- | ||
| [[Charizard]] || Flamethrower || Flames || | | [[Charizard]] || Flamethrower || Flames || | ||
{{GameIcon|SSB | {{GameIcon|SSB}} | ||
{{GameIcon|SSBM | {{GameIcon|SSBM}} | ||
|- | |- | ||
| [[Cyndaquil]] || Flamethrower || Flames || | | [[Cyndaquil]] || Flamethrower || Flames || | ||
{{GameIcon|SSBM | {{GameIcon|SSBM}} | ||
|- | |- | ||
| [[Electrode]] || | | [[Electrode]] || Explosion || Explosion || | ||
{{GameIcon|SSB4 | {{GameIcon|SSB4}} | ||
{{GameIcon|SSBU | {{GameIcon|SSBU}} | ||
|- | |- | ||
| [[Fennekin]] || | | [[Fennekin]] || Incinerate || Non-grounded fireball || | ||
{{GameIcon|SSB4 | {{GameIcon|SSB4}} | ||
{{GameIcon|SSBU | {{GameIcon|SSBU}} | ||
|- | |- | ||
| [[Genesect]] || Techno Blast || Beam || | | [[Genesect]] || Techno Blast || Beam || | ||
{{GameIcon|SSB4 | {{GameIcon|SSB4}} | ||
|- | |- | ||
| [[Meowth]] || Pay Day || Coins || | | [[Meowth]] || Pay Day || Coins || | ||
{{GameIcon|SSB | {{GameIcon|SSB}} | ||
|- | |- | ||
| [[Starmie]] || Swift || Stars || | | [[Starmie]] || Swift || Stars || | ||
{{GameIcon|SSB | {{GameIcon|SSB}} | ||
|- | |- | ||
| [[Staryu]] || Swift || Stars || | | [[Staryu]] || Swift || Stars || | ||
{{GameIcon|SSBM | {{GameIcon|SSBM}} | ||
{{GameIcon|SSBB | {{GameIcon|SSBB}} | ||
{{GameIcon|SSB4 | {{GameIcon|SSB4}} | ||
{{GameIcon|SSBU | {{GameIcon|SSBU}} | ||
|- | |- | ||
| [[Vulpix]] || | | [[Vulpix]] || Ember || Fireball || | ||
{{GameIcon|SSBU| | {{GameIcon|SSBU}} | ||
|} | |||
===By stage hazards=== | |||
{| class="wikitable" | |||
|- | |- | ||
! | !Stage | ||
!Stage Hazard | |||
!Game(s) | |||
|- | |- | ||
|rowspan | | rowspan=2|[[Corneria]] || Shots fired from Arwings and [[Wolfen]]s|| | ||
{{GameIcon|SSBM | {{GameIcon|SSBM}} | ||
{{GameIcon|SSBB | {{GameIcon|SSBB}} | ||
{{GameIcon|SSB4-3 | {{GameIcon|SSB4-3}} | ||
|- | |- | ||
| Shots fired from Great Fox|| | | Shots fired from Great Fox|| | ||
{{GameIcon|SSBM | {{GameIcon|SSBM}} | ||
{{GameIcon|SSBB | {{GameIcon|SSBB}} | ||
{{GameIcon|SSB4-3 | {{GameIcon|SSB4-3}} | ||
{{GameIcon|SSBU | {{GameIcon|SSBU}} | ||
|- | |- | ||
|[[Pyrosphere]] || FG-II Graham Unit shots || | |||
{{GameIcon|SSB4-U | {{GameIcon|SSB4-U}} | ||
|- | |- | ||
| rowspan=3|[[Saffron City]] || [[Electrode]] | | rowspan=3|[[Saffron City]] || [[Electrode]]'s Self-Destruct || | ||
{{GameIcon|SSBU | {{GameIcon|SSBU}} | ||
|- | |- | ||
| [[Charmander]] | | [[Charmander]]'s Flamethrower || | ||
{{GameIcon|SSB | {{GameIcon|SSB}} | ||
|- | |- | ||
| [[Venusaur]] | | [[Venusaur]]'s Razor Leaf || | ||
{{GameIcon|SSB | {{GameIcon|SSB}} | ||
|- | |- | ||
|[[Sector Z]] || Shots fired from [[Arwing]]s || | |||
{{GameIcon|SSB | {{GameIcon|SSB}} | ||
|- | |- | ||
|[[Venom]] || Shots fired from Arwings and Wolfens || | |||
{{GameIcon|SSBM | {{GameIcon|SSBM}} | ||
|- | |- | ||
|[[Wily Castle]] || [[Yellow Devil]]'s shots || | |||
{{GameIcon|SSB4-U | {{GameIcon|SSB4-U}} | ||
{{GameIcon|SSBU| | {{GameIcon|SSBU}} | ||
|} | |||
===By enemies and bosses=== | |||
{| class="wikitable" | |||
|- | |- | ||
! | !Enemy/Boss | ||
!Move | |||
!Game(s) | |||
|- | |- | ||
|[[Armank]]|| Energy Shot || | |||
{{GameIcon|SSBB | {{GameIcon|SSBB}} | ||
|- | |- | ||
|[[Chandelure]] || Fire Spin, Will-o-Wisp || | |||
{{GameIcon|SSB4-3 | {{GameIcon|SSB4-3}} | ||
|- | |- | ||
|[[Dracula]] || Hellfire, Magic Orbs (Red) || | |||
{{GameIcon|SSBU | {{GameIcon|SSBU}} | ||
|- | |- | ||
|[[Duon]] || Scattershot || | |||
{{GameIcon|SSBB | {{GameIcon|SSBB}} | ||
|- | |- | ||
|[[Galeem]] || Fireballs from Tri-Eye Attack || | |||
{{GameIcon|SSBU | {{GameIcon|SSBU}} | ||
|- | |- | ||
|[[Gamyga]] || Lasers || | |||
{{GameIcon|SSBB | {{GameIcon|SSBB}} | ||
|- | |- | ||
|[[Magikoopa]] || Spells || | |||
{{GameIcon|SSB4-3 | {{GameIcon|SSB4-3}} | ||
|- | |- | ||
|[[Marx]] || Ice Ball || | |||
{{GameIcon|SSBU | {{GameIcon|SSBU}} | ||
|- | |- | ||
|[[Master Edges]] || Sword projectiles || | |||
{{GameIcon|SSB4 | {{GameIcon|SSB4}} | ||
|- | |- | ||
|[[Master Hand]] || Finger bullets || | |||
{{GameIcon|SSB | {{GameIcon|SSB}} | ||
{{GameIcon|SSBM | {{GameIcon|SSBM}} | ||
{{GameIcon|SSBB | {{GameIcon|SSBB}} | ||
|- | |- | ||
|[[Monoeye]] || Energy Shot || | |||
{{GameIcon|SSB4-3 | {{GameIcon|SSB4-3}} | ||
|- | |- | ||
|[[Puppit]] || Lasers || | |||
{{GameIcon|SSBB | {{GameIcon|SSBB}} | ||
|- | |- | ||
|[[R.O.B. Blaster]] || Beams || | |||
{{GameIcon|SSBB | {{GameIcon|SSBB}} | ||
|- | |- | ||
|[[Scope Primid]] || Shots || | |||
{{GameIcon|SSBB | {{GameIcon|SSBB}} | ||
|- | |- | ||
| rowspan | | rowspan=2|[[Spaak]] || Electric ball || | ||
{{GameIcon|SSBB | {{GameIcon|SSBB}} | ||
|- | |- | ||
| Lightning bolt || | | Lightning bolt || | ||
{{GameIcon|SSBB | {{GameIcon|SSBB}} | ||
|- | |- | ||
|[[Starman (EarthBound)|Starman]] || PK Beam || | |||
{{GameIcon|SSB4 | {{GameIcon|SSB4}} | ||
{{GameIcon|SSBU | {{GameIcon|SSBU}} | ||
|} | |} | ||
==Gallery== | |||
<gallery> | |||
Filling OilPanic Melee.gif|Mr. Game & Watch absorbing a [[Charge Shot]] in ''Melee''. | |||
Lucas Down B SSBU.gif|[[PSI Magnet]] in ''Ultimate''. | |||
Mii Gunner Down B 3 SSBU.gif|[[Absorbing Vortex]] in ''Ultimate''. | |||
</gallery> | |||
==Trivia== | ==Trivia== | ||
*Every ''Super Smash Bros.'' game prior to ''Ultimate'' introduces one character with an absorption move: Ness in ''Super Smash Bros.'', Mr. Game & Watch in ''Melee'', Lucas in ''Brawl'', and Mii Gunner in ''Smash 4''. | *Every ''Super Smash Bros.'' game prior to ''Ultimate'' introduces one character with an absorption move: Ness in ''Super Smash Bros.'', Mr. Game & Watch in ''Melee'', Lucas in ''Brawl'', and Mii Gunner in ''Smash 4''. | ||
*If the [[Shadow]] [[Assist Trophy]] freezes a character performing an attack with an absorbing hitbox, said hitbox will remain active until being unfrozen and trigger if hit. This often creates an unintended side effect of the attack being able to absorb much more attacks than typical and for far longer. | |||
*[[Hero]] has the most absorbable attacks out of any playable fighter in the entire {{uv|Super Smash Bros.}} series, with a total of 10. | |||
==See also== | ==See also== | ||
Latest revision as of 19:15, December 9, 2024


- "Energy-based attack" redirects here. For the attack type, see Energy.
- For the technique referred to as "absorbing damage" by the Twinkle Toes bonus in Super Smash Bros. Melee, see tech.
Absorption is a property of certain moves that allows them to capture a certain kind of projectile (or just a general hitbox in rare cases), usually described as "energy-based". It then provides a benefit to the character absorbing it based on the damage output of the absorbed attack. The absorption property has currently only applied to down special moves, though it can theoretically apply to any attack. What constitutes an absorbable attack other than being labeled as energy-based is not consistent throughout the Smash series, and has no relation with move types or effects. Super Smash Bros. 4 allowed some, but not all explosive attacks to be absorbable when they were not in previous games.
Only four characters in the Super Smash Bros. series have moves that can absorb attacks, namely Ness, Lucas, Mii Gunner, and Mr. Game & Watch. Ness and Lucas' absorbing special move is PSI Magnet, Mr. Game & Watch's is Oil Panic, and the Mii Gunner's is Absorbing Vortex. PSI Magnet and Absorbing Vortex heal the user based on the absorbed attack's power, while Oil Panic stores the strength of up to three projectiles for unleashing a single attack later. Absorption is not to be confused with Villager and Isabelle's neutral special, Pocket, or any other form of collecting items.
In The Subspace Emissary in Super Smash Bros. Brawl, Floows are also capable of absorbing attacks, though they do not appear to do anything with the absorbed energy. In Smash Run in Super Smash Bros. for Nintendo 3DS, Chandelure appears to be capable of absorbing flame and darkness attacks to power up its own attacks, but absorbs all attacks with these effects, including non-projectile attacks.
In Super Smash Bros. 4 from version 1.1.3 onward, and Super Smash Bros. Ultimate, absorbed attacks from allies in team battles with team attack turned on have their damage reduced by half. For example, Ness' PSI Magnet, which increases the damage of absorbed projectiles by 1.6× in both games, decreases it instead by 0.8× for teammates' projectiles. This hinders the effectiveness of moves with absorption properties in doubles, as they were initially quite potent in earlier games/versions when combined with strong projectiles (such as Samus' fully charged Charge Shot, which could bring Oil Panic's attack close to one-hit KO potential).
List of moves with absorption propertiesEdit
| User | Move | Absorption multiplier | Max absorbable damage |
|---|---|---|---|
| Lucas | PSI Magnet | 2.5 |
30 |
| 2 | |||
| Mii Gunner | Absorbing Vortex | 1.2 |
30 |
| 1.4 | |||
| Mr. Game & Watch | Oil Panic | 1.5 (+5) |
500 |
| 2.8 |
60 | ||
| 2 |
48 | ||
| Efficient Panic | 2 | 24 | |
| Panic Overload | 2.5 | 45 | |
| Ness | PSI Magnet | 2 |
— |
| 1.6 |
30 | ||
| Forward PSI Magnet | 1.2 |
List of absorbable attacksEdit
By fightersEdit
For playable characters, if an attack has only one hitbox, the Part of the Move section is defined as the "Entire move" for this list. For example, in Smash 4, for certain bomb attacks the explosion is the only hitbox, so if the explosion is absorbable it is listed as "Entire move" for this list. If a move has multiple parts that are all able to be absorbed, it is noted as the entire move.
- ^ Must strike the stage or a different opponent first. An active hitbox will connect otherwise.
- ^ Either when the barrels are free-roaming and crash into the stage, or if Diddy rams directly into the stage. The barrels have active hitboxes before it explodes.
- ^ Kirby's version of Chef in Brawl can be absorbed while the original version cannot.
By itemsEdit
| Item | Part | Game(s) |
|---|---|---|
| Blast Box | Explosion |
|
| Bob-omb | Explosion |
|
| Bombchu | Explosion |
|
| Fire Flower | Flames |
|
| Gooey Bomb | Explosion |
|
| Lip's Stick | Spores |
|
| Motion-Sensor Bomb | Explosion |
|
| Rage Blaster | Shots |
|
| Ray Gun | Shots |
|
| Staff | Shots |
|
| Star Rod | Stars |
|
| Steel Diver | Shots |
|
| Super Scope | Shots |
|
| Superspicy Curry | Flames |
|
By Assist TrophiesEdit
| Assist Trophy | Move | Game(s) |
|---|---|---|
| Guile | Sonic Boom |
|
| Krystal | Ice Blast |
|
| Mother Brain | Rinkas |
|
| Phosphora | All attacks |
|
| Starman | PK Beam |
|
| Zero | Genmu Zero |
|
By PokémonEdit
| Pokémon | Move | Part of move | Game(s) |
|---|---|---|---|
| Charizard | Flamethrower | Flames |
|
| Cyndaquil | Flamethrower | Flames |
|
| Electrode | Explosion | Explosion |
|
| Fennekin | Incinerate | Non-grounded fireball |
|
| Genesect | Techno Blast | Beam |
|
| Meowth | Pay Day | Coins |
|
| Starmie | Swift | Stars |
|
| Staryu | Swift | Stars |
|
| Vulpix | Ember | Fireball |
|
By stage hazardsEdit
| Stage | Stage Hazard | Game(s) |
|---|---|---|
| Corneria | Shots fired from Arwings and Wolfens |
|
| Shots fired from Great Fox |
| |
| Pyrosphere | FG-II Graham Unit shots |
|
| Saffron City | Electrode's Self-Destruct |
|
| Charmander's Flamethrower |
| |
| Venusaur's Razor Leaf |
| |
| Sector Z | Shots fired from Arwings |
|
| Venom | Shots fired from Arwings and Wolfens |
|
| Wily Castle | Yellow Devil's shots |
|
By enemies and bossesEdit
| Enemy/Boss | Move | Game(s) |
|---|---|---|
| Armank | Energy Shot |
|
| Chandelure | Fire Spin, Will-o-Wisp |
|
| Dracula | Hellfire, Magic Orbs (Red) |
|
| Duon | Scattershot |
|
| Galeem | Fireballs from Tri-Eye Attack |
|
| Gamyga | Lasers |
|
| Magikoopa | Spells |
|
| Marx | Ice Ball |
|
| Master Edges | Sword projectiles |
|
| Master Hand | Finger bullets |
|
| Monoeye | Energy Shot |
|
| Puppit | Lasers |
|
| R.O.B. Blaster | Beams |
|
| Scope Primid | Shots |
|
| Spaak | Electric ball |
|
| Lightning bolt |
| |
| Starman | PK Beam |
|
GalleryEdit
Mr. Game & Watch absorbing a Charge Shot in Melee.
PSI Magnet in Ultimate.
Absorbing Vortex in Ultimate.


TriviaEdit
- Every Super Smash Bros. game prior to Ultimate introduces one character with an absorption move: Ness in Super Smash Bros., Mr. Game & Watch in Melee, Lucas in Brawl, and Mii Gunner in Smash 4.
- If the Shadow Assist Trophy freezes a character performing an attack with an absorbing hitbox, said hitbox will remain active until being unfrozen and trigger if hit. This often creates an unintended side effect of the attack being able to absorb much more attacks than typical and for far longer.
- Hero has the most absorbable attacks out of any playable fighter in the entire Super Smash Bros. series, with a total of 10.