Super Smash Bros. Melee

Bowser (SSBM)/Up smash: Difference between revisions

From SmashWiki, the Super Smash Bros. wiki
Jump to navigationJump to search
(Added description.)
Tag: Mobile edit
No edit summary
 
(2 intermediate revisions by 2 users not shown)
Line 4: Line 4:
==Overview==
==Overview==
Bowser thrusts his shell upward from a jump and hits the opponent with his spikes. A powerful attack with a rather long-lasting [[hitbox]]. Bowser has a smaller hitbox inside his shell that does 17% damage, but it rarely connects due to the overlapping of the bigger hitbox. Bowser's himself is [[intangible]] the moment he jumps off the ground.
==Hitboxes==
==Hitboxes==
{{MeleeHitboxTableHeader}}
Line 73: Line 74:
}}
}}
|}
|}
==Timing==
==Timing==
{|class="wikitable"
{|class="wikitable"
Line 101: Line 103:


{{FrameIconLegend|lag=y|charge=y|hitbox=y|interruptible=y|vulnerable=y|intangible=y}}
==Trivia==
*Bowser's up smash is called "Shell Shock."
{{MvSubNavBowser|g=SSBM}}
[[Category:Bowser (SSBM)]]
[[Category:Bowser (SSBM)]]
[[Category:Up smashes (SSBM)]]
[[Category:Up smashes (SSBM)]]

Latest revision as of 23:56, March 8, 2022

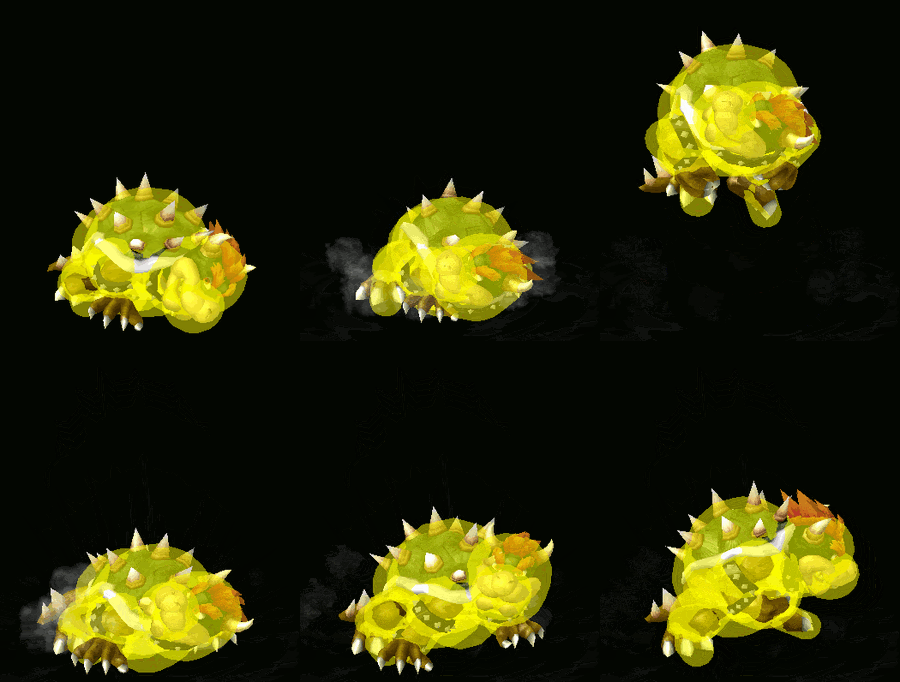
Hitbox visualization showing Bowser's up smash.

Overview[edit]

Bowser thrusts his shell upward from a jump and hits the opponent with his spikes. A powerful attack with a rather long-lasting hitbox. Bowser has a smaller hitbox inside his shell that does 17% damage, but it rarely connects due to the overlapping of the bigger hitbox. Bowser's himself is intangible the moment he jumps off the ground.

Hitboxes[edit]

ID Part Damage SD Angle BK KS FKV Radius Bone Offset Clang Rebound Effect G A Sound
Attack
0 0 20% 0 AngleIcon90.png 40 86 0 8.2026 1 0.0 12.4992 0.0 HitboxTableIcon(Clang).png HitboxTableIcon(Rebound).png Slash (effect) HitboxTableIcon(GroundedTrue).png HitboxTableIcon(AerialTrue).png L Burn
1 0 17% 0 AngleIcon90.png 40 86 0 7.0308 1 0.0 14.4522 0.0 HitboxTableIcon(Clang).png HitboxTableIcon(Rebound).png Slash (effect) HitboxTableIcon(GroundedTrue).png HitboxTableIcon(AerialTrue).png L Burn
Landing
0 0 12% 0 AngleIcon74.png 60 100 0 4.6872 1 0.0 12.4992 -3.906 HitboxTableIcon(Clang).png HitboxTableIcon(Rebound).png Normal (effect) HitboxTableIcon(GroundedTrue).png HitboxTableIcon(AerialFalse).png L Kick
1 0 12% 0 AngleIcon74.png 60 100 0 4.6872 1 0.0 12.4992 3.906 HitboxTableIcon(Clang).png HitboxTableIcon(Rebound).png Normal (effect) HitboxTableIcon(GroundedTrue).png HitboxTableIcon(AerialFalse).png L Kick

Timing[edit]

Charges between 10-11
Intangibility 16-17
Clean hit 16-21
Landing hit 30
Interruptible 53
Animation length 59
FrameIcon(Lag).png FrameIcon(Lag).png FrameIcon(Lag).png FrameIcon(Lag).png FrameIcon(Lag).png FrameIcon(Lag).png FrameIcon(Lag).png FrameIcon(Lag).png FrameIcon(Lag).png FrameIcon(LagChargeS).png FrameIcon(LagChargeE).png FrameIcon(Lag).png FrameIcon(Lag).png FrameIcon(Lag).png FrameIcon(Lag).png FrameIcon(Hitbox).png FrameIcon(Hitbox).png FrameIcon(Hitbox).png FrameIcon(Hitbox).png FrameIcon(Hitbox).png FrameIcon(Hitbox).png FrameIcon(Lag).png FrameIcon(Lag).png FrameIcon(Lag).png FrameIcon(Lag).png FrameIcon(Lag).png FrameIcon(Lag).png FrameIcon(Lag).png FrameIcon(Lag).png FrameIcon(Hitbox).png FrameIcon(Lag).png FrameIcon(Lag).png FrameIcon(Lag).png FrameIcon(Lag).png FrameIcon(Lag).png FrameIcon(Lag).png FrameIcon(Lag).png FrameIcon(Lag).png FrameIcon(Lag).png FrameIcon(Lag).png FrameIcon(Lag).png FrameIcon(Lag).png FrameIcon(Lag).png FrameIcon(Lag).png FrameIcon(Lag).png FrameIcon(Lag).png FrameIcon(Lag).png FrameIcon(Lag).png FrameIcon(Lag).png FrameIcon(Lag).png FrameIcon(Lag).png FrameIcon(Lag).png FrameIcon(Interruptible).png FrameIcon(Interruptible).png FrameIcon(Interruptible).png FrameIcon(Interruptible).png FrameIcon(Interruptible).png FrameIcon(Interruptible).png FrameIcon(Interruptible).png
FrameIcon(Vulnerable).png FrameIcon(Vulnerable).png FrameIcon(Vulnerable).png FrameIcon(Vulnerable).png FrameIcon(Vulnerable).png FrameIcon(Vulnerable).png FrameIcon(Vulnerable).png FrameIcon(Vulnerable).png FrameIcon(Vulnerable).png FrameIcon(Vulnerable).png FrameIcon(Vulnerable).png FrameIcon(Vulnerable).png FrameIcon(Vulnerable).png FrameIcon(Vulnerable).png FrameIcon(Vulnerable).png FrameIcon(Intangible).png FrameIcon(Intangible).png FrameIcon(Vulnerable).png FrameIcon(Vulnerable).png FrameIcon(Vulnerable).png FrameIcon(Vulnerable).png FrameIcon(Vulnerable).png FrameIcon(Vulnerable).png FrameIcon(Vulnerable).png FrameIcon(Vulnerable).png FrameIcon(Vulnerable).png FrameIcon(Vulnerable).png FrameIcon(Vulnerable).png FrameIcon(Vulnerable).png FrameIcon(Vulnerable).png FrameIcon(Vulnerable).png FrameIcon(Vulnerable).png FrameIcon(Vulnerable).png FrameIcon(Vulnerable).png FrameIcon(Vulnerable).png FrameIcon(Vulnerable).png FrameIcon(Vulnerable).png FrameIcon(Vulnerable).png FrameIcon(Vulnerable).png FrameIcon(Vulnerable).png FrameIcon(Vulnerable).png FrameIcon(Vulnerable).png FrameIcon(Vulnerable).png FrameIcon(Vulnerable).png FrameIcon(Vulnerable).png FrameIcon(Vulnerable).png FrameIcon(Vulnerable).png FrameIcon(Vulnerable).png FrameIcon(Vulnerable).png FrameIcon(Vulnerable).png FrameIcon(Vulnerable).png FrameIcon(Vulnerable).png FrameIcon(Vulnerable).png FrameIcon(Vulnerable).png FrameIcon(Vulnerable).png FrameIcon(Vulnerable).png FrameIcon(Vulnerable).png FrameIcon(Vulnerable).png FrameIcon(Vulnerable).png
Legend (1 square = 1 frame)
Lag
Lag time
ChargeCharge
Charge interval
Hitbox
Hitbox
FrameIcon(Vulnerable).png
Vulnerable
Intangibility
Intangible
Interruptibility
Interruptible

Trivia[edit]

  • Bowser's up smash is called "Shell Shock."