Super Smash Bros. Melee

Roy (SSBM)/Down aerial: Difference between revisions

From SmashWiki, the Super Smash Bros. wiki
Jump to navigationJump to search
(New Page: {{ArticleIcons|ssbm=y}} thumb|500px|Hitbox visualization showing Roy's down aerial. {{competitive expertise}} ==Overview== ==Hitboxes== {{MeleeHitboxTableHeader...)
 
 
(6 intermediate revisions by 3 users not shown)
Line 3: Line 3:
{{competitive expertise}}
==Overview==
==Overview==
Roy swings his sword in a downward slash. The move has the ability to send at a wide variety of angles, all having niche application.
The hitboxes located on Roy's body, which have lower priority than his sword hitboxes, will [[meteor smash]] the opponent. The meteor is most consistent when hit from below, akin to Young Link's down air. On the flipside, the commonly hit [[sourspot]] is located near the tip of Roy's sword and pops the opponent straight upwards. Lastly, the hilt of Roy's sword, which has more priority than the meteor but less priority than the tipper, knocks the opponent at the [[Sakurai angle]]. It is often regarded as the least desirable of the three angles to hit, although it can potentially kill at a somewhat reasonable percent under the right circumstances, due to the inherent "[[DI]] mixup" nature of the move.
Despite having relatively high landing lag, Roy's down air is an indispensable piece of his [[combo]] game, whether using the meteor to pillar opponents in tandem with down tilt or using the tipper for [[juggling]] intermittently with up airs; The overall modest knockback can work to its benefit in these situations.
However, one would be harshly mistaken in attempting to use this move's meteor as a serious means of offstage edgeguarding as its meteor hitboxes aren't really powerful to begin with, coupled with [[meteor cancel]], 53 frames of endlag, and Roy's high gravity.
==Hitboxes==
==Hitboxes==
{{MeleeHitboxTableHeader}}

Latest revision as of 13:50, February 11, 2023

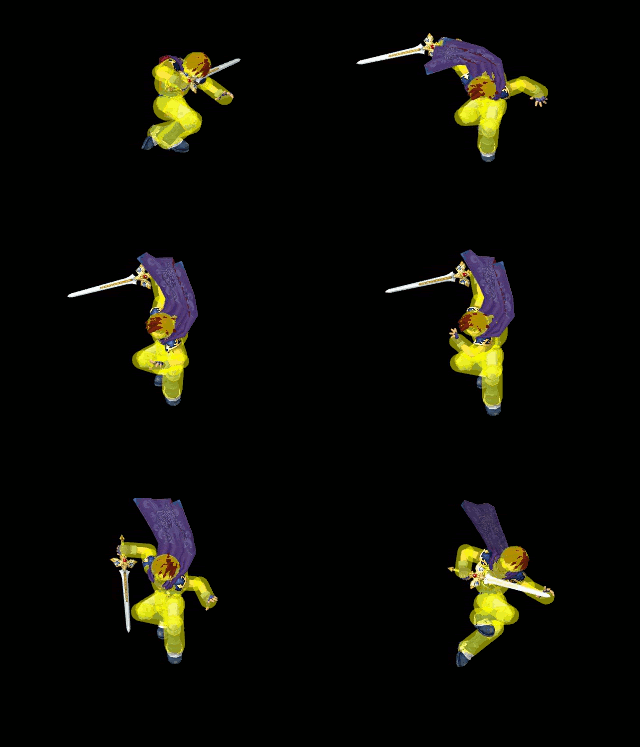
Hitbox visualization showing Roy's down aerial.
Competitive.png This article or section may require competitive expertise.
You can discuss this issue on the talk page or edit this page to improve it.

Overview[edit]

Roy swings his sword in a downward slash. The move has the ability to send at a wide variety of angles, all having niche application.

The hitboxes located on Roy's body, which have lower priority than his sword hitboxes, will meteor smash the opponent. The meteor is most consistent when hit from below, akin to Young Link's down air. On the flipside, the commonly hit sourspot is located near the tip of Roy's sword and pops the opponent straight upwards. Lastly, the hilt of Roy's sword, which has more priority than the meteor but less priority than the tipper, knocks the opponent at the Sakurai angle. It is often regarded as the least desirable of the three angles to hit, although it can potentially kill at a somewhat reasonable percent under the right circumstances, due to the inherent "DI mixup" nature of the move.

Despite having relatively high landing lag, Roy's down air is an indispensable piece of his combo game, whether using the meteor to pillar opponents in tandem with down tilt or using the tipper for juggling intermittently with up airs; The overall modest knockback can work to its benefit in these situations.

However, one would be harshly mistaken in attempting to use this move's meteor as a serious means of offstage edgeguarding as its meteor hitboxes aren't really powerful to begin with, coupled with meteor cancel, 53 frames of endlag, and Roy's high gravity.

Hitboxes[edit]

ID Part Damage SD Angle BK KS FKV Radius Bone Offset Clang Rebound Effect G A Sound
1 0 9% 0 Sakurai angle 40 70 0 4.2966 78 0.0 0.0 0.0 HitboxTableIcon(Clang).png HitboxTableIcon(Rebound).png Slash (effect) HitboxTableIcon(GroundedTrue).png HitboxTableIcon(AerialTrue).png L Slash
2 0 9% 0 AngleIcon270.png 40 70 0 3.1248 73 0.0 0.0 0.0 HitboxTableIcon(Clang).png HitboxTableIcon(Rebound).png Slash (effect) HitboxTableIcon(GroundedTrue).png HitboxTableIcon(AerialTrue).png L Slash
3 0 9% 0 AngleIcon270.png 40 70 0 2.3436 27 0.0 0.0 0.0 HitboxTableIcon(Clang).png HitboxTableIcon(Rebound).png Slash (effect) HitboxTableIcon(GroundedTrue).png HitboxTableIcon(AerialTrue).png L Slash
0 0 6% 0 AngleIcon90.png 40 70 0 3.5154 78 5.4684 0.0 0.0 HitboxTableIcon(Clang).png HitboxTableIcon(Rebound).png Normal (effect) HitboxTableIcon(GroundedTrue).png HitboxTableIcon(AerialTrue).png L Punch

Timing[edit]

Initial autocancel 1-6
Hitbox 7-10
Ending autocancel 55-
Interruptible 64
Animation length 68
FrameIcon(Lag).png FrameIcon(Lag).png FrameIcon(Lag).png FrameIcon(Lag).png FrameIcon(Lag).png FrameIcon(Lag).png FrameIcon(Hitbox).png FrameIcon(Hitbox).png FrameIcon(Hitbox).png FrameIcon(Hitbox).png FrameIcon(Lag).png FrameIcon(Lag).png FrameIcon(Lag).png FrameIcon(Lag).png FrameIcon(Lag).png FrameIcon(Lag).png FrameIcon(Lag).png FrameIcon(Lag).png FrameIcon(Lag).png FrameIcon(Lag).png FrameIcon(Lag).png FrameIcon(Lag).png FrameIcon(Lag).png FrameIcon(Lag).png FrameIcon(Lag).png FrameIcon(Lag).png FrameIcon(Lag).png FrameIcon(Lag).png FrameIcon(Lag).png FrameIcon(Lag).png FrameIcon(Lag).png FrameIcon(Lag).png FrameIcon(Lag).png FrameIcon(Lag).png FrameIcon(Lag).png FrameIcon(Lag).png FrameIcon(Lag).png FrameIcon(Lag).png FrameIcon(Lag).png FrameIcon(Lag).png FrameIcon(Lag).png FrameIcon(Lag).png FrameIcon(Lag).png FrameIcon(Lag).png FrameIcon(Lag).png FrameIcon(Lag).png FrameIcon(Lag).png FrameIcon(Lag).png FrameIcon(Lag).png FrameIcon(Lag).png FrameIcon(Lag).png FrameIcon(Lag).png FrameIcon(Lag).png FrameIcon(Lag).png FrameIcon(Lag).png FrameIcon(Lag).png FrameIcon(Lag).png FrameIcon(Lag).png FrameIcon(Lag).png FrameIcon(Lag).png FrameIcon(Lag).png FrameIcon(Lag).png FrameIcon(Lag).png FrameIcon(Interruptible).png FrameIcon(Interruptible).png FrameIcon(Interruptible).png FrameIcon(Interruptible).png FrameIcon(Interruptible).png
FrameIcon(Autocancel).png FrameIcon(Autocancel).png FrameIcon(Autocancel).png FrameIcon(Autocancel).png FrameIcon(Autocancel).png FrameIcon(Autocancel).png FrameIcon(Blank).png FrameIcon(Blank).png FrameIcon(Blank).png FrameIcon(Blank).png FrameIcon(Blank).png FrameIcon(Blank).png FrameIcon(Blank).png FrameIcon(Blank).png FrameIcon(Blank).png FrameIcon(Blank).png FrameIcon(Blank).png FrameIcon(Blank).png FrameIcon(Blank).png FrameIcon(Blank).png FrameIcon(Blank).png FrameIcon(Blank).png FrameIcon(Blank).png FrameIcon(Blank).png FrameIcon(Blank).png FrameIcon(Blank).png FrameIcon(Blank).png FrameIcon(Blank).png FrameIcon(Blank).png FrameIcon(Blank).png FrameIcon(Blank).png FrameIcon(Blank).png FrameIcon(Blank).png FrameIcon(Blank).png FrameIcon(Blank).png FrameIcon(Blank).png FrameIcon(Blank).png FrameIcon(Blank).png FrameIcon(Blank).png FrameIcon(Blank).png FrameIcon(Blank).png FrameIcon(Blank).png FrameIcon(Blank).png FrameIcon(Blank).png FrameIcon(Blank).png FrameIcon(Blank).png FrameIcon(Blank).png FrameIcon(Blank).png FrameIcon(Blank).png FrameIcon(Blank).png FrameIcon(Blank).png FrameIcon(Blank).png FrameIcon(Blank).png FrameIcon(Blank).png FrameIcon(Autocancel).png FrameIcon(Autocancel).png FrameIcon(Autocancel).png FrameIcon(Autocancel).png FrameIcon(Autocancel).png FrameIcon(Autocancel).png FrameIcon(Autocancel).png FrameIcon(Autocancel).png FrameIcon(Autocancel).png FrameIcon(Autocancel).png FrameIcon(Autocancel).png FrameIcon(Autocancel).png FrameIcon(Autocancel).png FrameIcon(Autocancel).png

Landing lag[edit]

Animation length 32
L-cancelled animation length 16
Normal  FrameIcon(Lag).png FrameIcon(Lag).png FrameIcon(Lag).png FrameIcon(Lag).png FrameIcon(Lag).png FrameIcon(Lag).png FrameIcon(Lag).png FrameIcon(Lag).png FrameIcon(Lag).png FrameIcon(Lag).png FrameIcon(Lag).png FrameIcon(Lag).png FrameIcon(Lag).png FrameIcon(Lag).png FrameIcon(Lag).png FrameIcon(Lag).png FrameIcon(Lag).png FrameIcon(Lag).png FrameIcon(Lag).png FrameIcon(Lag).png FrameIcon(Lag).png FrameIcon(Lag).png FrameIcon(Lag).png FrameIcon(Lag).png FrameIcon(Lag).png FrameIcon(Lag).png FrameIcon(Lag).png FrameIcon(Lag).png FrameIcon(Lag).png FrameIcon(Lag).png FrameIcon(Lag).png FrameIcon(Lag).png
L-cancelled  FrameIcon(Lag).png FrameIcon(Lag).png FrameIcon(Lag).png FrameIcon(Lag).png FrameIcon(Lag).png FrameIcon(Lag).png FrameIcon(Lag).png FrameIcon(Lag).png FrameIcon(Lag).png FrameIcon(Lag).png FrameIcon(Lag).png FrameIcon(Lag).png FrameIcon(Lag).png FrameIcon(Lag).png FrameIcon(Lag).png FrameIcon(Lag).png FrameIcon(Blank).png FrameIcon(Blank).png FrameIcon(Blank).png FrameIcon(Blank).png FrameIcon(Blank).png FrameIcon(Blank).png FrameIcon(Blank).png FrameIcon(Blank).png FrameIcon(Blank).png FrameIcon(Blank).png FrameIcon(Blank).png FrameIcon(Blank).png FrameIcon(Blank).png FrameIcon(Blank).png FrameIcon(Blank).png FrameIcon(Blank).png
Legend (1 square = 1 frame)
Lag
Lag time
Hitbox
Hitbox
Auto-canceling
Autocancel
Interruptibility
Interruptible