Ganondorf (SSBU)/Down smash: Difference between revisions
From SmashWiki, the Super Smash Bros. wiki
Jump to navigationJump to search
mNo edit summary |
(→Timing) |
||
| (7 intermediate revisions by 3 users not shown) | |||
| Line 1: | Line 1: | ||
{{ArticleIcons|ssbu=y}} | {{ArticleIcons|ssbu=y}} | ||
[[File:GanondorfDSmashSSBU.gif|thumb| | [[File:GanondorfDSmashSSBU.gif|thumb|400px|Hitbox visualization showing Ganondorf's down smash.]] | ||
{{competitive expertise}} | {{competitive expertise}} | ||
==Overview== | ==Overview== | ||
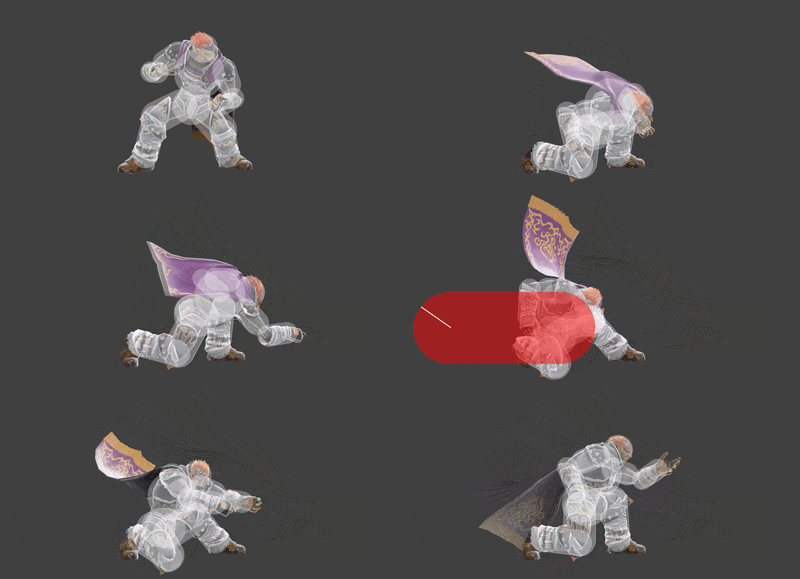
Ganondorf strikes with the handle of his sword in front of him, then strikes behind him with the blade | Ganondorf strikes with the handle of his sword in front of him, then strikes behind him with the blade. | ||
==Update History== | ==Update History== | ||
'''{{GameIcon|ssbu}} {{SSBU|3.1.0}}''' | '''{{GameIcon|ssbu}} {{SSBU|3.1.0}}''' | ||
| Line 9: | Line 9: | ||
==Hitboxes== | ==Hitboxes== | ||
{{UltimateHitboxTableHeader}} | {{UltimateHitboxTableHeader}} | ||
{{HitboxTableTitle|Hit 1| | {{HitboxTableTitle|Hit 1|50}} | ||
{{UltimateHitboxTableRow | {{UltimateHitboxTableRow | ||
|id=0 | |id=0 | ||
|damage=5.0 | |damage={{ChargedSmashDmgSSBU|5.0}} | ||
|angle=160 | |angle=160 | ||
|af=3 | |||
|bk=0 | |bk=0 | ||
|ks=90 | |ks=90 | ||
| Line 29: | Line 30: | ||
|slvl=M | |slvl=M | ||
|g=f | |g=f | ||
|setweight=t | |||
}} | }} | ||
{{UltimateHitboxTableRow | {{UltimateHitboxTableRow | ||
|id=1 | |id=1 | ||
|damage=5.0 | |damage={{ChargedSmashDmgSSBU|5.0}} | ||
|angle=175 | |angle=175 | ||
|af=3 | |||
|bk=0 | |bk=0 | ||
|ks=92 | |ks=92 | ||
| Line 49: | Line 52: | ||
|slvl=M | |slvl=M | ||
|g=f | |g=f | ||
|setweight=t | |||
}} | }} | ||
{{UltimateHitboxTableRow | {{UltimateHitboxTableRow | ||
|id=2 | |id=2 | ||
|damage=5.0 | |damage={{ChargedSmashDmgSSBU|5.0}} | ||
|angle=147 | |angle=147 | ||
|af=3 | |||
|bk=0 | |bk=0 | ||
|ks=90 | |ks=90 | ||
| Line 69: | Line 74: | ||
|slvl=M | |slvl=M | ||
|a=f | |a=f | ||
|setweight=t | |||
}} | }} | ||
{{UltimateHitboxTableRow | {{UltimateHitboxTableRow | ||
|id=3 | |id=3 | ||
|damage=5.0 | |damage={{ChargedSmashDmgSSBU|5.0}} | ||
|angle=150 | |angle=150 | ||
|af=3 | |||
|bk=0 | |bk=0 | ||
|ks=92 | |ks=92 | ||
| Line 89: | Line 96: | ||
|slvl=M | |slvl=M | ||
|a=f | |a=f | ||
|setweight=t | |||
}} | }} | ||
{{HitboxTableTitle|Hit 2| | {{HitboxTableTitle|Hit 2|50}} | ||
{{UltimateHitboxTableRow | {{UltimateHitboxTableRow | ||
|id=0 | |id=0 | ||
|damage=15.0 | |damage={{ChargedSmashDmgSSBU|15.0}} | ||
|angle=35 | |angle=35 | ||
|af=4 | |||
|bk=61 | |bk=61 | ||
|ks=81 | |ks=81 | ||
| Line 110: | Line 119: | ||
}} | }} | ||
|} | |} | ||
==Timing== | ==Timing== | ||
The move disables [[jostling]] during frames 19-38. | |||
{|class="wikitable" | {|class="wikitable" | ||
!Charges between | !Charges between | ||
Latest revision as of 13:34, July 6, 2022
Overview[edit]
Ganondorf strikes with the handle of his sword in front of him, then strikes behind him with the blade.
Update History[edit]
 Down smash's first hit has less base knockback (90/110/90/110 → 90/95/90/95) and one of its hitboxes' angles has been adjusted (160°/165°/147°/150° → 160°/175°/147°/150°). These changes make it connect more reliably into the second hit.
Hitboxes[edit]
Timing[edit]
The move disables jostling during frames 19-38.
| Charges between | 4-5 |
|---|---|
| Hit 1 | 15-18 |
| Hit 2 | 35-38 |
| Interruptible | 60 |
| Animation length | 83 |
Lag time |
Charge interval |
Hitbox |
Interruptible |
|

