Temple of Light: Difference between revisions
DevinWash97 (talk | contribs) No edit summary |
(→Trivia) |
||
| (36 intermediate revisions by 17 users not shown) | |||
| Line 1: | Line 1: | ||
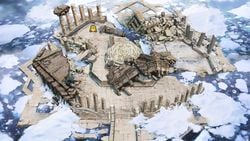
{{ | [[File:Temple-of-Light-Floor-1.jpeg|left|250px|thumb|Part 1 of the Temple of Light Map]] | ||
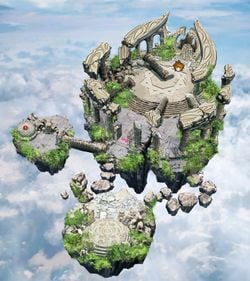
[[File:Temple-of-Light-Floor-2.jpeg|250px|thumb|Part 2 of the Temple of Light Map]] | |||
'''Temple of Light''' ({{ja|光の神殿|Hikari no Shinden}}, ''Temple of Light'') is a sub-world found in [[The Light Realm]] within [[Adventure Mode: World of Light|Adventure Mode]] in ''[[Super Smash Bros. Ultimate]]''. It is located on the northwest corner of the map and can be entered once each of the three of the colored buttons is pressed (green in the Kongo Jungle area, pink in the Heart Pool Mountain, and blue in the Cliffside Rapids). Clearing this area will remove the light breach, allowing access to the east half of the Light Realm, which includes the [[Forest Hill]] and thus [[Rathalos]]. The area is based on the depiction of {{s|icaruspedia|Skyworld}} in ''{{s|icaruspedia|Kid Icarus: Uprising}}'', though it shares the name of the {{s|zeldawiki|Temple of Light}} from ''{{s|zeldawiki|The Legend of Zelda: Ocarina of Time}}''. The area's background music is ''{{SSBUMusicLink|Kid Icarus|Destroyed Skyworld}}''. | |||
{{clr}} | |||
==Spirits== | ==Spirits== | ||
Spirits are ordered by when they are encountered in the sub-world. | The spirits found here are generally associated with the mythology of their own series or are otherwise found in sky-themed areas. Spirits are ordered by when they are encountered in the sub-world. | ||
{|class="wikitable sortable" style="width:100%;" | {|class="wikitable sortable" style="width:100%;" | ||
! colspan=4|Spirit | |||
! colspan= | |||
! colspan=7|Battle parameters | ! colspan=7|Battle parameters | ||
|- | |- | ||
| Line 13: | Line 14: | ||
! style="width:5%;"|Image | ! style="width:5%;"|Image | ||
! Name | ! Name | ||
! Series | |||
! Enemy Fighter(s) | ! Enemy Fighter(s) | ||
! style="width:5%;"|Type | ! style="width:5%;"|Type | ||
| Line 22: | Line 24: | ||
|- | |- | ||
|216 | |216 | ||
|{{SpiritTableName|Nayru|size=64}} | |||
|{{ | |''The Legend of Zelda'' Series | ||
|•{{SSBU|Zelda}} {{Head|Zelda|g=SSBU|s=20px|cl=Blue}} | |•{{SSBU|Zelda}} {{Head|Zelda|g=SSBU|s=20px|cl=Blue}}×2 | ||
|{{ | |{{SpiritType|Shield}} | ||
|3,500 | |3,500 | ||
|[[Bridge of Eldin]] | |[[Bridge of Eldin]] | ||
|•Temporary Invincibility | |•Temporary Invincibility | ||
|•The enemy will occasionally be invincible after a little while<br>•The enemy favors neutral specials | |•The enemy will occasionally be invincible after a little while<br>•The enemy favors neutral specials | ||
| | |{{SSBUMusicLink|The Legend of Zelda|Ballad of the Goddess (Original)}} | ||
|- | |- | ||
|1,269 | |1,269 | ||
|{{ | |{{SpiritTableName|Culdra|size=64}} | ||
| | |''Culdcept'' Series | ||
|•{{SSBU|Palutena}} {{Head|Palutena|g=SSBU|s=20px|cl=Pink}} | |•{{SSBU|Palutena}} {{Head|Palutena|g=SSBU|s=20px|cl=Pink}} | ||
|{{ | |{{SpiritType|Neutral}} | ||
|9,200 | |9,200 | ||
|[[Temple]] | |[[Temple]] | ||
|•Magic and PSI Unleashed | |•Magic and PSI Unleashed | ||
|•All fighters' magic and PSI attacks have increased power | |•All fighters' magic and PSI attacks have increased power | ||
| | |{{SSBUMusicLink|Other|Culdcept}} | ||
|- | |- | ||
|668 | |668 | ||
|{{SpiritTableName|Lon'qu|iw=fireemblem|size=64}} | |||
|{{ | |''Fire Emblem'' Series | ||
|•{{SSBU|Chrom}} {{Head|Chrom|g=SSBU|s=20px|cl=Black}} | |•{{SSBU|Chrom}} {{Head|Chrom|g=SSBU|s=20px|cl=Black}} | ||
|{{ | |{{SpiritType|Attack}} | ||
|3,700 | |3,700 | ||
|[[Arena Ferox]] | |[[Arena Ferox]] | ||
|•Item: Swords | |•Item: Swords | ||
|•The enemy's slash and stab attacks have increased power<br>•The enemy starts the battle with a [[Killing Edge]] | |•The enemy's slash and stab attacks have increased power<br>•The enemy starts the battle with a [[Killing Edge]] | ||
| | |{{SSBUMusicLink|Fire Emblem|Conquest (Ablaze)}} | ||
|- | |- | ||
|1,021 | |1,021 | ||
| | |{{SpiritTableName|Affinity|size=64}} | ||
| | |''Bayonetta'' Series | ||
|•{{SSBU|Pit}} Team {{Head|Pit|g=SSBU|s=20px|cl=Red}} ( | |•{{SSBU|Pit}} Team {{Head|Pit|g=SSBU|s=20px|cl=Red}}×4 (120 HP) | ||
|{{ | |{{SpiritType|Neutral}} | ||
|2,000 | |2,000 | ||
|[[Umbra Clock Tower]] ([[Battlefield form]]) | |[[Umbra Clock Tower]] ([[Battlefield form]]) | ||
|N/A | |N/A | ||
|•[[Stamina battle]]<br>•The enemy has increased move speed | |•[[Stamina battle]]<br>•The enemy has increased move speed | ||
| | |{{SSBUMusicLink|Bayonetta|One Of A Kind}} | ||
|- | |- | ||
|901 | |901 | ||
|{{ | |{{SpiritTableName|Wind Man|size=64}} | ||
| | |''Mega Man'' Series | ||
|•{{SSBU|Mega Man}} {{Head|Mega Man|g=SSBU|s=20px|cl=Orange}} | |•{{SSBU|Mega Man}} {{Head|Mega Man|g=SSBU|s=20px|cl=Orange}} (120 HP) | ||
|{{ | |{{SpiritType|Shield}} | ||
|2,200 | |2,200 | ||
|[[Skyworld]] | |[[Skyworld]] | ||
|•Hazard: Heavy Wind | |•Hazard: Heavy Wind | ||
|•Dangerously high winds are in effect after a little while<br>•[[Stamina battle]]<br>•The enemy loves to jump | |•Dangerously high winds are in effect after a little while<br>•[[Stamina battle]]<br>•The enemy loves to jump | ||
| | |{{SSBUMusicLink|Mega Man|Air Man Stage}} | ||
|- | |- | ||
|525 | |525 | ||
|{{SpiritTableName|Cobalion, Terrakion, & Virizion|size=64}} | |||
|{{ | |''Pokémon'' Series | ||
|•{{SSBU|Lucario}} {{Head|Lucario|g=SSBU|s=20px|cl=Green}}<br>•{{SSBU|Duck Hunt}} {{Head|Duck Hunt|g=SSBU|s=20px|cl=Yellow}}<br>•{{SSBU|Yoshi}} {{Head|Yoshi|g=SSBU|s=20px|cl=Blue}} | |•{{SSBU|Lucario}} {{Head|Lucario|g=SSBU|s=20px|cl=Green}}<br>•{{SSBU|Duck Hunt}} {{Head|Duck Hunt|g=SSBU|s=20px|cl=Yellow}}<br>•{{SSBU|Yoshi}} {{Head|Yoshi|g=SSBU|s=20px|cl=Blue}} | ||
|{{ | |{{SpiritType|Neutral}} | ||
|9,000 | |9,000 | ||
|[[Kalos Pokémon League]] | |[[Kalos Pokémon League]] | ||
|N/A | |N/A | ||
|•The enemy's melee weapons have increased power<br>•The enemy can unleash powerful critical hits at random<br>•The enemy starts the battle with a [[Beam Sword]] | |•The enemy's melee weapons have increased power<br>•The enemy can unleash powerful critical hits at random<br>•The enemy starts the battle with a [[Beam Sword]] | ||
| | |{{SSBUMusicLink|Pokémon|N's Castle}} | ||
|- | |- | ||
|1,234 | |1,234 | ||
|{{ | |{{SpiritTableName|Heracles|size=64}} | ||
|Heracles | |''Glory of Heracles'' Series | ||
|•{{SSBU|Simon}} {{Head|Simon|g=SSBU|s=20px|cl=Orange}} | |•{{SSBU|Simon}} {{Head|Simon|g=SSBU|s=20px|cl=Orange}} | ||
|{{ | |{{SpiritType|Attack}} | ||
|3,600 | |3,600 | ||
|[[Temple]] | |[[Temple]] | ||
|•Item: [[Food]] | |•Item: [[Food]] | ||
|•The enemy starts the battle with an [[Ore Club]] | |•The enemy starts the battle with an [[Ore Club]] | ||
| | |{{SSBUMusicLink|Other|Revolt -Striving for Hope-}} | ||
|- | |- | ||
|180 | |180 | ||
|{{SpiritTableName|Moblin|size=64}} | |||
|{{ | |''The Legend of Zelda'' Series | ||
|•{{SSBU|King Dedede}} Team {{Head|King Dedede|g=SSBU|s=20px|cl=Grey}} | |•{{SSBU|King Dedede}} Team {{Head|King Dedede|g=SSBU|s=20px|cl=Grey}}×4 | ||
|{{ | |{{SpiritType|Neutral}} | ||
|1,900 | |1,900 | ||
|[[Skyloft]] ([[Battlefield form]]) | |[[Skyloft]] ([[Battlefield form]]) | ||
|•Move Speed ↓ | |•Move Speed ↓ | ||
|•The enemy favors down specials<br>•The enemy has reduced move speed | |•The enemy favors down specials<br>•The enemy has reduced move speed | ||
| | |{{SSBUMusicLink|The Legend of Zelda|Overworld Theme - The Legend of Zelda}} | ||
|- | |- | ||
|670 | |670 | ||
|{{SpiritTableName|Tharja|iw=fireemblem|size=64}} | |||
|{{ | |''Fire Emblem'' Series | ||
|•{{SSBU|Lucina}} {{Head|Lucina|g=SSBU|s=20px|cl=Navy}} | |•{{SSBU|Lucina}} {{Head|Lucina|g=SSBU|s=20px|cl=Navy}} | ||
|{{ | |{{SpiritType|Grab}} | ||
|4,100 | |4,100 | ||
|[[Kalos Pokémon League]] ([[Battlefield form]]) | |[[Kalos Pokémon League]] ([[Battlefield form]]) | ||
|•Hazard: Poison Cloud | |•Hazard: Poison Cloud | ||
|•The stage is covered in a poisonous cloud<br>•The enemy's special moves have increased power | |•The stage is covered in a poisonous cloud<br>•The enemy's special moves have increased power | ||
| | |{{SSBUMusicLink|Fire Emblem|Conquest (Ablaze)}} | ||
|- | |- | ||
|728 | |728 | ||
|{{ | |{{SpiritTableName|Mimicutie|link=y|size=64}} | ||
| | |''Kid Icarus'' Series | ||
|•{{SSBU|Zero Suit Samus}} {{Head|Zero Suit Samus|g=SSBU|s=20px|cl=ShortsBlue}} | |•{{SSBU|Zero Suit Samus}} {{Head|Zero Suit Samus|g=SSBU|s=20px|cl=ShortsBlue}} | ||
|{{ | |{{SpiritType|Shield}} | ||
|1,700 | |1,700 | ||
|[[Skyworld]] | |[[Skyworld]] | ||
|•Item Tidal Wave | |•Item Tidal Wave | ||
|•The enemy's kicks and knee strikes have increased power<br>•The enemy favors side smash attacks<br>•Certain items will appear in large numbers after a little while | |•The enemy's kicks and knee strikes have increased power<br>•The enemy favors side smash attacks<br>•Certain items will appear in large numbers after a little while | ||
| | |{{SSBUMusicLink|Kid Icarus|In the Space-Pirate Ship}} | ||
|} | |} | ||
==Captured Fighters== | ==Captured Fighters== | ||
Both fighters are mandatory unlocks to complete the World of Light. Unlocking Simon activates a teleporter to the second portion of the subworld and unlocking Pit will clear out the light obstructing the bridge to the eastern portion of the Light Realm. | |||
{|class="wikitable sortable" style="width:100%;" | {|class="wikitable sortable" style="width:100%;" | ||
|- | |- | ||
| Line 146: | Line 149: | ||
| [[File:Simon SSBU.png|center|108x108px]] | | [[File:Simon SSBU.png|center|108x108px]] | ||
| {{SSBU|Simon}} | | {{SSBU|Simon}} | ||
| {{color|#17ba17|Grab}} | | {{SpiritType|Grab}} <center>{{color|#17ba17|Grab}}</center> | ||
| 7,500 | | 7,500 | ||
| [[Dracula's Castle]] | | [[Dracula's Castle]] [[Ω form|Ω]] | ||
| ''{{SSBUMusicLink|Castlevania|Vampire Killer}}'' | | ''{{SSBUMusicLink|Castlevania|Vampire Killer (Remix)|Vampire Killer}}'' | ||
|- | |- | ||
| 28 | | 28 | ||
| [[File:Pit SSBU.png|center|108x108px]] | | [[File:Pit SSBU.png|center|108x108px]] | ||
| {{SSBU|Pit}} | | {{SSBU|Pit}} | ||
| {{color|#18aef5|Shield}} | | {{SpiritType|Shield}} <center>{{color|#18aef5|Shield}}</center> | ||
| 3,300 | | 3,300 | ||
| [[Skyworld]] | | [[Skyworld]] [[Ω form|Ω]] | ||
| ''{{SSBUMusicLink|Kid Icarus|Underworld}}'' | | ''{{SSBUMusicLink|Kid Icarus|Underworld}}'' | ||
|} | |} | ||
== Chests == | |||
{|class="wikitable sortable" style="width:35%;" | |||
|- | |||
! Type | |||
! Item Name | |||
! Location | |||
|- | |||
| Music | |||
| Kid Icarus Retro Medley | |||
| After the Culdra spirit | |||
|- | |||
| Spirit | |||
| Mimicutie | |||
| Near Pit's location, the chest appears to be fake and turns into a spirit battle | |||
|} | |||
==Names in other languages== | |||
{{langtable | |||
|ja={{ja|光の神殿|Hikari no Shinden}} | |||
|jaM=Temple of Light | |||
|en=Temple of Light | |||
|fr=Temple de la lumière | |||
|frM=Temple of Light | |||
|es=Templo de la luz | |||
|esM=Temple of Light | |||
|de=Tempel des Lichts | |||
|deM=Temple of Light | |||
|it=Tempio della luce | |||
|itM=Temple of Light | |||
|nl=Tempel des Lichts | |||
|nlM=Temple of Light | |||
|ru={{rollover|Храм света|Khram sveta|?}} | |||
|ruM=Temple of Light | |||
|zh={{ja|光之神殿|Guāng zhī shéndiàn}} | |||
|zhM=Temple of Light | |||
|ko={{ja|빛의 신전|Bich-ui Sinjeon}} | |||
|koM=Temple of Light | |||
}} | |||
==Trivia== | |||
*Temple of Light is the only sub-world to use two separate maps. | |||
*Temple of Light is the only sub-world without a boss that must be completed in order to complete the World of Light, as it is required to access the [[Forest Hill]] sub-world. | |||
{{World of Light areas}} | {{World of Light areas}} | ||
[[Category:Super Smash Bros. Ultimate]] | [[Category:Super Smash Bros. Ultimate]] | ||
Latest revision as of 00:41, June 29, 2024
Temple of Light (光の神殿, Temple of Light) is a sub-world found in The Light Realm within Adventure Mode in Super Smash Bros. Ultimate. It is located on the northwest corner of the map and can be entered once each of the three of the colored buttons is pressed (green in the Kongo Jungle area, pink in the Heart Pool Mountain, and blue in the Cliffside Rapids). Clearing this area will remove the light breach, allowing access to the east half of the Light Realm, which includes the Forest Hill and thus Rathalos. The area is based on the depiction of Skyworld in Kid Icarus: Uprising, though it shares the name of the Temple of Light from The Legend of Zelda: Ocarina of Time. The area's background music is Destroyed Skyworld.
Spirits[edit]
The spirits found here are generally associated with the mythology of their own series or are otherwise found in sky-themed areas. Spirits are ordered by when they are encountered in the sub-world.
| Spirit | Battle parameters | |||||||||
|---|---|---|---|---|---|---|---|---|---|---|
| No. | Image | Name | Series | Enemy Fighter(s) | Type | Power | Stage | Rules | Conditions | Music |
| 216 | Nayru | The Legend of Zelda Series | •Zelda |
3,500 | Bridge of Eldin | •Temporary Invincibility | •The enemy will occasionally be invincible after a little while •The enemy favors neutral specials |
Ballad of the Goddess (Original) | ||
| 1,269 | Culdra | Culdcept Series | •Palutena |
9,200 | Temple | •Magic and PSI Unleashed | •All fighters' magic and PSI attacks have increased power | Culdcept | ||
| 668 | Lon'qu | Fire Emblem Series | •Chrom |
3,700 | Arena Ferox | •Item: Swords | •The enemy's slash and stab attacks have increased power •The enemy starts the battle with a Killing Edge |
Conquest (Ablaze) | ||
| 1,021 | Affinity | Bayonetta Series | •Pit Team |
2,000 | Umbra Clock Tower (Battlefield form) | N/A | •Stamina battle •The enemy has increased move speed |
One Of A Kind | ||
| 901 | Wind Man | Mega Man Series | •Mega Man |
2,200 | Skyworld | •Hazard: Heavy Wind | •Dangerously high winds are in effect after a little while •Stamina battle •The enemy loves to jump |
Air Man Stage | ||
| 525 | Cobalion, Terrakion, & Virizion | Pokémon Series | •Lucario •Duck Hunt •Yoshi |
9,000 | Kalos Pokémon League | N/A | •The enemy's melee weapons have increased power •The enemy can unleash powerful critical hits at random •The enemy starts the battle with a Beam Sword |
N's Castle | ||
| 1,234 | Heracles | Glory of Heracles Series | •Simon |
3,600 | Temple | •Item: Food | •The enemy starts the battle with an Ore Club | Revolt -Striving for Hope- | ||
| 180 | Moblin | The Legend of Zelda Series | •King Dedede Team |
1,900 | Skyloft (Battlefield form) | •Move Speed ↓ | •The enemy favors down specials •The enemy has reduced move speed |
Overworld Theme - The Legend of Zelda | ||
| 670 | Tharja | Fire Emblem Series | •Lucina |
4,100 | Kalos Pokémon League (Battlefield form) | •Hazard: Poison Cloud | •The stage is covered in a poisonous cloud •The enemy's special moves have increased power |
Conquest (Ablaze) | ||
| 728 | Mimicutie | Kid Icarus Series | •Zero Suit Samus |
1,700 | Skyworld | •Item Tidal Wave | •The enemy's kicks and knee strikes have increased power •The enemy favors side smash attacks •Certain items will appear in large numbers after a little while |
In the Space-Pirate Ship | ||
Captured Fighters[edit]
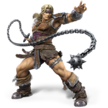
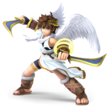
Both fighters are mandatory unlocks to complete the World of Light. Unlocking Simon activates a teleporter to the second portion of the subworld and unlocking Pit will clear out the light obstructing the bridge to the eastern portion of the Light Realm.
| No. | Image | Name | Type | Power | Stage | Music |
|---|---|---|---|---|---|---|
| 66 | Simon | 7,500 | Dracula's Castle Ω | Vampire Killer | ||
| 28 | Pit | 3,300 | Skyworld Ω | Underworld |
Chests[edit]
| Type | Item Name | Location |
|---|---|---|
| Music | Kid Icarus Retro Medley | After the Culdra spirit |
| Spirit | Mimicutie | Near Pit's location, the chest appears to be fake and turns into a spirit battle |
Names in other languages[edit]
Trivia[edit]
- Temple of Light is the only sub-world to use two separate maps.
- Temple of Light is the only sub-world without a boss that must be completed in order to complete the World of Light, as it is required to access the Forest Hill sub-world.


