Bowser (SSB4)/Up special/Default: Difference between revisions
m (turning some unknowns into knowns) |
m (Text replacement - "== ([^=])" to "== $1") |
||
| (5 intermediate revisions by 3 users not shown) | |||
| Line 1: | Line 1: | ||
{{ArticleIcons|ssb4=y}} | {{ArticleIcons|ssb4=y}} | ||
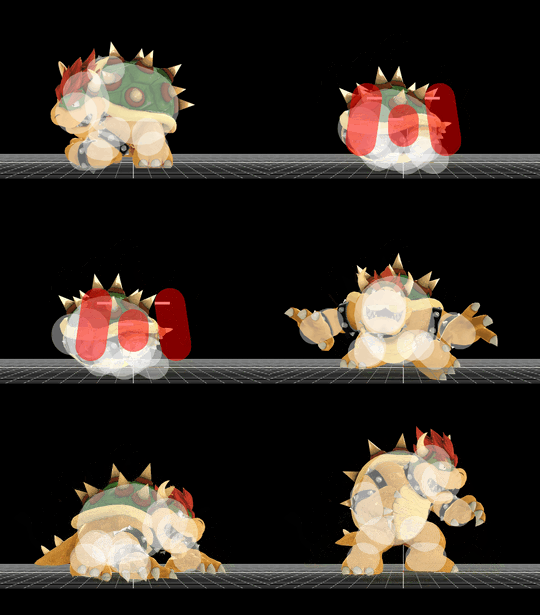
[[File:BowserWhirlingFortressGround.gif|thumb|270px|Hitbox visualization showing Bowser's grounded Whirling Fortress.]] | {{disambig2|the hitbox visualization in ''[[Super Smash Bros. 4]]''|the move itself|Whirling Fortress}}[[File:BowserWhirlingFortressGround.gif|thumb|270px|Hitbox visualization showing Bowser's grounded Whirling Fortress.]] | ||
[[File:BowserWhirlingFortressAir.gif|thumb|270px|Hitbox visualization showing Bowser's aerial Whirling Fortress.]] | [[File:BowserWhirlingFortressAir.gif|thumb|270px|Hitbox visualization showing Bowser's aerial Whirling Fortress.]] | ||
==Overview== | ==Overview== | ||
Bowser's up special in ''SSB4'' is Whirling Fortress. When this move is used, Bowser tucks into his shell and travels upwards a moderate distance before he slows his ascent and goes into a [[helpless]] state. Mashing the special button towards the beginning of the move decreases the vertical distance travelled, while mashing the special button towards the end of the move increases the distance travelled. When used from the ground, Bowser will not travel upwards, but instead spins on the ground, sliding in the direction the player inputs. When used in the air, the move's first hit launches players, while the following hits do not. On the ground, only the last hit will launch players. This move is often Bowser's most frequently used [[out of shield]] option, as it comes out on frame 6 and can carry Bowser away from the enemy if needed. | |||
==Update history== | |||
{{GameIcon|ssb4}} [[1.1.3]] | |||
*{{buff|All variations of Whirling Fortress can grab ledges from behind much sooner (frame 48 → 8).}} | |||
==Hitboxes== | ==Hitboxes== | ||
| Line 243: | Line 246: | ||
===Air=== | ===Air=== | ||
{{SSB4HitboxTableHeader}} | {{SSB4HitboxTableHeader}} | ||
{{HitboxTableTitle|Hit 1|42}} | {{HitboxTableTitle|Hit 1|42}} | ||
| Line 330: | Line 332: | ||
}} | }} | ||
|} | |} | ||
==Timing== | |||
===Grounded=== | |||
{|class="wikitable" | |||
!Multihits | |||
|6-38 | |||
|- | |||
!Final hit | |||
|39 | |||
|- | |||
!Interruptible | |||
|82 | |||
|- | |||
!Animation length | |||
|83 | |||
|} | |||
{{FrameStripStart}} | |||
{{FrameStrip|t=Lag|c=5}}{{FrameStrip|t=Hitbox|c=33|e=HitboxChangeS}}{{FrameStrip|t=Hitbox|c=1|s=HitboxChangeE}}{{FrameStrip|t=Lag|c=42}}{{FrameStrip|t=Interruptible|c=2}} | |||
{{FrameStripEnd}} | |||
===Aerial=== | |||
{|class="wikitable" | |||
!Hit 1 | |||
|6-7 | |||
|- | |||
!Hits 2-11 | |||
|8-11, 12-15, 16-19, 20-23, 24-27, 28-31, 32-35, 36-39, 40-43, 44-47 | |||
|- | |||
!Animation length | |||
|79 | |||
|} | |||
{{FrameStripStart}} | |||
{{FrameStrip|t=Lag|c=5}}{{FrameStrip|t=Hitbox|c=2|e=HitboxChangeS}}{{FrameStrip|t=Hitbox|c=4|e=HitboxChangeS|s=HitboxChangeE}}{{FrameStrip|t=Hitbox|c=4|e=HitboxChangeS|s=HitboxChangeE}}{{FrameStrip|t=Hitbox|c=4|e=HitboxChangeS|s=HitboxChangeE}}{{FrameStrip|t=Hitbox|c=4|e=HitboxChangeS|s=HitboxChangeE}}{{FrameStrip|t=Hitbox|c=4|e=HitboxChangeS|s=HitboxChangeE}}{{FrameStrip|t=Hitbox|c=4|e=HitboxChangeS|s=HitboxChangeE}}{{FrameStrip|t=Hitbox|c=4|e=HitboxChangeS|s=HitboxChangeE}}{{FrameStrip|t=Hitbox|c=4|e=HitboxChangeS|s=HitboxChangeE}}{{FrameStrip|t=Hitbox|c=4|e=HitboxChangeS|s=HitboxChangeE}}{{FrameStrip|t=Hitbox|c=4|s=HitboxChangeE}}{{FrameStrip|t=Lag|c=32}} | |||
{{FrameStripEnd}} | |||
{{FrameIconLegend|lag=y|hitbox=y|hitboxchange=y|interruptible=y}} | |||
{{MvSubNavBowser|g=SSB4}} | {{MvSubNavBowser|g=SSB4}} | ||
[[Category:Bowser (SSB4)]] | [[Category:Bowser (SSB4)]] | ||
[[Category:Special | [[Category:Special moves (SSB4)]] | ||
[[Category:Up special moves (SSB4)]] | [[Category:Up special moves (SSB4)]] | ||
Latest revision as of 19:49, April 12, 2022
Overview[edit]
Bowser's up special in SSB4 is Whirling Fortress. When this move is used, Bowser tucks into his shell and travels upwards a moderate distance before he slows his ascent and goes into a helpless state. Mashing the special button towards the beginning of the move decreases the vertical distance travelled, while mashing the special button towards the end of the move increases the distance travelled. When used from the ground, Bowser will not travel upwards, but instead spins on the ground, sliding in the direction the player inputs. When used in the air, the move's first hit launches players, while the following hits do not. On the ground, only the last hit will launch players. This move is often Bowser's most frequently used out of shield option, as it comes out on frame 6 and can carry Bowser away from the enemy if needed.
Update history[edit]
 All variations of Whirling Fortress can grab ledges from behind much sooner (frame 48 → 8).
Hitboxes[edit]
Ground[edit]
Air[edit]
Timing[edit]
Grounded[edit]
| Multihits | 6-38 |
|---|---|
| Final hit | 39 |
| Interruptible | 82 |
| Animation length | 83 |
Aerial[edit]
| Hit 1 | 6-7 |
|---|---|
| Hits 2-11 | 8-11, 12-15, 16-19, 20-23, 24-27, 28-31, 32-35, 36-39, 40-43, 44-47 |
| Animation length | 79 |
Lag time |
Hitbox |
Hitbox change |
Interruptible |
|

