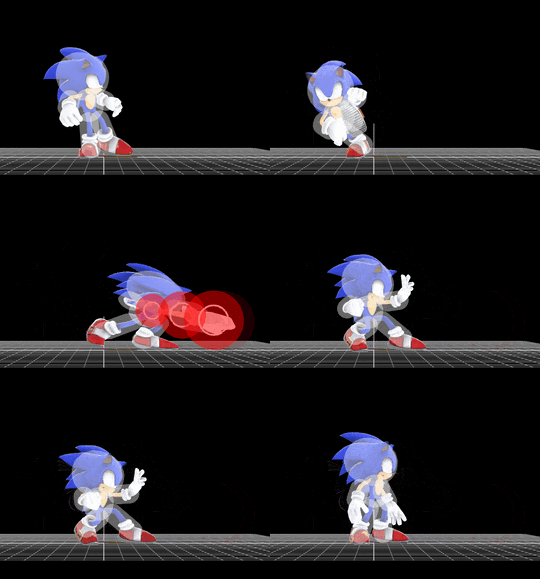
Sonic (SSB4)/Forward smash: Difference between revisions
From SmashWiki, the Super Smash Bros. wiki
Jump to navigationJump to search
No edit summary |
No edit summary |
||
| (7 intermediate revisions by 4 users not shown) | |||
| Line 13: | Line 13: | ||
|} | |} | ||
==Overview== | ==Overview== | ||
A wind-up punch. It can be angled, has deceptive range and deals high knockback, making it one of Sonic's most viable KOing options. It is also good for 2-frame-punishes. However, it comes out on frame 18 and has | A strong wind-up punch. It can be angled, has deceptive range and deals high knockback, making it one of Sonic's most viable KOing options. It is also good for 2-frame-punishes. However, it comes out on frame 18 and has 27 frames of ending lag, making it risky if used unwisely. Originates from ''Sonic the Fighters''. | ||
==Update history== | ==Update history== | ||
'''{{GameIcon|ssb4}} [[1.0.4]]''' | '''{{GameIcon|ssb4-3ds}} [[1.0.4]]/{{GameIcon|ssb4-wiiu}} 1.0.1''' | ||
*{{nerf|Ending lag | *{{nerf|Ending lag (FAF 44 → 48).}} | ||
'''{{GameIcon|ssb4}} [[1.1.0]]''' | '''{{GameIcon|ssb4}} [[1.1.0]]''' | ||
*{{nerf|Knockback | *{{nerf|Knockback scaling (106 → 101), slightly hindering its KO potential.}} | ||
==Hitboxes== | ==Hitboxes== | ||
{| | ==Hitboxes== | ||
| | {{SSB4HitboxTableHeader}} | ||
{{SSB4HitboxTableRow | |||
| | |id=0 | ||
| | |damage={{ChargedSmashDmgSSB4|14}} | ||
|sd=0 | |||
|angle=361 | |||
|bk=30 | |||
|ks=101 | |||
|fkv=0 | |||
|r=4.5 | |||
|bn=23 | |||
|xpos=4.0 | |||
|ypos=0.0 | |||
|zpos=0.0 | |||
|ff=1.0 | |||
|type=Hand | |||
|sfx=Punch | |||
|slvl=L | |||
}} | |||
{{SSB4HitboxTableRow | |||
|id=1 | |||
|damage={{ChargedSmashDmgSSB4|14}} | |||
|sd=0 | |||
|angle=361 | |||
|bk=30 | |||
|ks=101 | |||
|fkv=0 | |||
|r=3.5 | |||
|bn=22 | |||
|xpos=1.0 | |||
|ypos=0.0 | |||
|zpos=0.0 | |||
|type=Hand | |||
|ff=1.0 | |||
|effect=Normal | |||
|sfx=Punch | |||
|slvl=L | |||
}} | |||
{{SSB4HitboxTableRow | |||
|id=2 | |||
|damage={{ChargedSmashDmgSSB4|14}} | |||
|sd=0 | |||
|angle=361 | |||
|bk=30 | |||
|ks=101 | |||
|fkv=0 | |||
|r=2.5 | |||
|bn=21 | |||
|xpos=-1.0 | |||
|ypos=0.0 | |||
|zpos=0.0 | |||
|type=Hand | |||
|ff=1.0 | |||
|effect=Normal | |||
|sfx=Punch | |||
|slvl=L | |||
}} | |||
|} | |} | ||
==Timing== | ==Timing== | ||
{|class="wikitable" | {|class="wikitable" | ||
!Charges between | |||
|12-13 | |||
|- | |||
!Hitboxes | !Hitboxes | ||
|18-20 | |18-20 | ||
|- | |||
!Animation length | |||
|47 | |||
|- | |- | ||
!Interruptible | !Interruptible | ||
|48 | |48 | ||
|} | |} | ||
{{FrameStripStart}} | {{FrameStripStart}} | ||
{{FrameStrip|t=Lag|c= | {{FrameStrip|t=Lag|c=12|e=LagChargeS}}{{FrameStrip|t=Lag|c=5|s=LagChargeE}}{{FrameStrip|t=Hitbox|c=3}}{{FrameStrip|t=Lag|c=27}} | ||
{{FrameStripEnd}} | {{FrameStripEnd}} | ||
{{FrameIconLegend|lag=y| | |||
{{FrameIconLegend|lag=y|charge=y|hitbox=y}} | |||
{{MvSubNavSonic|g=SSB4}} | {{MvSubNavSonic|g=SSB4}} | ||
[[Category:Sonic (SSB4)]] | [[Category:Sonic (SSB4)]] | ||
[[Category:Forward smashes (SSB4)]] | [[Category:Forward smashes (SSB4)]] | ||
Latest revision as of 11:11, February 15, 2022
| Sonic forward smash hitbox visualization | |
|---|---|
| ↗ | 
|
| → | 
|
| ↘ | 
|
Overview[edit]
A strong wind-up punch. It can be angled, has deceptive range and deals high knockback, making it one of Sonic's most viable KOing options. It is also good for 2-frame-punishes. However, it comes out on frame 18 and has 27 frames of ending lag, making it risky if used unwisely. Originates from Sonic the Fighters.
Update history[edit]
![]() 1.0.4/
1.0.4/![]() 1.0.1
1.0.1
 Ending lag (FAF 44 → 48).
 Knockback scaling (106 → 101), slightly hindering its KO potential.
Hitboxes[edit]
Hitboxes[edit]
Timing[edit]
| Charges between | 12-13 |
|---|---|
| Hitboxes | 18-20 |
| Animation length | 47 |
| Interruptible | 48 |
Lag time |
Charge interval |
Hitbox |
|