Marth (SSBM)/Down special: Difference between revisions
From SmashWiki, the Super Smash Bros. wiki
Jump to navigationJump to search
EpicWendigo (talk | contribs) (New Page: Marth's Down special in Super Smash Bros. Melee is Counter, a move that involves posing for a few seconds and waiting for the opponent to strike. Once they do so, Marth will attack ...) |
|||
| (10 intermediate revisions by 6 users not shown) | |||
| Line 1: | Line 1: | ||
Marth's | {{ArticleIcons|ssbm=y}} | ||
==Overview== | |||
[[File:Marth Down Special Hitbox Melee.gif|thumb|Hitbox duration of the move.]] | |||
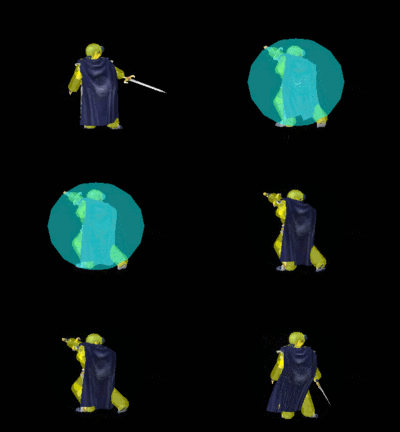
Marth's [[down special move]] in ''[[Super Smash Bros. Melee]]'' is '''[[Counter]]''', a move that involves posing for a few seconds. If the opponent hits Marth with an attack at the correct moment, Marth will throw out a counterattack. While this can be used as a surprise move in certain situations, it is usually rather [[punish]]able and easy to whiff. It also doesn't grant much followup ability if it does hit, making it a rather rarely-used move in competitive play. However, it can [[gimp]] certain recoveries, such as {{b|Screw Attack|move}}, [[Fire Fox]], and [[Fire Bird]]. | |||
==Hitboxes== | |||
{{MeleeHitboxTableHeader}} | |||
{{MeleeHitboxTableRow | |||
|id=0 | |||
|damage=7% | |||
|angle=361 | |||
|bk=90 | |||
|ks=35 | |||
|fkv=0 | |||
|r=1000 | |||
|bn=76 | |||
|xpos=1000 | |||
|clang=y | |||
|rebound=n | |||
|effect=Slash | |||
|slvl=L | |||
|sfx=Kick | |||
}} | |||
{{MeleeHitboxTableRow | |||
|id=1 | |||
|damage=7% | |||
|angle=361 | |||
|bk=90 | |||
|ks=35 | |||
|fkv=0 | |||
|r=1100 | |||
|bn=76 | |||
|clang=y | |||
|rebound=n | |||
|effect=Slash | |||
|slvl=L | |||
|sfx=Kick | |||
}} | |||
{{MeleeHitboxTableRow | |||
|id=2 | |||
|damage=7% | |||
|angle=361 | |||
|bk=90 | |||
|ks=35 | |||
|fkv=0 | |||
|r=700 | |||
|bn=71 | |||
|clang=y | |||
|rebound=n | |||
|effect=Slash | |||
|slvl=L | |||
|sfx=Kick | |||
}} | |||
{{MeleeHitboxTableRow | |||
|id=3 | |||
|damage=7% | |||
|angle=361 | |||
|bk=90 | |||
|ks=35 | |||
|fkv=0 | |||
|r=780 | |||
|bn=25 | |||
|clang=y | |||
|rebound=n | |||
|effect=Slash | |||
|slvl=L | |||
|sfx=Kick | |||
}} | |||
|} | |||
==Timing== | |||
===Defensive position=== | |||
{|class="wikitable" | |||
|- | |||
!Counter active | |||
|5-29 | |||
|- | |||
!Animation length | |||
|59 | |||
|} | |||
{{FrameStripStart}} | |||
{{FrameStrip|t=Lag|c=4}}{{FrameStrip|t=Defensive|c=25}}{{FrameStrip|t=Lag|c=30}} | |||
{{FrameStripEnd}} | |||
===Counterattack=== | |||
{|class="wikitable" | |||
|- | |||
!Freeze frames on activation | |||
|11 | |||
|- | |||
!Intangible | |||
|1-5 | |||
|- | |||
!Hitbox | |||
|3-9 | |||
|- | |||
!Animation length | |||
|35 | |||
|} | |||
{{FrameStripStart}} | |||
{{FrameStrip|t=Blank|c=11}}{{FrameStrip|t=Lag|c=2}}{{FrameStrip|t=Hitbox|c=7}}{{FrameStrip|t=Lag|c=26}} | |||
|- | |||
{{FrameStrip|t=Intangible|c=16}}{{FrameStrip|t=Vulnerable|c=30}} | |||
{{FrameStripEnd}} | |||
==Properties== | |||
{|class="wikitable" | |||
|- | |||
!Gravity | |||
|0.04 | |||
|- | |||
!Max fall speed | |||
|1.2 | |||
|- | |||
!Counter radius | |||
|8.5 | |||
|} | |||
{{MvSubNavMarth|g=SSBM}} | |||
[[Category:Marth (SSBM)]] | |||
[[Category:Down special moves (SSBM)]] | |||
[[Category:Counterattacks (SSBM)]] | |||
Latest revision as of 19:14, April 17, 2016
Overview[edit]
Marth's down special move in Super Smash Bros. Melee is Counter, a move that involves posing for a few seconds. If the opponent hits Marth with an attack at the correct moment, Marth will throw out a counterattack. While this can be used as a surprise move in certain situations, it is usually rather punishable and easy to whiff. It also doesn't grant much followup ability if it does hit, making it a rather rarely-used move in competitive play. However, it can gimp certain recoveries, such as Screw Attack, Fire Fox, and Fire Bird.
Hitboxes[edit]
Timing[edit]
Defensive position[edit]
| Counter active | 5-29 |
|---|---|
| Animation length | 59 |
Counterattack[edit]
| Freeze frames on activation | 11 |
|---|---|
| Intangible | 1-5 |
| Hitbox | 3-9 |
| Animation length | 35 |
Properties[edit]
| Gravity | 0.04 |
|---|---|
| Max fall speed | 1.2 |
| Counter radius | 8.5 |
