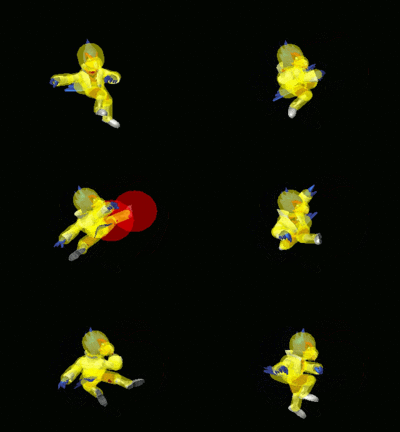
Falco (SSBM)/Forward aerial: Difference between revisions
From SmashWiki, the Super Smash Bros. wiki
Jump to navigationJump to search
MHStarCraft (talk | contribs) No edit summary |
Laprasified (talk | contribs) (technical data added) |
||
| Line 5: | Line 5: | ||
Falco does five consecutive kicks in front of himself. The move has a very long duration, and it is difficult to connect all of the hits. In addition, the move can cause occasional [[SD]]s if carelessly used offstage. However, despite the move being very [[punish]]able if whiffed, it is a great way to rack up damage on floaties, and using the first hit before landing can also lead into moves such as a {{mvsub|Falco|SSBM|down aerial}} on floaties. | Falco does five consecutive kicks in front of himself. The move has a very long duration, and it is difficult to connect all of the hits. In addition, the move can cause occasional [[SD]]s if carelessly used offstage. However, despite the move being very [[punish]]able if whiffed, it is a great way to rack up damage on floaties, and using the first hit before landing can also lead into moves such as a {{mvsub|Falco|SSBM|down aerial}} on floaties. | ||
{{competitive expertise}} | {{competitive expertise}} | ||
==Hitboxes== | |||
{{MeleeHitboxTableHeader}} | |||
{{HitboxTableTitle|Hit 1|19}} | |||
{{MeleeHitboxTableRow | |||
|id=0 | |||
|damage=9% | |||
|angle=361 | |||
|bk=10 | |||
|ks=100 | |||
|fkv=0 | |||
|r=1320 | |||
|bn=13 | |||
|effect=Normal | |||
|slvl=L | |||
|sfx=Kick | |||
}} | |||
{{MeleeHitboxTableRow | |||
|id=1 | |||
|damage=9% | |||
|angle=361 | |||
|bk=10 | |||
|ks=100 | |||
|fkv=0 | |||
|r=1320 | |||
|bn=13 | |||
|xpos=1200 | |||
|effect=Normal | |||
|slvl=L | |||
|sfx=Kick | |||
}} | |||
{{HitboxTableTitle|Hit 2|19}} | |||
{{MeleeHitboxTableRow | |||
|id=0 | |||
|damage=8% | |||
|angle=361 | |||
|bk=10 | |||
|ks=100 | |||
|fkv=0 | |||
|r=1192 | |||
|bn=7 | |||
|effect=Normal | |||
|slvl=M | |||
|sfx=Kick | |||
}} | |||
{{MeleeHitboxTableRow | |||
|id=1 | |||
|damage=8% | |||
|angle=361 | |||
|bk=10 | |||
|ks=100 | |||
|fkv=0 | |||
|r=1192 | |||
|bn=7 | |||
|xpos=1200 | |||
|effect=Normal | |||
|slvl=M | |||
|sfx=Kick | |||
}} | |||
{{HitboxTableTitle|Hit 3|19}} | |||
{{MeleeHitboxTableRow | |||
|id=0 | |||
|damage=7% | |||
|angle=361 | |||
|bk=10 | |||
|ks=100 | |||
|fkv=0 | |||
|r=1192 | |||
|bn=13 | |||
|effect=Normal | |||
|slvl=M | |||
|sfx=Kick | |||
}} | |||
{{MeleeHitboxTableRow | |||
|id=1 | |||
|damage=7% | |||
|angle=361 | |||
|bk=10 | |||
|ks=100 | |||
|fkv=0 | |||
|r=1192 | |||
|bn=13 | |||
|xpos=1200 | |||
|effect=Normal | |||
|slvl=M | |||
|sfx=Kick | |||
}} | |||
{{HitboxTableTitle|Hit 4|19}} | |||
{{MeleeHitboxTableRow | |||
|id=0 | |||
|damage=5% | |||
|angle=361 | |||
|bk=10 | |||
|ks=100 | |||
|fkv=0 | |||
|r=1192 | |||
|bn=7 | |||
|effect=Normal | |||
|slvl=M | |||
|sfx=Kick | |||
}} | |||
{{MeleeHitboxTableRow | |||
|id=1 | |||
|damage=5% | |||
|angle=361 | |||
|bk=10 | |||
|ks=100 | |||
|fkv=0 | |||
|r=1192 | |||
|bn=7 | |||
|xpos=1200 | |||
|effect=Normal | |||
|slvl=M | |||
|sfx=Kick | |||
}} | |||
{{HitboxTableTitle|Hit 5|19}} | |||
{{MeleeHitboxTableRow | |||
|id=0 | |||
|damage=3% | |||
|angle=361 | |||
|bk=50 | |||
|ks=100 | |||
|fkv=0 | |||
|r=1192 | |||
|bn=13 | |||
|effect=Normal | |||
|slvl=M | |||
|sfx=Kick | |||
}} | |||
{{MeleeHitboxTableRow | |||
|id=1 | |||
|damage=3% | |||
|angle=361 | |||
|bk=50 | |||
|ks=100 | |||
|fkv=0 | |||
|r=1192 | |||
|bn=13 | |||
|xpos=1000 | |||
|effect=Normal | |||
|slvl=M | |||
|sfx=Kick | |||
}} | |||
|} | |||
==Timing== | |||
===Attack=== | |||
{|class="wikitable" | |||
|- | |||
!Initial autocancel | |||
|1-5 | |||
|- | |||
!Hitboxes | |||
|6-8, 16-18, 24-26, 33-35, 43-45 | |||
|- | |||
!Ending autocancel | |||
|49- | |||
|- | |||
!Interruptible | |||
|53 | |||
|- | |||
!Animation length | |||
|59 | |||
|} | |||
{{FrameStripStart}} | |||
{{FrameStrip|t=Lag|c=5}}{{FrameStrip|t=Hitbox|c=3}} | |||
{{FrameStrip|t=Lag|c=7}}{{FrameStrip|t=Hitbox|c=3}} | |||
{{FrameStrip|t=Lag|c=5}}{{FrameStrip|t=Hitbox|c=3}} | |||
{{FrameStrip|t=Lag|c=6}}{{FrameStrip|t=Hitbox|c=3}} | |||
{{FrameStrip|t=Lag|c=7}}{{FrameStrip|t=Hitbox|c=3}} | |||
{{FrameStrip|t=Lag|c=7}}{{FrameStrip|t=Interruptible|c=7}} | |||
|- | |||
{{FrameStrip|t=Autocancel|c=5}}{{FrameStrip|t=Blank|c=43}}{{FrameStrip|t=Autocancel|c=11}} | |||
{{FrameStripEnd}} | |||
===Landing lag=== | |||
{|class="wikitable" | |||
|- | |||
!Animation length | |||
|22 | |||
|- | |||
!L-cancelled animation length | |||
|11 | |||
|} | |||
{{FrameStripStart}} | |||
|Normal {{FrameStrip|t=Lag|c=22}} | |||
|- | |||
|L-cancelled {{FrameStrip|t=Lag|c=11}}{{FrameStrip|t=Blank|c=11}} | |||
{{FrameStripEnd}} | |||
{{FrameIconLegend|lag=y|hitbox=y|autocancel=y|interruptible=y}} | |||
==Similar moves== | ==Similar moves== | ||
Revision as of 23:24, March 2, 2016
Overview
Falco does five consecutive kicks in front of himself. The move has a very long duration, and it is difficult to connect all of the hits. In addition, the move can cause occasional SDs if carelessly used offstage. However, despite the move being very punishable if whiffed, it is a great way to rack up damage on floaties, and using the first hit before landing can also lead into moves such as a down aerial on floaties.
Hitboxes
Timing
Attack
| Initial autocancel | 1-5 |
|---|---|
| Hitboxes | 6-8, 16-18, 24-26, 33-35, 43-45 |
| Ending autocancel | 49- |
| Interruptible | 53 |
| Animation length | 59 |
Landing lag
| Animation length | 22 |
|---|---|
| L-cancelled animation length | 11 |
| Normal | ||||||||||||||||||||||
| L-cancelled |
Lag time |
Hitbox |
Autocancel |
Interruptible |
Similar moves
|

