Luigi (SSBM)/Taunt: Difference between revisions
(New Page: {{ArticleIcons|ssbm=y}} thumb|380px|Hitbox visualization showing Luigi's taunt. {{competitive expertise}} ==Overview== ==Hitboxes== {{MeleeHitboxTableHeader}...) |
Mariogeek2 (talk | contribs) m (Removed the competitive expertise banner.) |
||
| (3 intermediate revisions by 2 users not shown) | |||
| Line 1: | Line 1: | ||
{{ArticleIcons|ssbm=y}} | {{ArticleIcons|ssbm=y}} | ||
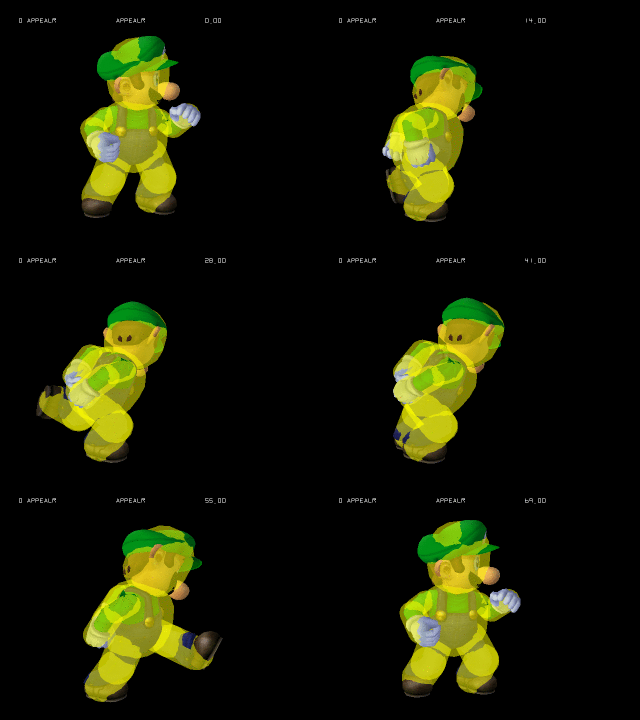
[[File:LuigiTauntSSBM.gif|thumb|380px|Hitbox visualization showing Luigi's taunt.]] | [[File:LuigiTauntSSBM.gif|thumb|380px|Hitbox visualization showing Luigi's taunt.]] | ||
==Overview== | ==Overview== | ||
Luigi bashfully puts his hands behind his back before kicking his foot forward. This move is notable for being wholly unique, as it's the only [[taunt]] in the game that has a [[hitbox]]. This doesn't mean that it's useful as an attack, however. It takes 3/4's of a second before a single frame of an attack hitbox comes out, only for it to take nearly half a second to recover. | |||
The move sees almost no use in competitive play. It is a horrible [[neutral game|neutral]] option, being slow and having a small hitbox, almost guaranteeing Luigi will be [[punishment|punished]]. It can be used at the [[edge]] of the stage to hit opponents attempting to [[edge#Edge sweet spot|sweetspot]]; this is almost always a bad idea, as well. If it misses, the opponent will likely be able to punish Luigi. If it hits, there's a decent chance they'll be able to [[meteor smash#Meteor cancelling|meteor cancel]]. Given this, the move's sole use in competitive play is as a humiliation tactic, getting a kill on an opponent who misses their meteor cancel. | |||
==Hitboxes== | ==Hitboxes== | ||
{{MeleeHitboxTableHeader}} | {{MeleeHitboxTableHeader}} | ||
| Line 12: | Line 15: | ||
|bk=0 | |bk=0 | ||
|ks=100 | |ks=100 | ||
|fkv= | |fkv=100 | ||
|r=800 | |r=800 | ||
|bn=51 | |bn=51 | ||
| Line 21: | Line 24: | ||
}} | }} | ||
|} | |} | ||
==Timing== | ==Timing== | ||
{|class="wikitable" | {|class="wikitable" | ||
!Hitboxes | !Hitboxes | ||
| | |46 | ||
|- | |- | ||
!Animation length | !Animation length | ||
| | |70 | ||
|} | |} | ||
{{FrameStripStart}} | {{FrameStripStart}} | ||
{{FrameStrip|t=Lag|c= | {{FrameStrip|t=Lag|c=45}}{{FrameStrip|t=Hitbox|c=1}}{{FrameStrip|t=Lag|c=24}} | ||
{{FrameStripEnd}} | {{FrameStripEnd}} | ||
Latest revision as of 19:24, October 17, 2024
Overview[edit]
Luigi bashfully puts his hands behind his back before kicking his foot forward. This move is notable for being wholly unique, as it's the only taunt in the game that has a hitbox. This doesn't mean that it's useful as an attack, however. It takes 3/4's of a second before a single frame of an attack hitbox comes out, only for it to take nearly half a second to recover.
The move sees almost no use in competitive play. It is a horrible neutral option, being slow and having a small hitbox, almost guaranteeing Luigi will be punished. It can be used at the edge of the stage to hit opponents attempting to sweetspot; this is almost always a bad idea, as well. If it misses, the opponent will likely be able to punish Luigi. If it hits, there's a decent chance they'll be able to meteor cancel. Given this, the move's sole use in competitive play is as a humiliation tactic, getting a kill on an opponent who misses their meteor cancel.
Hitboxes[edit]
| ID | Part | Damage | SD | Angle | BK | KS | FKV | Radius | Bone | Offset | Clang | Rebound | Effect | G | A | Sound | ||
|---|---|---|---|---|---|---|---|---|---|---|---|---|---|---|---|---|---|---|
| 0 | 0 | 1% | 1 | 0 | 100 | 100 | 3.1248 | 51 | 0.0 | 0.0 | 0.0 | |||||||
Timing[edit]
| Hitboxes | 46 |
|---|---|
| Animation length | 70 |
Lag time |
Hitbox |
|
