|
|
| (86 intermediate revisions by 44 users not shown) |
| Line 1: |
Line 1: |
| {{ArticleIcons|series=y}} | | {{ArticleIcons|series=y}} |
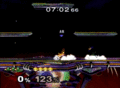
| [[File:Reflection Fox Capsule Brawl.gif|thumb|right|250px|{{SSBB|Fox}} reflecting a thrown [[Capsule]] in ''Brawl''.]] | | [[File:Reflection Fox Capsule Brawl.gif|thumb|250px|{{SSBB|Fox}} reflecting a thrown [[Capsule]] in ''Brawl''.]] |
| {{disambig2|the attack property|other uses|Reflector (disambiguation)}} | | {{disambig2|the attack property|other uses|Reflector (disambiguation)}} |
| A '''reflection''' is the process of deflecting incoming [[projectile|projectiles]]. The projectile then becomes property of the reflector's user and is often redirected to hit the original attacker, though some moves such as {{b|Thunder|Pokémon}} are not redirected when reflected. Most reflectors increase the damage done by projectiles, while some also increase their speed. Projectiles can be reflected from any direction.
| | :''"Reflect" redirects here. For the tournament, see [[Tournament:Reflect]].'' |
|
| |
|
| It is possible for a single projectile to be reflected multiple times, such as back and forth between two characters' reflectors. However, this cannot be kept going indefinitely, as all reflectors cannot withstand a projectile that becomes too powerful: a very strong projectile just passes through most reflectors, while actually physically shattering others (such as [[Guardian Orbitars]] and [[Reflect Barrier]]).
| | '''Reflection''' is a phenomenon wherein one [[fighter]] gains control of an opponent's projectile and uses it as their own attack. Most but not all projectiles reverse direction upon being reflected, sending them back to their original users. |
|
| |
|
| Note: In ''Super Smash Bros. Ultimate'', certain spirits can affect the hitboxes produced by reflection moves, but has no effect on the reflected projectiles.
| | ==Properties== |
| ==Moves with reflecting abilities== | | To be reflected, a projectile must come into contact with an attack or object that reflects, such as the aptly-named [[Reflector]], [[Ness]]'s [[forward smash]], or a character wearing a [[Franklin Badge]]. Most reflectors increase the damage done by projectiles, as well as the speed at which they travel back, and can also change their remaining active period (lifespan) to further adjust how much effective distance they can cover. Reflected projectiles also change ownership from the original user to the reflector, damaging the original user if they are hit. Projectiles can be reflected in any direction, and can be reflected multiple times to multiplicatively increase the damage dealt. A projectile can theoretically be reflected an infinite amount of times as long as it is active and will change ownership every time, though most reflecting attacks can only reflect projectiles up to a certain damage threshold before some kind of counter-measure activates. |
| {{incomplete|Home-Run Bat reflection speed and limit}} | | |
| Reflection moves only available as [[custom move]]s are in ''italics''.
| | In ''[[Super Smash Bros.]]'' and ''[[Super Smash Bros. Melee]]'', if a projectile is too strong for a reflector, the reflector breaks as if it was a [[shield]] and [[stun]]s the user. From ''[[Super Smash Bros. Brawl]]'' onward, the projectile simply ignores the reflector and hits the user. In the case of Ness's or Lucas's forward smash, should the overpowered projectile collide with the move's hitbox without striking the user, they undergo a proportionally-substantial amount of lag due to being [[priority|outprioritized]]. |
| | |
| | Reflectors are generally very useful moves, as they help prevent projectile [[camping]] and [[spamming]]. As such, characters with reliable reflectors tend to have better matchups against characters that rely upon projectiles, such as [[Samus]], than those who lack a reliable reflector. |
| | |
| | In addition to the above, {{SSBU|Villager}} and {{SSBU|Isabelle}} are able to grab projectiles and items and store them for later use via their [[neutral special]] move, [[Pocket]]. While not strictly a reflector, retrieved projectiles have their damage increased by 1.9×, much like the damage multipliers used by reflectors. |
| | |
| | In ''[[Super Smash Bros. 4]]'' and ''[[Super Smash Bros. Ultimate]]'', projectiles can only be reflected up to 7 times before disappearing. Additionally, in ''Ultimate'', a visual indicator in the form of a flashing blue hexagon (akin to Fox's {{b|Reflector|Fox}}) is displayed when a projectile is reflected. |
| | |
| | In [[Spirit Battle]]s, damage dealt by reflected projectiles is increased by the "Reflect-Damage Buffed" rule, often accompanied by the "All fighters' reflected projectiles have increased power" condition. |
| | |
| | ==List of reflectors== |
| | {{technical data|Lifespan multipliers for some fields}} |
| | Reflectors only available as [[custom move]]s are in ''italics''. |
|
| |
|
| {| class="wikitable sortable" | | {| class="wikitable sortable" |
| ! User !! Move !! Damage multiplier !! Speed multiplier !! Max damage reflectable | | ! User !! Move !! Damage multiplier !! Speed multiplier !! Lifespan multiplier !! Max damage reflectable |
| |-
| |
| | rowspan="5"| [[Dark Pit]] || [[Electroshock Arm]]** || 1 || 1 || 50
| |
| |- | | |- |
| | ''[[Electrocut Arm]]''** || 1 || 1 || 50 | | | rowspan="2"| All characters || [[Powershield]] {{GameIcon|SSBM}}<ref>Does not change the ownership of [[Poké Ball]]s.</ref> || 0.5 || 1 || 1 || — |
| |- | | |- |
| | ''[[Quickshock Arm]]''** || 1.3 || 1 || 50 | | | Perfect Shield Reflect {{GameIcon|SSBU}}<ref>Available as a [[Skill Tree|Skill]] in [[World of Light]]; can only reflect projectiles up to 3 times.</ref> || 1.2 || 1.5 || 2 || — |
| |- | | |- |
| | [[Guardian Orbitars]] || 1.5 || 1.7 || 50 | | | [[Bayonetta]] || [[Witch Time]] {{GameIcon|SSBU}}<ref name="straight">Does not reverse projectile direction.</ref><ref name="noeffect">Does not trigger reflection effect.</ref><ref name="control">The original owner can still control the projectile if acceptable.</ref> || 1 || 1 || 1 || — |
| |- | | |- |
| | ''[[Amplifying Orbitars]]'' || 2 || 2 || 50 | | | rowspan="5"| [[Dark Pit]] || [[Electroshock Arm]]<ref name="arm">Does not change the ownership of certain projectiles reflected.</ref> || 1 || 1 || 1 || 50 |
| |- | | |- |
| | rowspan="2"| [[Dr. Mario]] || [[Super Sheet]] || 1.5 || 1 || 50 | | | ''[[Electrocut Arm]]''<ref name="arm"/> || 1 || 1 || || 50 |
| |- | | |- |
| | ''[[Breezy Sheet]]'' || 1.5 || 1 || 50 | | | ''[[Quickshock Arm]]''<ref name="arm"/> || 1.3 || 1 || || 50 |
| |- | | |- |
| | rowspan="4"| [[Falco]] || rowspan="2"| [[Reflector (Falco)|Reflector]] || 1.5 {{GameIcon|SSBM}}{{GameIcon|SSBB}} || 1 {{GameIcon|SSBM}}{{GameIcon|SSBB}} || 50
| | | [[Guardian Orbitars]] || 1.5 || 1.7 || 0.7 || 50 |
| |- | | |- |
| | 1.2 {{GameIcon|SSB4}}{{GameIcon|SSBU}} || 1.3 {{GameIcon|SSB4}}{{GameIcon|SSBU}} || 50 | | | ''[[Amplifying Orbitars]]'' || 2 || 2 || || 50 |
| |- | | |- |
| | ''[[Accele-Reflector]]'' || 1 || 2.1 || 50 | | | rowspan="2"| [[Dr. Mario]] || [[Super Sheet]] || 1.5 {{GameIcon|SSBM}}{{GameIcon|SSB4}}, 1.6 {{GameIcon|SSBU}} || rowspan="2"| 1 || 0.75 || rowspan="2"| 50 |
| |- | | |- |
| | ''[[Reflector Void]]''*** || 0.7 || ? || ? | | | ''[[Breezy Sheet]]'' || 1.5 || |
| |- | | |- |
| | rowspan="4"| [[Fox]] || rowspan="2 "|[[Reflector (Fox)|Reflector]] || 1.5 {{GameIcon|SSBM}}{{GameIcon|SSBB}} || 1 {{GameIcon|SSBM}}{{GameIcon|SSBB}} || 50 | | | rowspan="3"| [[Falco]] || [[Reflector (Falco)|Reflector]] || 1.5 {{GameIcon|SSBM}}{{GameIcon|SSBB}}, 1.2 {{GameIcon|SSB4}}{{GameIcon|SSBU}} || 1 {{GameIcon|SSBM}}{{GameIcon|SSBB}}, 1.3 {{GameIcon|SSB4}}{{GameIcon|SSBU}} || 0.8 || 50 |
| |- | | |- |
| | 1.4 {{GameIcon|SSB4}}{{GameIcon|SSBU}} || 1.4 {{GameIcon|SSB4}}{{GameIcon|SSBU}} || 50 | | | ''[[Accele-Reflector]]'' || 1 || 2.1 || || 50 |
| |- | | |- |
| | ''[[Big Reflector]]'' || 1.2 || 1 || 50 | | | ''[[Reflector Void]]''<ref name="absorb">Only reflects physical projectiles. Absorbs energy-based projectiles.</ref> || 0.7 || 0.6 || || 999 |
| |- | | |- |
| | ''[[Amplifying Reflector]]'' || 2.1 || 1.8 || 50 | | | rowspan="3"| [[Fox]] || [[Reflector (Fox)|Reflector]] || 1.5 {{GameIcon|SSB}} (JP), 1.8 {{GameIcon|SSB}} (USA), 1.5 {{GameIcon|SSBM}}{{GameIcon|SSBB}}, 1.4 {{GameIcon|SSB4}}{{GameIcon|SSBU}} || 1 {{GameIcon|SSB}}{{GameIcon|SSBM}}{{GameIcon|SSBB}}, 1.4 {{GameIcon|SSB4}}{{GameIcon|SSBU}} || 1 || rowspan="3"| 50 |
| |- | | |- |
| | {{SSBU|Hero}} || Bounce || ? || ? || ? | | | ''[[Big Reflector]]'' || 1.2 || 1 || |
| |- | | |- |
| | {{SSBU|Joker}} || [[Rebel's Guard|Makarakarn]]**** || 1.6 || 1.9 || 50 | | | ''[[Amplifying Reflector]]'' || 2.1 || 1.8 || |
| |- | | |- |
| | {{SSBU|King Dedede}} || [[Inhale (King Dedede)|Inhale]] {{GameIcon|SSBU}} || 1.5 || 1.6 || — | | | {{SSBU|Hero}} || [[Command Selection|Bounce]]<ref>Selected randomly through Command Selection.</ref> || 1.5 || 1.4 || 1.1 || 50 |
| |- | | |- |
| | {{SSBU|King K. Rool}} || [[Gut Check]] || 1.5 || 2 || 50 | | | {{SSBU|Joker}} || [[Rebel's Guard|Makarakarn]]<ref>Only available while Arsene is active.</ref> || 1.6 || 1.9 || 0.7 || 50 |
| |- | | |- |
| | [[Lucas]] || Forward smash || 1.5 || 1.5 || 50 | | | {{SSBU|Kazuya}} || [[Left Splits Kick]] || 2.4 || 1.8 || 0.8 || 80 |
| |- | | |- |
| | rowspan="2"| [[Mario]] || [[Cape]] || 1.5 || 1 || 50 | | | {{SSBU|King Dedede}} || [[Inhale (King Dedede)|Inhale]] {{GameIcon|SSBU}} || 1.5 || 1.6 || || — |
| |- | | |- |
| | ''[[Gust Cape]]'' || 1.5 || 1 || 50 | | | {{SSBU|King K. Rool}} || [[Gut Check]] || 1.5 || 2 || 1 || 50 |
| |- | | |- |
| | {{SSB4|Mega Man}} || ''[[Skull Barrier]]'' || 1.2 || 1.2 || 25 | | | [[Lucas]] || Forward smash || 1.5 || 1.5 || 0.7 || 50 |
| |- | | |- |
| | [[Mewtwo]] || [[Confusion]]* || 1.4 || 1.2 || 50 | | | rowspan="2"| [[Mario]] || [[Cape]] || 1.5 || 1 || 0.75 || 50 |
| |- | | |- |
| | rowspan="2"| [[Mii Gunner]] || rowspan="2"| [[Echo Reflector]] || 1.4 {{GameIcon|SSB4}} || 1.1 {{GameIcon|SSB4}} || 50 | | | ''[[Gust Cape]]'' || 1.5 || 1 || || 50 |
| |- | | |- |
| | 1.5 {{GameIcon|SSBU}} || 1.9 {{GameIcon|SSBU}} || 50 | | | {{SSB4|Mega Man}} || ''[[Skull Barrier]]'' || 1.2 || 1.2 || || 25 |
| |- | | |- |
| | rowspan="2"| [[Mii Swordfighter]] || rowspan="2"| [[Reversal Slash]] || 1.5 {{GameIcon|SSB4}} || 1 {{GameIcon|SSB4}} || 50
| | | [[Mewtwo]] || [[Confusion]]<ref>In ''Melee'', simply reverses projectiles without changing their owner.</ref> || 1.4 || 1.2 || 1.25 || 50 |
| |- | | |- |
| | 1.8 {{GameIcon|SSBU}} || 1.5 {{GameIcon|SSBU}} || 50 | | | [[Mii Gunner]] || [[Echo Reflector]] || 1.4 {{GameIcon|SSB4}}, 1.5 {{GameIcon|SSBU}} || 1.1 {{GameIcon|SSB4}}, 1.9 {{GameIcon|SSBU}} || 1 || 50 |
| |- | | |- |
| | {{SSBU|Mr. Game & Watch}} || [[Oil Panic]]*** {{GameIcon|SSBU}} || 1 || 0.8 || 50 | | | [[Mii Swordfighter]] || [[Reversal Slash]] || 1.5 {{GameIcon|SSB4}}, 1.8 {{GameIcon|SSBU}} || 1 {{GameIcon|SSB4}}, 1.5 {{GameIcon|SSBU}} || 0.75 {{GameIcon|SSB4}}, 1 {{GameIcon|SSBU}} || 50 |
| |- | | |- |
| | rowspan="3"| [[Ness]] || rowspan="3"| Forward smash || rowspan="2"| 1.5 {{GameIcon|SSBM}} {{GameIcon|SSBB}} || 1 {{GameIcon|SSBM}} || 50 {{GameIcon|SSBM}} | | | {{SSBU|Min Min}} || Up smash || 1.8 || 2.4 || 0.8 || 80 |
| |- | | |- |
| | 1.5 {{GameIcon|SSBB}} || rowspan="2"| 80 {{GameIcon|SSBB}}{{GameIcon|SSB4}}{{GameIcon|SSBU}} | | | {{SSBU|Mr. Game & Watch}} || [[Oil Panic]]<ref name="absorb"/> {{GameIcon|SSBU}} || 1 || 0.8 || 0.8 || 50 |
| |- | | |- |
| | 2 {{GameIcon|SSB4}}{{GameIcon|SSBU}} || 2.5 {{GameIcon|SSB4}}{{GameIcon|SSBU}} | | | [[Ness]] || Forward smash || 1.5 {{GameIcon|SSB}} (JP), 1.8 {{GameIcon|SSB}} (US), 1.5 {{GameIcon|SSBM}} {{GameIcon|SSBB}}, 2 {{GameIcon|SSB4}}{{GameIcon|SSBU}} || 1 {{GameIcon|SSB}} {{GameIcon|SSBM}}, 1.5 {{GameIcon|SSBB}}, 2.5 {{GameIcon|SSB4}}{{GameIcon|SSBU}} || || — {{GameIcon|SSB}}, 50 {{GameIcon|SSBM}}, 80 {{GameIcon|SSBB}}{{GameIcon|SSB4}}{{GameIcon|SSBU}} |
| |- | | |- |
| | rowspan="2"| [[Palutena]] || rowspan="2"| [[Reflect Barrier]] || 1.17 {{GameIcon|SSB4}} || rowspan="2"| 1.25 || 50
| | | [[Palutena]] || [[Reflect Barrier]] || 1.17 {{GameIcon|SSB4}}, 1.4 {{GameIcon|SSBU}} || 1.25 || 1 || 50 |
| |- | | |- |
| | 1.4 {{GameIcon|SSBU}} || 50 | | | rowspan="7"| [[Pit]] || [[Angel Ring]] || 1.5 || 1 || || 50 |
| |- | | |- |
| | rowspan="7"| [[Pit]] || [[Angel Ring]] || 1.5 || 1 || 50
| | | [[Mirror Shield]] || 1.5 || 1.7 || || 50 |
| |- | | |- |
| | [[Mirror Shield]] || 1.5 || 1.7 || 50 | | | [[Upperdash Arm]]<ref name="arm"/> || 1 || 1 || 1 || 50 |
| |- | | |- |
| | [[Upperdash Arm]]** || 1 || 1 || 50 | | | ''[[Interception Arm]]''<ref name="arm"/> || 1 || 1 || || 50 |
| |- | | |- |
| | ''[[Interception Arm]]''** || 1 || 1 || 50 | | | ''[[Quickdash Arm]]'' || 1.3 || 1 || || 50 |
| |- | | |- |
| | ''[[Quickdash Arm]]''** || 1.3 || 1 || 50 | | | [[Guardian Orbitars]] || 1.5 || 1.7 || 0.7 || 50 |
| |- | | |- |
| | [[Guardian Orbitars]] || 1.5 || 1.7 || 50 | | | ''[[Amplifying Orbitars]]'' || 2 || 2 || || 50 |
| |- | | |- |
| | ''[[Amplifying Orbitars]]'' || 2 || 2 || 50 | | | rowspan="3"| [[R.O.B.]] || [[Arm Rotor]] || 1.5 || 1 {{GameIcon|SSBB}}, 1.3 {{GameIcon|SSB4}}{{GameIcon|SSBU}} || 1 || 50 |
| |- | | |- |
| | rowspan="4"| [[R.O.B.]] || rowspan="2"| [[Arm Rotor]] || rowspan="2"| 1.5 || 1 {{GameIcon|SSBB}} || 50 | | | ''[[Reflector Arm]]'' || 1.8 || 1.5 || || 50 |
| |- | | |- |
| | 1.3 {{GameIcon|SSB4}}{{GameIcon|SSBU}} || 50 | | | ''[[Backward Arm Rotor]]'' || 1.5 || 1.3 || || 50 |
| |- | | |- |
| | ''[[Reflector Arm]]'' || 1.8 || 1.5 || 50 | | | {{SSBU|Sora}} || [[Counterattack (Sora)|Counterattack]]<ref name="straight"/> || 1.4 || {{rollover|1|1.8 but ignored in game|y}} || {{rollover|1|0.5 but ignored in game|y}} || 80 |
| |- | | |- |
| | ''[[Backward Arm Rotor]]'' || 1.5 || 1.3 || 50 | | | [[Wolf]] || [[Reflector (Wolf)|Reflector]] || 1.3 {{GameIcon|SSBB}}, 1.5 {{GameIcon|SSBU}} || 1.8 || 0.5 || 50 |
| |- | | |- |
| | rowspan="2"| [[Wolf]] || rowspan="2"| [[Reflector (Wolf)|Reflector]] || 1.3 {{GameIcon|SSBB}} || rowspan="2"| 1.8 || 50 | | | rowspan="2"| [[Zelda]] || [[Nayru's Love]] || 1.5 {{GameIcon|SSBM}}, 1.2 {{GameIcon|SSBB}}, 1.25 {{GameIcon|SSB4}}{{GameIcon|SSBU}} || 1 {{GameIcon|SSBM}}, 1.2 {{GameIcon|SSBB}}, 1.4 {{GameIcon|SSB4}}{{GameIcon|SSBU}} || 0.75 || 50 |
| |- | | |- |
| | 1.5 {{GameIcon|SSBU}} || 50 | | | ''[[Nayru's Rejection]]'' || 1.25 || 1.2 || || 50 |
| |- | | |- |
| | rowspan="4"| [[Zelda]] || rowspan="3"| [[Nayru's Love]] || 1.5 {{GameIcon|SSBM}} || 1 {{GameIcon|SSBM}} || 50
| | |[[Home-Run Bat]]{{GameIcon|SSB4}}{{GameIcon|SSBU}}||Forward smash||2||2.5||0.5|| 80 |
| |- | | |- |
| | 1.2 {{GameIcon|SSBB}} || 1.2 {{GameIcon|SSBB}} || 50 | | |colspan=2|[[Franklin Badge]]||1.3||1.3|| 0.5 || 50 |
| |- | | |- |
| | 1.25 {{GameIcon|SSB4}}{{GameIcon|SSBU}} || 1.4 {{GameIcon|SSB4}}{{GameIcon|SSBU}} || 50 | | |colspan=2|[[Gardevoir]]||1.3||1.3|| ||100 |
| |- | | |- |
| | ''[[Nayru's Rejection]]'' || 1.25 || 1.2 || 50 | | |colspan=2|[[Ghirahim]]||1||1.3|| ||30 |
| |- | | |- |
| |[[Franklin Badge]]||||1.3||1.3||— | | |colspan=2|[[Color TV-Game 15]]||1.1||?||?||? |
| |- | | |- |
| |[[Gray Fox]]||||1.0||1.0|||100 | | |colspan=2|[[Gray Fox]]||1||1|| ||100 |
| |- | | |- |
| |[[Gardevoir]]||||2.2||1.3||100 | | |colspan=2|[[Shovel Knight]]||1.2||1||1.15||? |
| |-
| |
| |[[Home-Run Bat]] {{GameIcon|SSB4}}{{GameIcon|SSBU}}||||2.0||?||?
| |
| |} | | |} |
| <small><nowiki>*</nowiki> Confusion in ''Melee'' simply reverses projectiles without changing their owner.</small> | | <references/> |
| | |
| <small><nowiki>**</nowiki> Upperdash Arm and Electroshock Arm does not change the ownership of certain projectiles reflected.</small>
| |
| | |
| <small><nowiki>***</nowiki> Can only reflect physical projectiles while absorbing energy based projectiles.</small>
| |
| | |
| <small><nowiki>****</nowiki> Only available when Arsene is active.</small>
| |
| | |
| In ''SSB64'' and ''Melee'', if a projectile is too strong for a reflector, the reflector breaks (as if it was a [[shield]]) and [[stun]]s its user. In ''Brawl'' and ''SSB4'', the overpowered projectile simply ignores the reflector and hits its user anyway. In the case of Ness's or Lucas's forward smash, should the overpowered projectile collide with the move's hitbox without striking the user, he will undergo a proportionally-substantial amount of lag due to being [[priority|outprioritized]].
| |
| | |
| Reflectors are generally very useful moves that can be vital, as they help prevent projectile [[camping]] and [[spamming]]. As such, characters with reliable reflectors tend to have better matchups against characters that rely upon projectiles, such as [[Samus]], than those who lack a reliable reflector.
| |
| | |
| In addition to the above, {{SSBU|Villager}} and {{SSBU|Isabelle}} are able to grab projectiles and items and store them for later use via [[Pocket]]. While not strictly a reflector, retrieved projectiles gain a 1.9x damage multiplier generally associated with reflectors.
| |
|
| |
|
| ==List of reflectable attacks== | | ==List of reflectable attacks== |
| {{incomplete|Final Smashes and Custom Moves, Smash Run enemies, needs [[Super Smash Bros. Ultimate]] update}}
| | These attacks can also be blocked by the [[passive shield]]s worn by [[Link]] (from ''Melee'' onward), [[Young Link]], [[Toon Link]], and [[Hero]]. |
|
| |
|
| | ===By characters=== |
| {| class="wikitable" | | {| class="wikitable" |
| | ! Character !! Move |
| |- | | |- |
| ! scope="col"|User/Item
| | |[[Banjo & Kazooie]]||[[Egg Firing / Breegull Blaster]], the pad of [[Shock Spring Jump]], [[Rear Egg]] |
| ! scope="col"|Move
| |
| ! scope="col"|Part of Move
| |
| ! scope="col"|Games
| |
| |-
| |
| ! scope="row" colspan=4|{{anchor|By Characters}} By Characters
| |
| |- | | |- |
| | rowspan=1|[[Bayonetta]] || [[Bullet Climax]] || Entire move ||
| | |[[Bayonetta]]||[[Bullet Climax]] |
| [[File:SSB4 Icon.png|24px|link=Super Smash Bros. 4]]
| |
| [[File:SSBU Icon.png|24px|link=Super Smash Bros. Ultimate]]
| |
| |- | | |- |
| | rowspan=1|[[Bowser]] ([[Giga Bowser]]) || [[Fire Breath]] || Entire move ||
| | |[[Bowser]] ([[Giga Bowser]])||[[Fire Breath]] |
| [[File:SSBM Icon.png|24px|link=Super Smash Bros. Melee]]
| |
| [[File:SSBB Icon.png|24px|link=Super Smash Bros. Brawl]]
| |
| [[File:SSB4 Icon.png|24px|link=Super Smash Bros. 4]]
| |
| [[File:SSBU Icon.png|24px|link=Super Smash Bros. Ultimate]]
| |
| |- | | |- |
| | rowspan=2|[[Bowser Jr.]] || [[Clown Cannon]] || Entire move ||
| | |[[Bowser Jr.]]||[[Clown Cannon]], [[Mechakoopa]] both when walking and when thrown as an item |
| [[File:SSB4 Icon.png|24px|link=Super Smash Bros. 4]] | |
| [[File:SSBU Icon.png|24px|link=Super Smash Bros. Ultimate]]
| |
| |- | | |- |
| | [[Mechakoopa]] || Walking; Thrown || | | |[[Byleth]]||[[Failnaught]]<ref>When fully charged, cannot be pocketed or inhaled</ref>, [[Sword of the Creator]]<ref name="shield">Does not change trajectory nor damages the user when reflected, instead act as if they were [[shield]]ed.</ref> |
| [[File:SSB4 Icon.png|24px|link=Super Smash Bros. 4]] | |
| [[File:SSBU Icon.png|24px|link=Super Smash Bros. Ultimate]] | |
| |- | | |- |
| | rowspan=2|[[Charizard]] || [[Flamethrower]] || Entire move ||
| | |[[Charizard]]||[[Flamethrower]], [[Rock Smash]] fragments, [[Flare Blitz]] explosion |
| [[File:SSBB Icon.png|24px|link=Super Smash Bros. Brawl]] | |
| [[File:SSB4 Icon.png|24px|link=Super Smash Bros. 4]] | |
| [[File:SSBU Icon.png|24px|link=Super Smash Bros. Ultimate]]
| |
| |- | | |- |
| | [[Rock Smash]] || Fragments || | | |[[Cloud]]||[[Blade Beam]] both normally and in [[Limit Break]] |
| [[File:SSBB Icon.png|24px|link=Super Smash Bros. Brawl]] | |
| [[File:SSB4 Icon.png|24px|link=Super Smash Bros. 4]] | |
| |- | | |- |
| | rowspan=1|[[Cloud]] || [[Blade Beam]] || Entire move ||
| | |[[Corrin]]||[[Dragon Fang Shot]]'s projectile |
| [[File:SSB4 Icon.png|24px|link=Super Smash Bros. 4]]
| |
| [[File:SSBU Icon.png|24px|link=Super Smash Bros. Ultimate]]
| |
| | |
| |- | | |- |
| | rowspan=1|[[Corrin]] || [[Dragon Fang Shot]] || Water Projectile ||
| | |[[Daisy]]||[[Toad_(move)|Toad]]'s spores, [[Vegetable]]s when thrown |
| [[File:SSB4 Icon.png|24px|link=Super Smash Bros. 4]] | |
| [[File:SSBU Icon.png|24px|link=Super Smash Bros. Ultimate]] | |
| |- | | |- |
| | rowspan=2|[[Daisy]] || [[Toad_(move)|Toad]] || Entire move ||
| | |[[Dark Samus]]||[[Charge Shot]], [[Missile]], {{b|Bomb|Samus}} |
| [[File:SSBU Icon.png|24px|link=Super Smash Bros. Ultimate]] | |
| |- | | |- |
| | [[Vegetable]] || Thrown || | | |[[Dark Pit]]||[[Silver Bow]] |
| [[File:SSBU Icon.png|24px|link=Super Smash Bros. Ultimate]] | |
| |- | | |- |
| | rowspan=3|[[Dark Samus]] || [[Charge Shot]] || Entire move ||
| | |[[Diddy Kong]]||[[Peanut Popgun]], stray barrels from [[Rocketbarrel Boost]], [[Banana Peel]] whether stationary or thrown |
| [[File:SSBU Icon.png|24px|link=Super Smash Bros. Ultimate]] | |
| |- | | |- |
| | [[Missile]] || Entire move || | | |[[Dr. Mario]]||[[Megavitamin]] |
| [[File:SSBU Icon.png|24px|link=Super Smash Bros. Ultimate]] | |
| |- | | |- |
| | {{b|Bomb|Samus}} || Entire move || | | |[[Duck Hunt]]||[[Trick Shot]] can, [[Clay Shooting]] clay pigeon, [[Wild Gunman]] gunfire |
| [[File:SSBU Icon.png|24px|link=Super Smash Bros. Ultimate]] | |
| |- | | |- |
| | rowspan=1|[[Dark Pit]] || [[Silver Bow]] || Entire move ||
| | |[[Falco]]||Blaster shots from [[up throw]], [[back throw]], and [[down throw]]; {{b|Blaster|Falco}}, [[Reflector (Falco)|Reflector]]<ref name="nah">Does not change trajectory when reflected.</ref> <small>({{GameIcon|SSB4}} only)</small> |
| [[File:SSB4 Icon.png|24px|link=Super Smash Bros. 4]] | |
| [[File:SSBU Icon.png|24px|link=Super Smash Bros. Ultimate]] | |
| |- | | |- |
| | rowspan=3|[[Diddy Kong]] || [[Peanut Popgun]] || Entire move ||
| | |[[Fox]]||Blaster shots from [[up throw]], [[back throw]], and [[down throw]]; {{b|Blaster|Fox}} |
| [[File:SSBB Icon.png|24px|link=Super Smash Bros. Brawl]] | |
| [[File:SSB4 Icon.png|24px|link=Super Smash Bros. 4]] | |
| [[File:SSBU Icon.png|24px|link=Super Smash Bros. Ultimate]]
| |
| |- | | |- |
| | [[Rocketbarrel Boost]] || Loose barrels || | | |[[Greninja]]||[[Water Shuriken]], [[Hydro Pump]] |
| [[File:SSBB Icon.png|24px|link=Super Smash Bros. Brawl]] | |
| [[File:SSB4 Icon.png|24px|link=Super Smash Bros. 4]] | |
| [[File:SSBU Icon.png|24px|link=Super Smash Bros. Ultimate]]
| |
| |-
| |
| | [[Banana_Peel_(move)|Banana Peel]] || Entire move; Thrown ||
| |
| [[File:SSBB Icon.png|24px|link=Super Smash Bros. Brawl]]
| |
| [[File:SSB4 Icon.png|24px|link=Super Smash Bros. 4]]
| |
| [[File:SSBU Icon.png|24px|link=Super Smash Bros. Ultimate]]
| |
| |- | | |- |
| | rowspan=1|[[Dr. Mario]] || [[Megavitamin]] || Entire move ||
| | |[[Hero]]||[[Frizz/Frizzle/Kafrizz]], [[Kazap]] (first half), [[Woosh/Swoosh/Kaswoosh]], [[Kaboom]], [[Bang]], [[Sizzle]], [[Sizz]], [[Snooze]], [[Whack]], [[Thwack]] |
| [[File:SSBM Icon.png|24px|link=Super Smash Bros. Melee]] | |
| [[File:SSB4 Icon.png|24px|link=Super Smash Bros. 4]] | |
| [[File:SSBU Icon.png|24px|link=Super Smash Bros. Ultimate]] | |
| |- | | |- |
| | rowspan=3|[[Duck Hunt]] || [[Trick Shot]] || Can ||
| | |[[Ice Climbers]]||[[Ice Shot]], [[Blizzard]] |
| [[File:SSB4 Icon.png|24px|link=Super Smash Bros. 4]] | |
| [[File:SSBU Icon.png|24px|link=Super Smash Bros. Ultimate]]
| |
| |- | | |- |
| | [[Clay Pigeon]] || Clay pigeon || | | |[[Inkling]]||[[Splattershot]], [[Splat Bomb]] |
| [[File:SSB4 Icon.png|24px|link=Super Smash Bros. 4]] | |
| [[File:SSBU Icon.png|24px|link=Super Smash Bros. Ultimate]] | |
| |- | | |- |
| | [[Wild Gunman]] || Shot || | | |[[Isabelle]]||[[Dash attack]], [[forward aerial]], [[back aerial]], [[Fishing Rod]]<ref name="shield"/>, [[Lloid Trap]] |
| [[File:SSB4 Icon.png|24px|link=Super Smash Bros. 4]] | |
| [[File:SSBU Icon.png|24px|link=Super Smash Bros. Ultimate]] | |
| |- | | |- |
| | rowspan=2|[[Falco]] || {{b|Blaster|Falco}} || <span class="explain" title="Used as Special, Up Throw, or Down Throw">Entire move</span> ||
| | |[[Ivysaur]]||[[Bullet Seed]], [[Razor Leaf]] |
| [[File:SSBM Icon.png|24px|link=Super Smash Bros. Melee]] | |
| [[File:SSBB Icon.png|24px|link=Super Smash Bros. Brawl]]
| |
| [[File:SSB4 Icon.png|24px|link=Super Smash Bros. 4]] | |
| [[File:SSBU Icon.png|24px|link=Super Smash Bros. Ultimate]]
| |
| |- | | |- |
| | [[Reflector (Falco)|Reflector]] || <span class="explain" title="Does not affect trajectory">Entire move</span> || | | |[[Joker]]||[[Eiha]], [[Eigaon]], [[Grappling Hook]]<ref name="shield"/> |
| [[File:SSB4 Icon.png|24px|link=Super Smash Bros. 4]]
| |
| |- | | |- |
| | rowspan=1|[[Fox]] || {{b|Blaster|Fox}} || <span class="explain" title="Used as Special, Up Throw, or Down Throw">Entire move</span> ||
| | |[[Kazuya]]||[[Devil Blaster]], beam shot from [[up throw]] |
| [[File:SSB64 Icon.png|24px|link=Super Smash Bros.]] | |
| [[File:SSBM Icon.png|24px|link=Super Smash Bros. Melee]]
| |
| [[File:SSBB Icon.png|24px|link=Super Smash Bros. Brawl]] | |
| [[File:SSB4 Icon.png|24px|link=Super Smash Bros. 4]]
| |
| [[File:SSBU Icon.png|24px|link=Super Smash Bros. Ultimate]]
| |
| |- | | |- |
| | rowspan=2|[[Greninja]] || [[Water Shuriken]] || Entire move ||
| | |[[Ken]]||[[Hadoken]] |
| [[File:SSB4 Icon.png|24px|link=Super Smash Bros. 4]]
| |
| [[File:SSBU Icon.png|24px|link=Super Smash Bros. Ultimate]]
| |
| |- | | |- |
| | [[Hydro Pump]] || Entire move || | | |[[King Dedede]]||Waddle Dees, Waddle Doos, and Gordos thrown by [[Waddle Dee Toss]]<ref>When reflected, Waddle Dees and Waddle Doos will not switch ownership.</ref> <small>({{GameIcon|SSBB}} only)</small>, [[Waddle Doo]]'s beam attack <small>({{GameIcon|SSBB}} only)</small>, [[Gordo Throw]] <small>({{GameIcon|SSB4}} onwards)</small>, [[Super Dedede Jump]] landing stars |
| [[File:SSB4 Icon.png|24px|link=Super Smash Bros. 4]] | |
| [[File:SSBU Icon.png|24px|link=Super Smash Bros. Ultimate]] | |
| |- | | |- |
| | rowspan=2|[[Ice Climbers]] || [[Ice Shot]] || Entire move ||
| | |[[King K. Rool]]||[[Blunderbuss]] (Cannonball), [[Crownerang]] |
| [[File:SSBM Icon.png|24px|link=Super Smash Bros. Melee]]
| |
| [[File:SSBB Icon.png|24px|link=Super Smash Bros. Brawl]]
| |
| [[File:SSBU Icon.png|24px|link=Super Smash Bros. Ultimate]] | |
| |- | | |- |
| | [[Blizzard]] || Entire move || | | |[[Kirby]]||All reflectable attacks he can [[Inhale (Kirby)|copy]], [[Final Cutter]] projectile |
| [[File:SSBM Icon.png|24px|link=Super Smash Bros. Melee]] | |
| [[File:SSBB Icon.png|24px|link=Super Smash Bros. Brawl]] | |
| [[File:SSBU Icon.png|24px|link=Super Smash Bros. Ultimate]]
| |
| |- | | |- |
| | rowspan=2|[[Inkling]] || [[Splattershot]] || Entire move || | | |[[Link]]||[[Forward smash]] sword beam <small>({{GameIcon|SSBU}} only)</small>, [[Hero's Bow]] <small>(before {{GameIcon|SSBU}})</small>, [[Bow and Arrows]] whether fired or thrown as items <small>({{GameIcon|SSBU}} only)</small>, [[Boomerang]] <small>({{GameIcon|SSB}}{{GameIcon|SSBM}}{{GameIcon|SSBU}} only)</small>, [[Gale Boomerang]] <small>({{GameIcon|SSBB}}{{GameIcon|SSB4}} only)</small>, {{b|Bomb|Link}} <small>(before {{GameIcon|SSBU}})</small>, [[Remote Bomb]] <small>({{GameIcon|SSBU}} only)</small> |
| [[File:SSBU Icon.png|24px|link=Super Smash Bros. Ultimate]] | |
| |- | | |- |
| | [[Splat Bomb]] || Entire move || | | |[[Lucario]]||[[Aura Sphere]] when launched, [[Force Palm]] blast |
| [[File:SSBU Icon.png|24px|link=Super Smash Bros. Ultimate]] | |
| |- | | |- |
| | rowspan=3|[[Isabelle]] || [[Forward aerial]] || Entire move ||
| | |[[Lucas]]||[[PK Freeze]]<ref name="nah"/>, [[PK Fire]], [[PK Thunder]] |
| [[File:SSBU Icon.png|24px|link=Super Smash Bros. Ultimate]] | |
| |- | | |- |
| | [[Back aerial]] || Entire move || | | |[[Luigi]]||[[Fireball]] |
| [[File:SSBU Icon.png|24px|link=Super Smash Bros. Ultimate]] | |
| |- | | |- |
| | [[Lloid Trap]] || Lloid missile || | | |[[Mario]]||[[Fireball]], [[F.L.U.D.D.]] <small>({{GameIcon|SSBB}} onwards)</small> |
| [[File:SSBU Icon.png|24px|link=Super Smash Bros. Ultimate]] | |
| |- | | |- |
| | rowspan=2|[[Ivysaur]] || [[Bullet Seed]] || Entire move ||
| | |[[Mega Man]]||[[Neutral attack]], [[forward tilt]], [[forward smash]], [[neutral aerial]], [[up aerial]], [[down aerial]], [[Metal Blade]], [[Crash Bomber]], [[Leaf Shield]] once thrown |
| [[File:SSBB Icon.png|24px|link=Super Smash Bros. Brawl]] | |
| [[File:SSBU Icon.png|24px|link=Super Smash Bros. Ultimate]] | |
| |- | | |- |
| | [[Razor Leaf]] || Entire move || | | |[[Mewtwo]]||[[Forward throw]] shots, [[Shadow Ball]], [[Disable]] |
| [[File:SSBB Icon.png|24px|link=Super Smash Bros. Brawl]] | |
| [[File:SSBU Icon.png|24px|link=Super Smash Bros. Ultimate]] | |
| |- | | |- |
| | rowspan=3|[[Joker]] || [[Eiha]] || Entire move ||
| | |[[Mii Brawler]]||[[Shot Put]] |
| [[File:SSBU Icon.png|24px|link=Super Smash Bros. Ultimate]]
| |
| |- | | |- |
| | [[Eigaon]] || Entire move || | | |[[Mii Gunner]]||[[Forward aerial]], [[Charge Blast]], [[Laser Blaze]], [[Grenade Launch]], [[Flame Pillar]], [[Stealth Burst]] at the moment of detonation<ref name="nah"/>, [[Lunar Launch]], [[Bomb Drop]] |
| [[File:SSBU Icon.png|24px|link=Super Smash Bros. Ultimate]] | |
| |- | | |- |
| | [[Grappling Hook]] || <span class="explain" title="Does not change trajectory.">Entire move</span> || | | |[[Mii Swordfighter]]||[[Gale Strike]], [[Shuriken of Light]], [[Chakram]] |
| [[File:SSBU Icon.png|24px|link=Super Smash Bros. Ultimate]] | |
| |- | | |- |
| | rowspan=4|[[King Dedede]] || rowspan=2|[[Waddle Dee Toss]] || <span class="explain" title="When reflected, Waddle Dees and Waddle Doos will not switch ownership.">Thrown</span> ||
| | |[[Mr. Game & Watch]]||[[Forward aerial]]<ref name="nah"/> <small>({{GameIcon|SSBU}} only)</small>, [[up aerial]] <small>({{GameIcon|SSBU}} only)</small>, [[Chef]] |
| [[File:SSBB Icon.png|24px|link=Super Smash Bros. Brawl]] | |
| |- | | |- |
| | [[Waddle Doo]]'s beam attack || | | |[[Mythra]]||[[Ray of Punishment / Chroma Dust]] |
| [[File:SSBB Icon.png|24px|link=Super Smash Bros. Brawl]] | |
| |- | | |- |
| | [[Gordo Throw]] || Entire move || | | |[[Ness]]||[[PK Flash]]<ref name="nah"/>, [[PK Fire]], [[PK Thunder]] |
| [[File:SSB4 Icon.png|24px|link=Super Smash Bros. 4]] | |
| [[File:SSBU Icon.png|24px|link=Super Smash Bros. Ultimate]] | |
| |- | | |- |
| | [[Super Dedede Jump]] || Stars || | | |[[Olimar]]||[[Forward smash]] <small>({{GameIcon|SSB4}} onwards)</small>, [[Up smash]] <small>({{GameIcon|SSB4}} onwards)</small>, [[Down smash]] <small>({{GameIcon|SSB4}} onwards)</small>, [[Pikmin Throw]] |
| [[File:SSBB Icon.png|24px|link=Super Smash Bros. Brawl]] | |
| [[File:SSB4 Icon.png|24px|link=Super Smash Bros. 4]] | |
| [[File:SSBU Icon.png|24px|link=Super Smash Bros. Ultimate]] | |
| |- | | |- |
| | rowspan=2|[[Kirby]] || [[Inhale (Kirby)|Copy Ability]] || Some [[neutral special move]]s || | | |[[Pac-Man]]||All [[Bonus Fruit]] projectiles, [[Fire Hydrant]] while falling, Fire Hydrant water blasts |
| [[File:SSB64 Icon.png|24px|link=Super Smash Bros.]] | |
| [[File:SSBM Icon.png|24px|link=Super Smash Bros. Melee]]
| |
| [[File:SSBB Icon.png|24px|link=Super Smash Bros. Brawl]]
| |
| [[File:SSB4 Icon.png|24px|link=Super Smash Bros. 4]] | |
| [[File:SSBU Icon.png|24px|link=Super Smash Bros. Ultimate]] | |
| |- | | |- |
| | [[Final Cutter]] || Wave || | | |[[Palutena]]||[[Autoreticle]], [[Explosive Flame]] |
| [[File:SSB64 Icon.png|24px|link=Super Smash Bros.]]
| |
| [[File:SSBM Icon.png|24px|link=Super Smash Bros. Melee]]
| |
| [[File:SSBB Icon.png|24px|link=Super Smash Bros. Brawl]]
| |
| [[File:SSB4 Icon.png|24px|link=Super Smash Bros. 4]] | |
| [[File:SSBU Icon.png|24px|link=Super Smash Bros. Ultimate]] | |
| |- | | |- |
| | rowspan=4|[[Link]] || [[Hero's Bow]] || Entire move ||
| | |[[Peach]]||[[Toad_(move)|Toad]]'s spores, [[Vegetable]]s when thrown |
| [[File:SSBM Icon.png|24px|link=Super Smash Bros. Melee]]
| |
| [[File:SSBB Icon.png|24px|link=Super Smash Bros. Brawl]] | |
| [[File:SSB4 Icon.png|24px|link=Super Smash Bros. 4]]
| |
| [[File:SSBU Icon.png|24px|link=Super Smash Bros. Ultimate]]
| |
| |- | | |- |
| | [[Boomerang]] || Entire move || | | |[[Pichu]]||[[Thunder Jolt]], {{b|Thunder|Pokémon}}<ref name="nah"/> |
| [[File:SSB64 Icon.png|24px|link=Super Smash Bros.]]
| |
| [[File:SSBM Icon.png|24px|link=Super Smash Bros. Melee]] | |
| [[File:SSBU Icon.png|24px|link=Super Smash Bros. Ultimate]]
| |
| |- | | |- |
| | [[Gale Boomerang]] || Entire move || | | |[[Pikachu]]||[[Thunder Jolt]], {{b|Thunder|Pokémon}}<ref name="nah"/> <small>({{GameIcon|SSBM}} onwards)</small> |
| [[File:SSBB Icon.png|24px|link=Super Smash Bros. Brawl]] | |
| [[File:SSB4 Icon.png|24px|link=Super Smash Bros. 4]]
| |
| |- | | |- |
| | {{b|Bomb|Link}} || Thrown || | | |[[Piranha Plant]]||[[Ptooie]], [[Poison Breath]] |
| [[File:SSB64 Icon.png|24px|link=Super Smash Bros.]]
| |
| [[File:SSBM Icon.png|24px|link=Super Smash Bros. Melee]] | |
| [[File:SSBB Icon.png|24px|link=Super Smash Bros. Brawl]]
| |
| [[File:SSB4 Icon.png|24px|link=Super Smash Bros. 4]] | |
| [[File:SSBU Icon.png|24px|link=Super Smash Bros. Ultimate]] | |
| |- | | |- |
| | rowspan=2|[[Lucario]] || [[Aura Sphere]] || Entire move || | | ||[[Pit]]||[[Palutena Bow]] |
| [[File:SSBB Icon.png|24px|link=Super Smash Bros. Brawl]]
| |
| [[File:SSB4 Icon.png|24px|link=Super Smash Bros. 4]]
| |
| [[File:SSBU Icon.png|24px|link=Super Smash Bros. Ultimate]]
| |
| |- | | |- |
| | [[Force Palm]] || Damaging portion || | | |[[Pyra]]||[[Blazing End]] |
| [[File:SSBB Icon.png|24px|link=Super Smash Bros. Brawl]]
| |
| [[File:SSB4 Icon.png|24px|link=Super Smash Bros. 4]]
| |
| [[File:SSBU Icon.png|24px|link=Super Smash Bros. Ultimate]] | |
| | |
| |- | | |- |
| | rowspan=3|[[Lucas]] || [[PK Freeze]] || Entire move ||
| | |[[R.O.B.]]||[[Robo Beam]], [[Gyro]] both when launched and when thrown |
| [[File:SSBB Icon.png|24px|link=Super Smash Bros. Brawl]]
| |
| [[File:SSB4 Icon.png|24px|link=Super Smash Bros. 4]] | |
| [[File:SSBU Icon.png|24px|link=Super Smash Bros. Ultimate]] | |
| |- | | |- |
| | [[PK Fire]] || Entire move || | | ||[[Richter]]||[[Axe]], [[Cross]], [[Holy Water]] |
| [[File:SSBB Icon.png|24px|link=Super Smash Bros. Brawl]] | |
| [[File:SSB4 Icon.png|24px|link=Super Smash Bros. 4]] | |
| [[File:SSBU Icon.png|24px|link=Super Smash Bros. Ultimate]] | |
| |- | | |- |
| | [[PK Thunder]] || Lightning ball || | | |[[Ridley]]||[[Plasma Breath]] |
| [[File:SSBB Icon.png|24px|link=Super Smash Bros. Brawl]]
| |
| [[File:SSB4 Icon.png|24px|link=Super Smash Bros. 4]]
| |
| [[File:SSBU Icon.png|24px|link=Super Smash Bros. Ultimate]] | |
| |- | | |- |
| | rowspan=1| [[Luigi]] || [[Fireball]] || Entire move ||
| | |[[Robin]]||All {{b|Thunder|Robin}} projectiles, [[Arcfire]], [[Elwind]], Levin Sword and all Tomes once expired and thrown as items |
| [[File:SSB64 Icon.png|24px|link=Super Smash Bros.]] | |
| [[File:SSBM Icon.png|24px|link=Super Smash Bros. Melee]] | |
| [[File:SSBB Icon.png|24px|link=Super Smash Bros. Brawl]]
| |
| [[File:SSB4 Icon.png|24px|link=Super Smash Bros. 4]]
| |
| [[File:SSBU Icon.png|24px|link=Super Smash Bros. Ultimate]]
| |
| |- | | |- |
| | rowspan=2|[[Mario]] || [[Fireball]] || Entire move ||
| | |[[Rosalina]]||[[Luma Shot]], [[Star Bits]] ({{GameIcon|SSBU}} only) |
| [[File:SSB64 Icon.png|24px|link=Super Smash Bros.]]
| |
| [[File:SSBM Icon.png|24px|link=Super Smash Bros. Melee]] | |
| [[File:SSBB Icon.png|24px|link=Super Smash Bros. Brawl]] | |
| [[File:SSB4 Icon.png|24px|link=Super Smash Bros. 4]]
| |
| [[File:SSBU Icon.png|24px|link=Super Smash Bros. Ultimate]]
| |
| |- | | |- |
| | [[F.L.U.D.D.]] || Entire move || | | |[[Ryu]]||[[Hadoken]] |
| [[File:SSBB Icon.png|24px|link=Super Smash Bros. Brawl]]
| |
| [[File:SSB4 Icon.png|24px|link=Super Smash Bros. 4]]
| |
| [[File:SSBU Icon.png|24px|link=Super Smash Bros. Ultimate]] | |
| |- | | |- |
| | rowspan=9|[[Mega Man]] || [[Neutral attack]] || Entire move ||
| | |[[Samus]]||[[Charge Shot]], [[Missile]], {{b|Bomb|Samus}} |
| [[File:SSB4 Icon.png|24px|link=Super Smash Bros. 4]] | |
| [[File:SSBU Icon.png|24px|link=Super Smash Bros. Ultimate]]
| |
| |- | | |- |
| | [[Forward tilt]] || Entire move || | | |[[Sephiroth]]||[[Flare / Megaflare / Gigaflare]]<ref name="nah"/>, [[Shadow Flare]], [[Scintilla]] |
| [[File:SSB4 Icon.png|24px|link=Super Smash Bros. 4]] | |
| [[File:SSBU Icon.png|24px|link=Super Smash Bros. Ultimate]] | |
| |- | | |- |
| | [[Neutral aerial]] || Entire move || | | |[[Sheik]]||[[Needle Storm]], [[Burst Grenade]] <small>({{GameIcon|SSB4}} onwards)</small> |
| [[File:SSB4 Icon.png|24px|link=Super Smash Bros. 4]] | |
| [[File:SSBU Icon.png|24px|link=Super Smash Bros. Ultimate]] | |
| |- | | |- |
| | [[Up aerial]] || Entire move || | | |[[Simon]]||[[Axe]], [[Cross]], [[Holy Water]] |
| [[File:SSB4 Icon.png|24px|link=Super Smash Bros. 4]] | |
| [[File:SSBU Icon.png|24px|link=Super Smash Bros. Ultimate]] | |
| |- | | |- |
| | [[Down aerial]] || Entire move || | | |[[Snake]]||[[Up smash]] bomb, [[Hand Grenade]], [[Remote Missile]], independently flying [[Cypher]], [[List_of_taunts_(SSBB)#Snake|Box]] |
| [[File:SSB4 Icon.png|24px|link=Super Smash Bros. 4]] | |
| [[File:SSBU Icon.png|24px|link=Super Smash Bros. Ultimate]] | |
| |- | | |- |
| | [[Forward smash]] || Entire move || | | |[[Sonic]]||The falling spring from aerial [[Spring Jump]] |
| [[File:SSB4 Icon.png|24px|link=Super Smash Bros. 4]]
| |
| [[File:SSBU Icon.png|24px|link=Super Smash Bros. Ultimate]] | |
| |- | | |- |
| | [[Metal Blade]] || Entire move || | | |[[Sora]]||All 3 moves of [[Magic]] |
| [[File:SSB4 Icon.png|24px|link=Super Smash Bros. 4]]
| |
| [[File:SSBU Icon.png|24px|link=Super Smash Bros. Ultimate]] | |
| |- | | |- |
| | [[Crash Bomber]] || Entire move || | | |[[Squirtle]]||[[Water Gun]]<ref>In ''Brawl'', Water Gun is only reflectible when at least partially charged.</ref> |
| [[File:SSB4 Icon.png|24px|link=Super Smash Bros. 4]] | |
| [[File:SSBU Icon.png|24px|link=Super Smash Bros. Ultimate]]
| |
| |- | | |- |
| | [[Leaf Shield]] || When thrown || | | |[[Steve]]||[[Down smash]], [[Down aerial]], [[Minecart]], [[TNT]], [[Down throw]], [[Down tilt]] |
| [[File:SSB4 Icon.png|24px|link=Super Smash Bros. 4]] | |
| [[File:SSBU Icon.png|24px|link=Super Smash Bros. Ultimate]] | |
| |- | | |- |
| | rowspan=3|[[Mewtwo]] || [[Shadow Ball]] || Entire move ||
| | |[[Terry]]||[[Power Wave]] |
| [[File:SSBM Icon.png|24px|link=Super Smash Bros. Melee]] | |
| [[File:SSB4 Icon.png|24px|link=Super Smash Bros. 4]]
| |
| [[File:SSBU Icon.png|24px|link=Super Smash Bros. Ultimate]]
| |
| |- | | |- |
| | [[Disable]] || Entire move || | | |[[Toon Link]]||[[Hero's Bow]], [[Boomerang]], {{b|Bomb|Link}} |
| [[File:SSBM Icon.png|24px|link=Super Smash Bros. Melee]] | |
| [[File:SSB4 Icon.png|24px|link=Super Smash Bros. 4]] | |
| [[File:SSBU Icon.png|24px|link=Super Smash Bros. Ultimate]]
| |
| |- | | |- |
| |[[Forward throw]] || Shots || | | |[[Villager]]||[[Dash attack]], [[forward smash]], [[up smash]] firework explosion, [[forward aerial]], [[back aerial]], [[Lloid Rocket]]; [[Timber]] water, falling tree, and wood chip |
| [[File:SSBM Icon.png|24px|link=Super Smash Bros. Melee]] | |
| [[File:SSB4 Icon.png|24px|link=Super Smash Bros. 4]] | |
| [[File:SSBU Icon.png|24px|link=Super Smash Bros. Ultimate]] | |
| |- | | |- |
| | rowspan=1|[[Mii Brawler]] || [[Shot Put]] || Entire move ||
| | |[[Wario]]||[[Wario Bike]] when thrown, Wario Bike tires <small>({{GameIcon|SSBB}} only)</small> |
| [[File:SSB4 Icon.png|24px|link=Super Smash Bros. 4]] | |
| [[File:SSBU Icon.png|24px|link=Super Smash Bros. Ultimate]]
| |
| |- | | |- |
| | rowspan=8|[[Mii Gunner]] || [[Charge Blast]] || Entire move ||
| | |[[Wii Fit Trainer]]||[[Sun Salutation]], [[Header]] ball |
| [[File:SSB4 Icon.png|24px|link=Super Smash Bros. 4]] | |
| [[File:SSBU Icon.png|24px|link=Super Smash Bros. Ultimate]]
| |
| |- | | |- |
| |[[Laser Blaze]] || Entire move || | | |[[Wolf]]||{{b|Blaster|Wolf}} projectile |
| [[File:SSB4 Icon.png|24px|link=Super Smash Bros. 4]]
| |
| [[File:SSBU Icon.png|24px|link=Super Smash Bros. Ultimate]]
| |
| |- | | |- |
| |[[Grenade Launch]] ||Entire move || | | |[[Yoshi]]||[[Egg Throw]], [[Yoshi Bomb]] landing stars |
| [[File:SSB4 Icon.png|24px|link=Super Smash Bros. 4]] | |
| [[File:SSBU Icon.png|24px|link=Super Smash Bros. Ultimate]] | |
| |- | | |- |
| |[[Flame Pillar]] || Entire move || | | |[[Young Link]]||[[Fire Bow]], [[Boomerang]], {{b|Bomb|Link}} |
| [[File:SSB4 Icon.png|24px|link=Super Smash Bros. 4]] | |
| [[File:SSBU Icon.png|24px|link=Super Smash Bros. Ultimate]] | |
| |- | | |- |
| |[[Stealth Burst]] || <span class="explain" title="Will not be sent back">Blast</span> || | | |[[Zelda]]||[[Din's Fire]] at the moment of detonation<ref name="nah"/>, [[Phantom Slash]] |
| [[File:SSB4 Icon.png|24px|link=Super Smash Bros. 4]] | |
| [[File:SSBU Icon.png|24px|link=Super Smash Bros. Ultimate]]
| |
| |- | | |- |
| |[[Gunner Missile]] || Entire move || | | |[[Zero Suit Samus]]||[[Paralyzer]], thrown [[Power Suit Piece]]s <small>({{GameIcon|SSBB}} only)</small> |
| [[File:SSB4 Icon.png|24px|link=Super Smash Bros. 4]] | | |} |
| [[File:SSBU Icon.png|24px|link=Super Smash Bros. Ultimate]] | | |
| | ===By [[item]]s=== |
| | *All throwable items except for the [[Spiny Shell]] |
| | *All projectiles from battering and shooting items (such as the [[Ray Gun]]'s shots or the [[Star Rod]]'s stars) |
| | *[[Bob-omb]]s and [[Bombchu]]s while moving along the ground |
| | *[[Rolling Crate]]s in motion |
| | *[[Soccer Ball]]s when launched |
| | *[[Bumper]]s (''Smash 64'' only) and [[Unira]]s when set |
| | *All explosions from ''Smash 4'' onward, such as from a [[Blast Box]] or [[Motion-Sensor Bomb]] |
| | *Players who have transformed into a {{b|Bullet Bill|item}} during flight |
| | |
| | ====By [[Poké Ball]] Pokémon==== |
| | {| class="wikitable" |
| | ! Pokémon !! Move |
| |- | | |- |
| |[[Lunar Launch]] || Blast || | | |[[Blastoise]]||Hydro Pump |
| [[File:SSB4 Icon.png|24px|link=Super Smash Bros. 4]]
| |
| [[File:SSBU Icon.png|24px|link=Super Smash Bros. Ultimate]]
| |
| |- | | |- |
| |[[Bomb Drop]] || Entire move || | | |[[Bonsly]]||Tackle when thrown as an item |
| [[File:SSB4 Icon.png|24px|link=Super Smash Bros. 4]]
| |
| [[File:SSBU Icon.png|24px|link=Super Smash Bros. Ultimate]]
| |
| |- | | |- |
| | rowspan=3|[[Mii Swordfighter]] || [[Gale Strike]] || Entire move ||
| | |[[Charizard]]||Flamethrower |
| [[File:SSB4 Icon.png|24px|link=Super Smash Bros. 4]]
| |
| [[File:SSBU Icon.png|24px|link=Super Smash Bros. Ultimate]]
| |
| |- | | |- |
| |[[Shuriken of Light]] || Entire move || | | |[[Chespin]]||Seed Bomb |
| [[File:SSB4 Icon.png|24px|link=Super Smash Bros. 4]]
| |
| [[File:SSBU Icon.png|24px|link=Super Smash Bros. Ultimate]]
| |
| |- | | |- |
| |[[Chakram]] || Entire move || | | |[[Chikorita]]||Razor Leaf |
| [[File:SSB4 Icon.png|24px|link=Super Smash Bros. 4]]
| |
| [[File:SSBU Icon.png|24px|link=Super Smash Bros. Ultimate]]
| |
| |- | | |- |
| | rowspan=1|[[Mr. Game & Watch]] || [[Chef]] || Entire move ||
| | |[[Clefairy]]||Some copied attacks with Metronome |
| [[File:SSBM Icon.png|24px|link=Super Smash Bros. Melee]]
| |
| [[File:SSBB Icon.png|24px|link=Super Smash Bros. Brawl]]
| |
| [[File:SSB4 Icon.png|24px|link=Super Smash Bros. 4]]
| |
| [[File:SSBU Icon.png|24px|link=Super Smash Bros. Ultimate]]
| |
| |- | | |- |
| | rowspan=3|[[Ness]] || [[PK Flash]] || Entire move ||
| | |[[Cyndaquil]]||Flamethrower |
| [[File:SSBM Icon.png|24px|link=Super Smash Bros. Melee]]
| |
| [[File:SSBB Icon.png|24px|link=Super Smash Bros. Brawl]]
| |
| [[File:SSB4 Icon.png|24px|link=Super Smash Bros. 4]]
| |
| [[File:SSBU Icon.png|24px|link=Super Smash Bros. Ultimate]]
| |
| |- | | |- |
| | [[PK Fire]] || Entire move || | | |[[Darkrai]]||Dark Void balls |
| [[File:SSB64 Icon.png|24px|link=Super Smash Bros.]]
| |
| [[File:SSBM Icon.png|24px|link=Super Smash Bros. Melee]]
| |
| [[File:SSBB Icon.png|24px|link=Super Smash Bros. Brawl]]
| |
| [[File:SSB4 Icon.png|24px|link=Super Smash Bros. 4]]
| |
| [[File:SSBU Icon.png|24px|link=Super Smash Bros. Ultimate]]
| |
| |- | | |- |
| | [[PK Thunder]] || Lightning ball || | | |[[Ditto]]||Any reflectible moves it copies |
| [[File:SSB64 Icon.png|24px|link=Super Smash Bros.]]
| |
| [[File:SSBM Icon.png|24px|link=Super Smash Bros. Melee]]
| |
| [[File:SSBB Icon.png|24px|link=Super Smash Bros. Brawl]]
| |
| [[File:SSB4 Icon.png|24px|link=Super Smash Bros. 4]]
| |
| [[File:SSBU Icon.png|24px|link=Super Smash Bros. Ultimate]]
| |
| |- | | |- |
| | rowspan=2|[[Olimar]] || [[Pikmin Throw]] || Entire move ||
| | |[[Fennekin]]||Incinerate |
| [[File:SSBB Icon.png|24px|link=Super Smash Bros. Brawl]]
| |
| [[File:SSB4 Icon.png|24px|link=Super Smash Bros. 4]]
| |
| [[File:SSBU Icon.png|24px|link=Super Smash Bros. Ultimate]]
| |
| |- | | |- |
| | [[Forward smash]] || Entire move || | | |[[Genesect]]||Techno Blast |
| [[File:SSBB Icon.png|24px|link=Super Smash Bros. Brawl]]
| |
| [[File:SSB4 Icon.png|24px|link=Super Smash Bros. 4]]
| |
| [[File:SSBU Icon.png|24px|link=Super Smash Bros. Ultimate]]
| |
| |- | | |- |
| | rowspan=2|[[Pac-Man]] || [[Bonus Fruit]] || Entire move ||
| | |[[Kyogre]]||Hydro Pump |
| [[File:SSB4 Icon.png|24px|link=Super Smash Bros. 4]]
| |
| [[File:SSBU Icon.png|24px|link=Super Smash Bros. Ultimate]]
| |
| |- | | |- |
| | [[Fire Hydrant]] || Falling; Water || | | |[[Marill]]||Tackle |
| [[File:SSB4 Icon.png|24px|link=Super Smash Bros.4]]
| |
| [[File:SSBU Icon.png|24px|link=Super Smash Bros. Ultimate]]
| |
| |- | | |- |
| | rowspan=1|[[Palutena]] || [[Autoreticle]] || Shots ||
| | |[[Meloetta]]||Echoed Voice |
| [[File:SSB4 Icon.png|24px|link=Super Smash Bros. 4]]
| |
| [[File:SSBU Icon.png|24px|link=Super Smash Bros. Ultimate]]
| |
| |- | | |- |
| | rowspan=2|[[Peach]] || [[Toad_(move)|Toad]] || Entire move || | | |[[Meowth]]||Pay Day |
| [[File:SSBM Icon.png|24px|link=Super Smash Bros. Melee]]
| |
| [[File:SSBB Icon.png|24px|link=Super Smash Bros. Brawl]] | |
| [[File:SSB4 Icon.png|24px|link=Super Smash Bros. 4]]
| |
| [[File:SSBU Icon.png|24px|link=Super Smash Bros. Ultimate]]
| |
| |- | | |- |
| | [[Vegetable]] || Thrown || | | |[[Oshawott]]||Surf |
| [[File:SSBM Icon.png|24px|link=Super Smash Bros. Melee]]
| |
| [[File:SSBB Icon.png|24px|link=Super Smash Bros. Brawl]]
| |
| [[File:SSB4 Icon.png|24px|link=Super Smash Bros. 4]]
| |
| [[File:SSBU Icon.png|24px|link=Super Smash Bros. Ultimate]]
| |
| |- | | |- |
| | rowspan=2|[[Pichu]] || [[Thunder Jolt]] || Entire move ||
| | |[[Piplup]]||Surf |
| [[File:SSBM Icon.png|24px|link=Super Smash Bros. Melee]]
| |
| [[File:SSBU Icon.png|24px|link=Super Smash Bros. Ultimate]]
| |
| |- | | |- |
| | {{b|Thunder|Pokémon}} || Bolt || | | |[[Snivy]]||Razor Leaf |
| [[File:SSBM Icon.png|24px|link=Super Smash Bros. Melee]] | |
| [[File:SSBU Icon.png|24px|link=Super Smash Bros. Ultimate]]
| |
| |- | | |- |
| | rowspan=2|[[Pikachu]] || [[Thunder Jolt]] || Entire move || | | |[[Starmie]]||Swift |
| [[File:SSB64 Icon.png|24px|link=Super Smash Bros.]] | |
| [[File:SSBM Icon.png|24px|link=Super Smash Bros. Melee]]
| |
| [[File:SSBB Icon.png|24px|link=Super Smash Bros. Brawl]]
| |
| [[File:SSB4 Icon.png|24px|link=Super Smash Bros. 4]]
| |
| [[File:SSBU Icon.png|24px|link=Super Smash Bros. Ultimate]]
| |
| |- | | |- |
| | {{b|Thunder|Pokémon}} || Bolt || | | |[[Staryu]]||Swift |
| [[File:SSB64 Icon.png|24px|link=Super Smash Bros.]]
| |
| [[File:SSBM Icon.png|24px|link=Super Smash Bros. Melee]]
| |
| [[File:SSBB Icon.png|24px|link=Super Smash Bros. Brawl]] | |
| [[File:SSB4 Icon.png|24px|link=Super Smash Bros. 4]]
| |
| [[File:SSBU Icon.png|24px|link=Super Smash Bros. Ultimate]]
| |
| |- | | |- |
| | rowspan=2|[[Piranha Plant]] || [[Ptooie]] || Entire move ||
| | |[[Tapu Koko]]||Electroweb beams |
| [[File:SSBU Icon.png|24px|link=Super Smash Bros. Ultimate]]
| |
| |- | | |- |
| | [[Poison Breath]] || Entire move || | | |[[Vulpix]]||Incinerate, Blizzard |
| [[File:SSBU Icon.png|24px|link=Super Smash Bros. Ultimate]] | | |} |
| | |
| | ====By [[Assist Trophies]]==== |
| | {| class="wikitable" |
| | ! Assist Trophy !! Move |
| |- | | |- |
| | rowspan=1|[[Pit]] || [[Palutena's Bow]] || Entire move ||
| | |[[Chef Kawasaki]]||Plates |
| [[File:SSBB Icon.png|24px|link=Super Smash Bros. Brawl]]
| |
| [[File:SSB4 Icon.png|24px|link=Super Smash Bros. 4]]
| |
| [[File:SSBU Icon.png|24px|link=Super Smash Bros. Ultimate]]
| |
| |- | | |- |
| | rowspan=2|[[R.O.B.]] || [[Robo Beam]] || Entire move ||
| | |[[Color TV-Game 15]]||Pong ball |
| [[File:SSBB Icon.png|24px|link=Super Smash Bros. Brawl]]
| |
| [[File:SSB4 Icon.png|24px|link=Super Smash Bros. 4]]
| |
| [[File:SSBU Icon.png|24px|link=Super Smash Bros. Ultimate]]
| |
| |- | | |- |
| | [[Gyro]] || Entire move; Thrown || | | |[[Dark Samus]]||Homing shots |
| [[File:SSBB Icon.png|24px|link=Super Smash Bros. Brawl]]
| |
| [[File:SSB4 Icon.png|24px|link=Super Smash Bros. 4]]
| |
| [[File:SSBU Icon.png|24px|link=Super Smash Bros. Ultimate]]
| |
| |- | | |- |
| | rowspan=3|[[Richter]] || [[Axe]] || Entire move ||
| | |[[Dr. Wily]]||Projectiles |
| [[File:SSBU Icon.png|24px|link=Super Smash Bros. Ultimate]]
| |
| |- | | |- |
| | [[Cross]] || Entire move || | | |[[Elec Man]]||Thunder Beam |
| [[File:SSBU Icon.png|24px|link=Super Smash Bros. Ultimate]]
| |
| |- | | |- |
| | [[Holy Water]] || Entire move || | | |[[Excitebike]]s||Collision |
| [[File:SSBU Icon.png|24px|link=Super Smash Bros. Ultimate]]
| |
| |- | | |- |
| | rowspan=1|[[Ridley]] || [[Plasma Scream]] || Entire move ||
| | |[[Ghirahim]]||Knives |
| [[File:SSBU Icon.png|24px|link=Super Smash Bros. Ultimate]]
| |
| |- | | |- |
| | rowspan=3|[[Robin]] || {{b|Thunder|Robin}} || Entire move ||
| | |[[Guile]]||Sonic Boom |
| [[File:SSB4 Icon.png|24px|link=Super Smash Bros. 4]]
| |
| [[File:SSBU Icon.png|24px|link=Super Smash Bros. Ultimate]]
| |
| |- | | |- |
| | [[Arcfire]] || Entire move || | | |[[Hammer Bros.]]||Hammers |
| [[File:SSB4 Icon.png|24px|link=Super Smash Bros. 4]]
| |
| [[File:SSBU Icon.png|24px|link=Super Smash Bros. Ultimate]]
| |
| |- | | |- |
| | [[Elwind]] || Entire move || | | |[[Infantry and Tanks]]||Shots |
| [[File:SSB4 Icon.png|24px|link=Super Smash Bros. 4]]
| |
| [[File:SSBU Icon.png|24px|link=Super Smash Bros. Ultimate]]
| |
| |- | | |- |
| | rowspan=1|[[Rosalina]] || [[Luma Shot]] || Entire move ||
| | |[[Jeff]]||Multi-Bottle Rockets |
| [[File:SSB4 Icon.png|24px|link=Super Smash Bros. 4]]
| |
| [[File:SSBU Icon.png|24px|link=Super Smash Bros. Ultimate]]
| |
| |- | | |- |
| | rowspan=1|[[Ryu]] || [[Hadoken]] || Entire move || | | |[[Knuckle Joe]]||Smash Punch |
| [[File:SSB4 Icon.png|24px|link=Super Smash Bros. 4]] | |
| [[File:SSBU Icon.png|24px|link=Super Smash Bros. Ultimate]]
| |
| |- | | |- |
| | rowspan=3|[[Samus]] || [[Charge Shot]] || Entire move || | | |[[Krystal]]||Ice Blast |
| [[File:SSB64 Icon.png|24px|link=Super Smash Bros.]] | |
| [[File:SSBM Icon.png|24px|link=Super Smash Bros. Melee]]
| |
| [[File:SSBB Icon.png|24px|link=Super Smash Bros. Brawl]]
| |
| [[File:SSB4 Icon.png|24px|link=Super Smash Bros. 4]]
| |
| [[File:SSBU Icon.png|24px|link=Super Smash Bros. Ultimate]]
| |
| |- | | |- |
| | [[Missile]] || Entire move || | | |[[Mother Brain]]||Rinkas |
| [[File:SSBM Icon.png|24px|link=Super Smash Bros. Melee]]
| |
| [[File:SSBB Icon.png|24px|link=Super Smash Bros. Brawl]]
| |
| [[File:SSB4 Icon.png|24px|link=Super Smash Bros. 4]]
| |
| [[File:SSBU Icon.png|24px|link=Super Smash Bros. Ultimate]]
| |
| |- | | |- |
| | {{b|Bomb|Samus}} || Entire move || | | |[[Phosphora]]||All attacks |
| [[File:SSB64 Icon.png|24px|link=Super Smash Bros.]]
| |
| [[File:SSBM Icon.png|24px|link=Super Smash Bros. Melee]]
| |
| [[File:SSBB Icon.png|24px|link=Super Smash Bros. Brawl]] | |
| [[File:SSB4 Icon.png|24px|link=Super Smash Bros. 4]]
| |
| [[File:SSBU Icon.png|24px|link=Super Smash Bros. Ultimate]]
| |
| |- | | |- |
| | rowspan=1|[[Sheik]] || [[Needle Storm]] || Entire move ||
| | |[[Rathalos]]||Fireballs |
| [[File:SSBM Icon.png|24px|link=Super Smash Bros. Melee]]
| |
| [[File:SSBB Icon.png|24px|link=Super Smash Bros. Brawl]]
| |
| [[File:SSB4 Icon.png|24px|link=Super Smash Bros. 4]]
| |
| [[File:SSBU Icon.png|24px|link=Super Smash Bros. Ultimate]]
| |
| |- | | |- |
| | rowspan=3|[[Simon]] || [[Axe]] || Entire move ||
| | |[[Ray Mk III]]||Lasers |
| [[File:SSBU Icon.png|24px|link=Super Smash Bros. Ultimate]]
| |
| |- | | |- |
| | [[Cross]] || Entire move || | | |[[Saki Amamiya]]||Shots |
| [[File:SSBU Icon.png|24px|link=Super Smash Bros. Ultimate]]
| |
| |- | | |- |
| | [[Holy Water]] || Entire move || | | |[[Sheriff]]||Shots <small>({{GameIcon|SSB4}} only)</small> |
| [[File:SSBU Icon.png|24px|link=Super Smash Bros. Ultimate]]
| |
| |- | | |- |
| | rowspan=5|[[Snake]] || [[Hand Grenade]] || Thrown ||
| | |[[Shovel Knight]]||Dirt |
| [[File:SSBB Icon.png|24px|link=Super Smash Bros. Brawl]]
| |
| [[File:SSBU Icon.png|24px|link=Super Smash Bros. Ultimate]]
| |
| |- | | |- |
| | [[Remote Missile]] || Entire move || | | |[[Starman (Earthbound)|Starman]]||PK Beam, PK Beam γ |
| [[File:SSBB Icon.png|24px|link=Super Smash Bros. Brawl]]
| |
| [[File:SSBU Icon.png|24px|link=Super Smash Bros. Ultimate]]
| |
| |- | | |- |
| | [[Cypher]] || Flying off || | | |[[Sukapon]]||Tondeker |
| [[File:SSBB Icon.png|24px|link=Super Smash Bros. Brawl]]
| |
| |- | | |- |
| | [[Up smash]] || Shell || | | |[[Takamaru]]||Thrown Knives |
| [[File:SSBB Icon.png|24px|link=Super Smash Bros. Brawl]]
| |
| [[File:SSBU Icon.png|24px|link=Super Smash Bros. Ultimate]]
| |
| |- | | |- |
| | [[List_of_taunts_(SSBB)#Snake|Taunt]] || Box || | | |{{b|Zero|Mega Man}}||Genmu Zero |
| [[File:SSBB Icon.png|24px|link=Super Smash Bros. Brawl]]
| | |} |
| [[File:SSBU Icon.png|24px|link=Super Smash Bros. Ultimate]]
| | |
| | ===By stage hazards=== |
| | {| class="wikitable" |
| | ! Stage !! Hazard |
| |- | | |- |
| | rowspan=1|[[Squirtle]] || [[Water Gun]] || <span class="explain" title="When charged">Entire move</span> ||
| | |[[Corneria]]||Shots fired from [[Arwing]]s, [[Wolfen]]s, and the [[Great Fox]] |
| [[File:SSBB Icon.png|24px|link=Super Smash Bros. Brawl]] | |
| [[File:SSBU Icon.png|24px|link=Super Smash Bros. Ultimate]] | |
| |- | | |- |
| | rowspan=3|[[Toon Link]] || [[Hero's Bow]] || Entire move ||
| | |[[Green Greens]]||[[Apple]]s |
| [[File:SSBB Icon.png|24px|link=Super Smash Bros. Brawl]]
| |
| [[File:SSB4 Icon.png|24px|link=Super Smash Bros. 4]]
| |
| [[File:SSBU Icon.png|24px|link=Super Smash Bros. Ultimate]]
| |
| |- | | |- |
| | [[Boomerang]] || Entire move || | | |[[Mario Bros.]]||[[Shellcreeper]]s and [[Sidestepper]]s |
| [[File:SSBB Icon.png|24px|link=Super Smash Bros. Brawl]] | |
| [[File:SSB4 Icon.png|24px|link=Super Smash Bros. 4]] | |
| [[File:SSBU Icon.png|24px|link=Super Smash Bros. Ultimate]]
| |
| |- | | |- |
| | {{b|Bomb|Link}} || Thrown || | | |[[Sector Z]]||Shots fired from Arwings |
| [[File:SSBB Icon.png|24px|link=Super Smash Bros. Brawl]]
| |
| [[File:SSB4 Icon.png|24px|link=Super Smash Bros. 4]] | |
| [[File:SSBU Icon.png|24px|link=Super Smash Bros. Ultimate]]
| |
| |- | | |- |
| | rowspan=5|[[Villager]] || [[Lloid Rocket]] || Entire move ||
| | |[[Venom]]||Shots fired from Arwings and Wolfens |
| [[File:SSB4 Icon.png|24px|link=Super Smash Bros. 4]]
| |
| [[File:SSBU Icon.png|24px|link=Super Smash Bros. Ultimate]]
| |
| |- | | |- |
| | [[Timber]] || Water; Chopped tree || | | |[[Wily Castle]]||[[Yellow Devil]]'s energy blasts |
| [[File:SSB4 Icon.png|24px|link=Super Smash Bros. 4]] | | |} |
| [[File:SSBU Icon.png|24px|link=Super Smash Bros. Ultimate]]
| | |
| |-
| | ===By enemies and bosses=== |
| | [[Forward smash]] || Entire move ||
| | {| class="wikitable" |
| [[File:SSB4 Icon.png|24px|link=Super Smash Bros. 4]]
| | ! Enemy/Boss !! Move |
| [[File:SSBU Icon.png|24px|link=Super Smash Bros. Ultimate]]
| |
| |-
| |
| | [[Forward air]] || Entire move ||
| |
| [[File:SSB4 Icon.png|24px|link=Super Smash Bros. 4]]
| |
| [[File:SSBU Icon.png|24px|link=Super Smash Bros. Ultimate]]
| |
| |-
| |
| | [[Back air]] || Entire move ||
| |
| [[File:SSB4 Icon.png|24px|link=Super Smash Bros. 4]]
| |
| [[File:SSBU Icon.png|24px|link=Super Smash Bros. Ultimate]]
| |
| |-
| |
| | rowspan=2|[[Wario]] || rowspan=2|[[Wario Bike]] || Thrown ||
| |
| [[File:SSBB Icon.png|24px|link=Super Smash Bros. Brawl]]
| |
| [[File:SSB4 Icon.png|24px|link=Super Smash Bros. 4]]
| |
| [[File:SSBU Icon.png|24px|link=Super Smash Bros. Ultimate]]
| |
| |-
| |
| | Tires ||
| |
| [[File:SSBB Icon.png|24px|link=Super Smash Bros. Brawl]]
| |
| [[File:SSB4 Icon.png|24px|link=Super Smash Bros. 4]]
| |
| |-
| |
| | rowspan=2|[[Wii Fit Trainer]] || [[Sun Salutation]] || Entire move ||
| |
| [[File:SSB4 Icon.png|24px|link=Super Smash Bros. 4]]
| |
| [[File:SSBU Icon.png|24px|link=Super Smash Bros. Ultimate]]
| |
| |-
| |
| | [[Header]] || Soccer Ball ||
| |
| [[File:SSB4 Icon.png|24px|link=Super Smash Bros. 4]]
| |
| [[File:SSBU Icon.png|24px|link=Super Smash Bros. Ultimate]]
| |
| |-
| |
| | rowspan=1|[[Wolf]] || {{b|Blaster|Wolf}} || Shot ||
| |
| [[File:SSBB Icon.png|24px|link=Super Smash Bros. Brawl]]
| |
| [[File:SSBU Icon.png|24px|link=Super Smash Bros. Ultimate]]
| |
| |-
| |
| | rowspan=2|[[Yoshi]] || [[Egg Throw]] || Entire move ||
| |
| [[File:SSB64 Icon.png|24px|link=Super Smash Bros.]]
| |
| [[File:SSBM Icon.png|24px|link=Super Smash Bros. Melee]]
| |
| [[File:SSBB Icon.png|24px|link=Super Smash Bros. Brawl]]
| |
| [[File:SSB4 Icon.png|24px|link=Super Smash Bros. 4]]
| |
| [[File:SSBU Icon.png|24px|link=Super Smash Bros. Ultimate]]
| |
| |-
| |
| | [[Yoshi Bomb]] || Stars ||
| |
| [[File:SSB64 Icon.png|24px|link=Super Smash Bros.]]
| |
| [[File:SSBM Icon.png|24px|link=Super Smash Bros. Melee]]
| |
| [[File:SSBB Icon.png|24px|link=Super Smash Bros. Brawl]]
| |
| [[File:SSB4 Icon.png|24px|link=Super Smash Bros. 4]]
| |
| [[File:SSBU Icon.png|24px|link=Super Smash Bros. Ultimate]]
| |
| |-
| |
| | rowspan=3|[[Young Link]] || [[Fire Bow]] || Entire move ||
| |
| [[File:SSBM Icon.png|24px|link=Super Smash Bros. Melee]]
| |
| [[File:SSBU Icon.png|24px|link=Super Smash Bros. Ultimate]]
| |
| |-
| |
| | [[Boomerang]] || Entire move ||
| |
| [[File:SSBM Icon.png|24px|link=Super Smash Bros. Melee]]
| |
| [[File:SSBU Icon.png|24px|link=Super Smash Bros. Ultimate]]
| |
| |-
| |
| | {{b|Bomb|Link}} || Thrown ||
| |
| [[File:SSBM Icon.png|24px|link=Super Smash Bros. Melee]]
| |
| [[File:SSBU Icon.png|24px|link=Super Smash Bros. Ultimate]]
| |
| |-
| |
| | rowspan=2|[[Zelda]] || [[Din's Fire]] || <span class="explain" title="Will not be sent back">Blast</span> ||
| |
| [[File:SSBM Icon.png|24px|link=Super Smash Bros. Melee]]
| |
| [[File:SSBB Icon.png|24px|link=Super Smash Bros. Brawl]]
| |
| [[File:SSB4 Icon.png|24px|link=Super Smash Bros. 4]]
| |
| [[File:SSBU Icon.png|24px|link=Super Smash Bros. Ultimate]]
| |
| |-
| |
| | [[Phantom Slash]] || Initial Summon ||
| |
| [[File:SSB4 Icon.png|24px|link=Super Smash Bros. 4]]
| |
| [[File:SSBU Icon.png|24px|link=Super Smash Bros. Ultimate]]
| |
| |-
| |
| | rowspan=2|[[Zero Suit Samus]] || [[Paralyzer]] || Entire move ||
| |
| [[File:SSBB Icon.png|24px|link=Super Smash Bros. Brawl]]
| |
| [[File:SSB4 Icon.png|24px|link=Super Smash Bros. 4]]
| |
| [[File:SSBU Icon.png|24px|link=Super Smash Bros. Ultimate]]
| |
| |-
| |
| | [[Power Suit Piece]]s || When thrown ||
| |
| [[File:SSBB Icon.png|24px|link=Super Smash Bros. Brawl]]
| |
| |-
| |
| ! scope="row" colspan=4|{{anchor|By Items}} By Items | |
| |-
| |
| | colspan=3|All Thrown Items ||
| |
| [[File:SSB64 Icon.png|24px|link=Super Smash Bros.]]
| |
| [[File:SSBM Icon.png|24px|link=Super Smash Bros. Melee]]
| |
| [[File:SSBB Icon.png|24px|link=Super Smash Bros. Brawl]]
| |
| [[File:SSB4 Icon.png|24px|link=Super Smash Bros. 4]]
| |
| |-
| |
| | colspan=2|[[Blast Box]] || Explosion ||
| |
| [[File:SSBB Icon.png|24px|link=Super Smash Bros. Brawl]]
| |
| [[File:SSB4 Icon.png|24px|link=Super Smash Bros. 4]]
| |
| |-
| |
| | colspan=2|[[Bob-omb]] || Walking ||
| |
| [[File:SSB64 Icon.png|24px|link=Super Smash Bros.]]
| |
| [[File:SSBM Icon.png|24px|link=Super Smash Bros. Melee]]
| |
| [[File:SSBB Icon.png|24px|link=Super Smash Bros. Brawl]]
| |
| [[File:SSB4 Icon.png|24px|link=Super Smash Bros. 4]]
| |
| |-
| |
| | colspan=2|[[Bombchu]] || Collision ||
| |
| [[File:SSB4 Icon.png|24px|link=Super Smash Bros. 4]]
| |
| |- | | |- |
| | colspan=2|[[Bullet Bill (item)|Bullet Bill]] || Collision ||
| | |[[Armank]]||Energy shot |
| [[File:SSB4 Icon.png|24px|link=Super Smash Bros. 4]]
| |
| |- | | |- |
| | colspan=2|[[Bumper]] || When Set ||
| | |[[Autolance]]||Launched lance |
| [[File:SSB64 Icon.png|24px|link=Super Smash Bros.]]
| |
| |- | | |- |
| | colspan=2|[[Cracker Launcher]] || Shots ||
| | |[[Bombed]]||Thrown head |
| [[File:SSBB Icon.png|24px|link=Super Smash Bros. Brawl]]
| |
| |- | | |- |
| | colspan=2|[[Drill (item)|Drill]] || Collision ||
| | |[[Boom Primid]]||Thrown boomerang |
| [[File:SSB4 Icon.png|24px|link=Super Smash Bros. 4]]
| |
| |- | | |- |
| | colspan=2|[[Fire Flower]] || Flames || | | |[[Bullet Bill (enemy)|Bullet Bill]]||Collision |
| [[File:SSB64 Icon.png|24px|link=Super Smash Bros.]]
| |
| [[File:SSBM Icon.png|24px|link=Super Smash Bros. Melee]] | |
| [[File:SSBB Icon.png|24px|link=Super Smash Bros. Brawl]]
| |
| [[File:SSB4 Icon.png|24px|link=Super Smash Bros. 4]]
| |
| |- | | |- |
| | colspan=2|[[Green Shell]] || Collision || | | |[[Crazy Hand]]||Bombs<ref>Only the bombs themselves, not their explosions, can be reflected.</ref> |
| [[File:SSB64 Icon.png|24px|link=Super Smash Bros.]]
| |
| [[File:SSBM Icon.png|24px|link=Super Smash Bros. Melee]] | |
| [[File:SSBB Icon.png|24px|link=Super Smash Bros. Brawl]]
| |
| [[File:SSB4 Icon.png|24px|link=Super Smash Bros. 4]]
| |
| |- | | |- |
| | colspan=2|[[Red Shell]] || Collision ||
| | |[[Duon]]||Scattershot, missiles |
| [[File:SSB64 Icon.png|24px|link=Super Smash Bros.]]
| |
| [[File:SSBM Icon.png|24px|link=Super Smash Bros. Melee]]
| |
| |- | | |- |
| | colspan=2|[[Hocotate Bomb]] || Collision ||
| | |[[Fire Primid]]||Fireball |
| [[File:SSB4 Icon.png|24px|link=Super Smash Bros. 4]]
| |
| |- | | |- |
| | colspan=2|[[Hothead]] || Collision ||
| | |[[Galeem]]||Tri-Eye Attack |
| [[File:SSBB Icon.png|24px|link=Super Smash Bros. Brawl]]
| |
| [[File:SSB4 Icon.png|24px|link=Super Smash Bros. 4]]
| |
| |- | | |- |
| | colspan=2|[[Killer Eye]] || Beam ||
| | |[[Gamyga]]||Lasers |
| [[File:SSB4 Icon.png|24px|link=Super Smash Bros. 4]]
| |
| |- | | |- |
| | colspan=2|[[Lip's Stick]] || Spores || | | |[[Hammer Bro.]]||Hammers |
| [[File:SSBM Icon.png|24px|link=Super Smash Bros. Melee]]
| |
| [[File:SSBB Icon.png|24px|link=Super Smash Bros. Brawl]] | |
| [[File:SSB4 Icon.png|24px|link=Super Smash Bros. 4]]
| |
| |- | | |- |
| | colspan=2|[[Ore Club]] || Collision ||
| | |[[Master Edges]]||Sword projectiles |
| [[File:SSB4 Icon.png|24px|link=Super Smash Bros. 4]]
| |
| |- | | |- |
| | colspan=2|[[Ray Gun]] || Shots ||
| | |[[Master Hand]]||Finger bullets, fireball rain <small>({{GameIcon|SSB4}} only)</small> |
| [[File:SSB64 Icon.png|24px|link=Super Smash Bros.]]
| |
| [[File:SSBM Icon.png|24px|link=Super Smash Bros. Melee]]
| |
| [[File:SSBB Icon.png|24px|link=Super Smash Bros. Brawl]]
| |
| [[File:SSB4 Icon.png|24px|link=Super Smash Bros. 4]]
| |
| |- | | |- |
| | colspan=2|[[Rolling Crate]] || Rolling ||
| | |[[Meta Ridley]]||Small and medium fireballs |
| [[File:SSBB Icon.png|24px|link=Super Smash Bros. Brawl]]
| |
| [[File:SSB4 Icon.png|24px|link=Super Smash Bros. 4]]
| |
| |- | | |- |
| | colspan=2|[[Soccer Ball]] || Launch ||
| | |[[Poppant]]||Tossed gifts |
| [[File:SSBB Icon.png|24px|link=Super Smash Bros. Brawl]]
| |
| [[File:SSB4 Icon.png|24px|link=Super Smash Bros. 4]]
| |
| |- | | |- |
| | colspan=2|[[Star Rod]] || Stars || | | |[[Puppit]]||Lasers |
| [[File:SSB64 Icon.png|24px|link=Super Smash Bros.]] | |
| [[File:SSBM Icon.png|24px|link=Super Smash Bros. Melee]]
| |
| [[File:SSBB Icon.png|24px|link=Super Smash Bros. Brawl]]
| |
| [[File:SSB4 Icon.png|24px|link=Super Smash Bros. 4]]
| |
| |- | | |- |
| | colspan=2|[[Steel Diver]] || Shots ||
| | |[[Rayquaza]]||Energy ball |
| [[File:SSB4 Icon.png|24px|link=Super Smash Bros. 4]]
| |
| |- | | |- |
| | colspan=2|[[Super Scope]] || Shots || | | |[[R.O.B. Blaster]]||Lasers |
| [[File:SSBM Icon.png|24px|link=Super Smash Bros. Melee]] | |
| [[File:SSBB Icon.png|24px|link=Super Smash Bros. Brawl]]
| |
| [[File:SSB4 Icon.png|24px|link=Super Smash Bros. 4]]
| |
| |- | | |- |
| | colspan=2|[[Superspicy Curry]] || Flames ||
| | |[[R.O.B. Launcher]]||Missiles |
| [[File:SSBB Icon.png|24px|link=Super Smash Bros. Brawl]]
| |
| [[File:SSB4 Icon.png|24px|link=Super Smash Bros. 4]]
| |
| |- | | |- |
| | colspan=2|[[Unira]] || When Set ||
| | |[[Roturret]]||Bullets |
| [[File:SSBB Icon.png|24px|link=Super Smash Bros. Brawl]]
| |
| [[File:SSB4 Icon.png|24px|link=Super Smash Bros. 4]]
| |
| |- | | |- |
| ! scope="row" colspan=4|{{anchor|By Pokémon}}By Pokémon
| | |[[Scope Primid]]||Shots |
| |- | | |- |
| | [[Blastoise]] || Hydro Pump || Water Jets ||
| | |[[Spaak]]||Electric ball, lightning bolt |
| [[File:SSB64 Icon.png|24px|link=Super Smash Bros.]]
| |
| [[File:SSBM Icon.png|24px|link=Super Smash Bros. Melee]]
| |
| |-
| |
| | [[Bonsly]] || Tackle || Thrown ||
| |
| [[File:SSBB Icon.png|24px|link=Super Smash Bros. Brawl]]
| |
| |-
| |
| | [[Charizard]] || Flamethrower || Flames ||
| |
| [[File:SSB64 Icon.png|24px|link=Super Smash Bros.]]
| |
| [[File:SSBM Icon.png|24px|link=Super Smash Bros. Melee]]
| |
| |-
| |
| | [[Chespin]] || Seed Bomb || Seeds ||
| |
| [[File:SSB4 Icon.png|24px|link=Super Smash Bros. 4]]
| |
| |-
| |
| | [[Chikorita]] || Razor Leaf || Leaves ||
| |
| [[File:SSBM Icon.png|24px|link=Super Smash Bros. Melee]]
| |
| [[File:SSBB Icon.png|24px|link=Super Smash Bros. Brawl]]
| |
| |-
| |
| | [[Clefairy]] || Metronome || Some copied attacks ||
| |
| [[File:SSB64 Icon.png|24px|link=Super Smash Bros.]]
| |
| |-
| |
| | [[Cyndaquil]] || Flamethrower || Flames ||
| |
| [[File:SSBM Icon.png|24px|link=Super Smash Bros. Melee]]
| |
| |-
| |
| | [[Darkrai]] || Dark Void || Dark Void Balls ||
| |
| [[File:SSB4 Icon.png|24px|link=Super Smash Bros. 4]]
| |
| |-
| |
| | [[Fennekin]] || Incinerate || Flames ||
| |
| [[File:SSB4 Icon.png|24px|link=Super Smash Bros. 4]]
| |
| |-
| |
| | [[Genesect]] || Techno Blast || Beam ||
| |
| [[File:SSB4 Icon.png|24px|link=Super Smash Bros. 4]]
| |
| |-
| |
| | [[Kyogre]] || Hydro Pump || Water Jets ||
| |
| [[File:SSBB Icon.png|24px|link=Super Smash Bros. Brawl]]
| |
| [[File:SSB4 Icon.png|24px|link=Super Smash Bros. 4]]
| |
| |-
| |
| | [[Marill]] || Tackle || Collision ||
| |
| [[File:SSBM Icon.png|24px|link=Super Smash Bros. Melee]]
| |
| |-
| |
| | [[Meloetta]] || Echoed Voice || Music Notes ||
| |
| [[File:SSB4 Icon.png|24px|link=Super Smash Bros. 4]]
| |
| |-
| |
| | [[Meowth]] || Pay Day || Coins ||
| |
| [[File:SSB64 Icon.png|24px|link=Super Smash Bros.]]
| |
| [[File:SSBB Icon.png|24px|link=Super Smash Bros. Brawl]]
| |
| [[File:SSB4 Icon.png|24px|link=Super Smash Bros. 4]]
| |
| |-
| |
| | [[Oshawott]] || Surf || Collision ||
| |
| [[File:SSB4 Icon.png|24px|link=Super Smash Bros. 4]]
| |
| |-
| |
| | [[Piplup]] || Surf || Collision ||
| |
| [[File:SSBB Icon.png|24px|link=Super Smash Bros. Brawl]]
| |
| |-
| |
| | [[Snivy]] || Razor Leaf || Leaves ||
| |
| [[File:SSB4 Icon.png|24px|link=Super Smash Bros. 4]]
| |
| |-
| |
| | [[Starmie]] || Swift || Stars ||
| |
| [[File:SSB64 Icon.png|24px|link=Super Smash Bros.]]
| |
| |-
| |
| | [[Staryu]] || Swift || Stars ||
| |
| [[File:SSBM Icon.png|24px|link=Super Smash Bros. Melee]]
| |
| [[File:SSBB Icon.png|24px|link=Super Smash Bros. Brawl]]
| |
| [[File:SSB4 Icon.png|24px|link=Super Smash Bros. 4]]
| |
| |-
| |
| | [[Zoroark]] || Fury Swipes || <span class="explain" title="Blocked by wearing a Franklin Badge, but not actually reflected back">Claw swipes</span> ||
| |
| [[File:SSB4 Icon.png|24px|link=Super Smash Bros. 4]]
| |
| |-
| |
| ! scope="row" colspan=4|{{anchor|By Assist Trophies}}By Assist Trophies
| |
| |-
| |
| | colspan=2|[[Color TV-Game 15]] || Pong Ball ||
| |
| [[File:SSB4 Icon.png|24px|link=Super Smash Bros. 4]]
| |
| |-
| |
| | colspan=2|[[Dark Samus]] || Shots ||
| |
| [[File:SSB4 Icon.png|24px|link=Super Smash Bros. 4]]
| |
| |-
| |
| | colspan=2|[[Elec Man]] || Thunder Beams ||
| |
| [[File:SSB4 Icon.png|24px|link=Super Smash Bros. 4]]
| |
| |-
| |
| | colspan=2|[[Excitebike]]s || Collision ||
| |
| [[File:SSBB Icon.png|24px|link=Super Smash Bros. Brawl]]
| |
| |-
| |
| | colspan=2|[[Hammer Bros.]] || Hammers ||
| |
| [[File:SSBB Icon.png|24px|link=Super Smash Bros. Brawl]]
| |
| [[File:SSB4 Icon.png|24px|link=Super Smash Bros. 4]]
| |
| |-
| |
| | colspan=2|[[Infantry and Tanks]] || Shots ||
| |
| [[File:SSBB Icon.png|24px|link=Super Smash Bros. Brawl]]
| |
| [[File:SSB4 Icon.png|24px|link=Super Smash Bros. 4]]
| |
| |-
| |
| | colspan=2|[[Jeff]] || Rockets ||
| |
| [[File:SSBB Icon.png|24px|link=Super Smash Bros. Brawl]]
| |
| [[File:SSB4 Icon.png|24px|link=Super Smash Bros. 4]]
| |
| |-
| |
| | colspan=2|[[Knuckle Joe]] || Smash Punch ||
| |
| [[File:SSBB Icon.png|24px|link=Super Smash Bros. Brawl]]
| |
| [[File:SSB4 Icon.png|24px|link=Super Smash Bros. 4]]
| |
| |-
| |
| | colspan=2|[[Phosphora]] || Electric Attacks ||
| |
| [[File:SSB4 Icon.png|24px|link=Super Smash Bros. 4]]
| |
| |-
| |
| | colspan=2|[[Ray MK III]] || Lasers ||
| |
| [[File:SSBB Icon.png|24px|link=Super Smash Bros. Brawl]]
| |
| |-
| |
| | colspan=2|[[Saki Amamiya]] || Shots ||
| |
| [[File:SSBB Icon.png|24px|link=Super Smash Bros. Brawl]]
| |
| [[File:SSB4 Icon.png|24px|link=Super Smash Bros. 4]]
| |
| |-
| |
| | colspan=2|[[Sheriff]] || Shots ||
| |
| [[File:SSBB Icon.png|24px|link=Super Smash Bros. Brawl]]
| |
| [[File:SSB4 Icon.png|24px|link=Super Smash Bros. 4]]
| |
| |-
| |
| | colspan=2|[[Takamaru]] || Thrown Knives ||
| |
| [[File:SSB4 Icon.png|24px|link=Super Smash Bros. 4]]
| |
| |-
| |
| | colspan=2|{{b|Zero|Mega Man}} || Genmu Zero ||
| |
| [[File:SSBU Icon.png|24px|link=Super Smash Bros. Ultimate]]
| |
| |-
| |
| ! scope="row" colspan=4|{{anchor|By Stage Hazards}}By Stage Hazards
| |
| |-
| |
| | colspan=2|[[Corneria]] || Shots fired from Arwings, [[Wolfen]]s, and the [[Great Fox]] ||
| |
| [[File:SSBM Icon.png|24px|link=Super Smash Bros. Melee]]
| |
| [[File:SSBB Icon.png|24px|link=Super Smash Bros. Brawl]]
| |
| [[File:SSB4-3 Icon.png|24px|link=Super Smash Bros. for Nintendo 3DS]]
| |
| |-
| |
| | colspan=2|[[Green Greens]] || [[Apple]]s ||
| |
| [[File:SSBM Icon.png|24px|link=Super Smash Bros. Melee]]
| |
| [[File:SSBB Icon.png|24px|link=Super Smash Bros. Brawl]]
| |
| |-
| |
| | colspan=2|[[Mario Bros.]] || [[Shellcreeper]]s and [[Sidestepper]]s ||
| |
| [[File:SSBB Icon.png|24px|link=Super Smash Bros. Brawl]]
| |
| |-
| |
| | colspan=2|[[Sector Z]] || Shots fired from [[Arwing]]s ||
| |
| [[File:SSB64 Icon.png|24px|link=Super Smash Bros.]]
| |
| |-
| |
| | colspan=2|[[Venom]] || Shots fired from Arwings and Wolfens ||
| |
| [[File:SSBM Icon.png|24px|link=Super Smash Bros. Melee]]
| |
| |-
| |
| | colspan=2|[[Wily Castle]] || [[Yellow Devil]]'s energy blasts ||
| |
| [[File:SSB4 Icon.png|24px|link=Super Smash Bros. 4]]
| |
| |-
| |
| ! scope="row" colspan=4|{{anchor|By Enemies and Bosses}}By Enemies and Bosses
| |
| |-
| |
| | colspan=2|[[Armank]]|| Energy Shot ||
| |
| [[File:SSBB Icon.png|24px|link=Super Smash Bros. Brawl]]
| |
| |-
| |
| | colspan=2|[[Autolance]] || Launched lance ||
| |
| [[File:SSBB Icon.png|24px|link=Super Smash Bros. Brawl]]
| |
| |-
| |
| | colspan=2|[[Bombed]] || Thrown Head ||
| |
| [[File:SSBB Icon.png|24px|link=Super Smash Bros. Brawl]]
| |
| |-
| |
| | colspan=2|[[Boom Primid]] || Thrown Boomerang ||
| |
| [[File:SSBB Icon.png|24px|link=Super Smash Bros. Brawl]]
| |
| |-
| |
| | colspan=2|[[Bullet Bill (enemy)|Bullet Bill]] || Collision ||
| |
| [[File:SSBB Icon.png|24px|link=Super Smash Bros. Brawl]]
| |
| [[File:SSB4-3 Icon.png|24px|link=Super Smash Bros. for Nintendo 3DS]]
| |
| |-
| |
| | colspan=2|[[Crazy Hand]] || <span class="explain" title="not the explosion">Bombs</span> ||
| |
| [[File:SSBM Icon.png|24px|link=Super Smash Bros. Melee]]
| |
| [[File:SSBB Icon.png|24px|link=Super Smash Bros. Brawl]]
| |
| [[File:SSB4 Icon.png|24px|link=Super Smash Bros. 4]]
| |
| |-
| |
| | colspan=2|[[Duon]] || Scattershot ||
| |
| [[File:SSBB Icon.png|24px|link=Super Smash Bros. Brawl]]
| |
| |-
| |
| | colspan=2|[[Fire Primid]] || Fireball ||
| |
| [[File:SSBB Icon.png|24px|link=Super Smash Bros. Brawl]]
| |
| |-
| |
| | colspan=2|[[Gamyga]] || Lasers ||
| |
| [[File:SSBB Icon.png|24px|link=Super Smash Bros. Brawl]]
| |
| |-
| |
| | colspan=2|[[Hammer Bro.]] || Hammers ||
| |
| [[File:SSBB Icon.png|24px|link=Super Smash Bros. Brawl]]
| |
| [[File:SSB4-3 Icon.png|24px|link=Super Smash Bros. for Nintendo 3DS]]
| |
| |-
| |
| | colspan=2|[[Master Edges]] || Sword projectiles ||
| |
| [[File:SSB4 Icon.png|24px|link=Super Smash Bros. 4]]
| |
| |-
| |
| | rowspan=2 colspan=2|[[Master Hand]] || Finger bullets ||
| |
| [[File:SSB64 Icon.png|24px|link=Super Smash Bros.]]
| |
| [[File:SSBM Icon.png|24px|link=Super Smash Bros. Melee]]
| |
| [[File:SSBB Icon.png|24px|link=Super Smash Bros. Brawl]]
| |
| [[File:SSB4 Icon.png|24px|link=Super Smash Bros. 4]]
| |
| |-
| |
| | Fireball Blitz ||
| |
| [[File:SSB4 Icon.png|24px|link=Super Smash Bros. 4]]
| |
| |-
| |
| | rowspan=2 colspan=2|[[Meta Ridley]]|| Small fireballs ||
| |
| [[File:SSBB Icon.png|24px|link=Super Smash Bros. Brawl]]
| |
| |-
| |
| | Medium fireballs ||
| |
| [[File:SSBB Icon.png|24px|link=Super Smash Bros. Brawl]]
| |
| |-
| |
| | colspan=2|[[Poppant]] || Tossed gifts ||
| |
| [[File:SSBB Icon.png|24px|link=Super Smash Bros. Brawl]]
| |
| [[File:SSB4-3 Icon.png|24px|link=Super Smash Bros. for Nintendo 3DS]]
| |
| |-
| |
| | colspan=2|[[Puppit]] || Lasers ||
| |
| [[File:SSBB Icon.png|24px|link=Super Smash Bros. Brawl]]
| |
| |-
| |
| | colspan=2|[[Rayquaza]] || Energy ball ||
| |
| [[File:SSBB Icon.png|24px|link=Super Smash Bros. Brawl]]
| |
| |-
| |
| | colspan=2|[[R.O.B. Blaster]] || Lasers ||
| |
| [[File:SSBB Icon.png|24px|link=Super Smash Bros. Brawl]]
| |
| |-
| |
| | colspan=2|[[R.O.B. Launcher]] || Missiles ||
| |
| [[File:SSBB Icon.png|24px|link=Super Smash Bros. Brawl]]
| |
| |-
| |
| | colspan=2|[[Roturret]] || Bullets ||
| |
| [[File:SSBB Icon.png|24px|link=Super Smash Bros. Brawl]]
| |
| [[File:SSB4-3 Icon.png|24px|link=Super Smash Bros. for Nintendo 3DS]]
| |
| |-
| |
| | colspan=2|[[Scope Primid]] || Shots ||
| |
| [[File:SSBB Icon.png|24px|link=Super Smash Bros. Brawl]]
| |
| |-
| |
| | rowspan=2 colspan=2|[[Spaak]] || Electric ball ||
| |
| [[File:SSBB Icon.png|24px|link=Super Smash Bros. Brawl]]
| |
| |-
| |
| | Lightning bolt ||
| |
| [[File:SSBB Icon.png|24px|link=Super Smash Bros. Brawl]]
| |
| |} | | |} |
| | <references/> |
|
| |
|
| | ==Gallery== |
| | <gallery> |
| | Peach Powershield Laser.gif|[[Power shield]]s being used as a reflector in ''Melee''. |
| | Melee ReflectionConfuse.gif|{{SSBM|Falco}} being stunned after his reflector breaks in ''Melee''. |
| | Confusionowner.gif|Although {{SSBM|Mewtwo}}'s [[Confusion]] reflects projectiles, the projectiles are still owned by the thrower. |
| | Dark Pit Down B SSBU.gif|[[Guardian Orbitars]] in ''Ultimate''. |
| | King K Rool Down B 2 SSBU.gif|[[Gut Check]] in ''Ultimate''. |
| | Joker Down B 3 SSBU.gif|[[Makarakarn]] in ''Ultimate''. |
| | </gallery> |
| ==Trivia== | | ==Trivia== |
| *Not counting ''Melee{{'}}s'' powershield, since [[Princess Zelda|Zelda's]] [[Nayru's Love]] and [[King Dedede]]'s [[Inhale (King Dedede)|Inhale]] in ''Ultimate'' are the only [[neutral special]] reflection moves, they are the only reflection moves that [[Kirby]] can copy or use. | | *Of all reflections in the ''Smash'' series: |
| | **Left Splits Kick has the highest damage multiplier at 2.4x |
| | **Ness' forward smash and home run bat are tied for highest speed multiplier at 2.5x |
| | *Since [[Zelda]]'s [[Nayru's Love]] and [[King Dedede]]'s {{b|Inhale|King Dedede}} in ''Ultimate'' are [[neutral special]] moves that can reflect projectiles, they can also be used by [[Kirby]] via his Copy Ability. |
| *[[Pit]] is the only character to have different reflectors between games. | | *[[Pit]] is the only character to have different reflectors between games. |
| | *Prior to version 1.0.8 of ''[[Smash 4]]'', all but the final hit of [[Zoroark]]'s Fury Swipes could be reflected. By wearing a [[Franklin Badge]], a character trapped by Zoroark would only take damage from the final hit of the attack. |
| | *[[Ness]], [[Lucas]], [[Min Min]], and [[Kazuya]] are the only fighters whose reflection moves are not [[special move]]s. Out of these, Ness' is the only one to be present in all ''Smash'' games. |
| | *[[Hero]] has the most reflectable attacks out of any playable fighter in the entire {{uv|Super Smash Bros.}} series, with a total of 14. |
| | *If the [[Shadow]] [[Assist Trophy]] freezes a character performing a reflection attack, the reflection hitbox will remain active until being unfrozen and trigger if hit. This causes a side effect of some attacks being able to reflect much longer than intended. |
| | |
| | ==See also== |
| | *[[Absorption]] |
| {{AllGames|Techniques}} | | {{AllGames|Techniques}} |
|
| |
|
| [[Category:Game physics]] | | [[Category:Game physics]] |