Captain Falcon (SSBU)/Forward aerial: Difference between revisions
mNo edit summary |
|||
| (7 intermediate revisions by 5 users not shown) | |||
| Line 1: | Line 1: | ||
{{ArticleIcons|ssbu=y}} | {{ArticleIcons|ssbu=y}} | ||
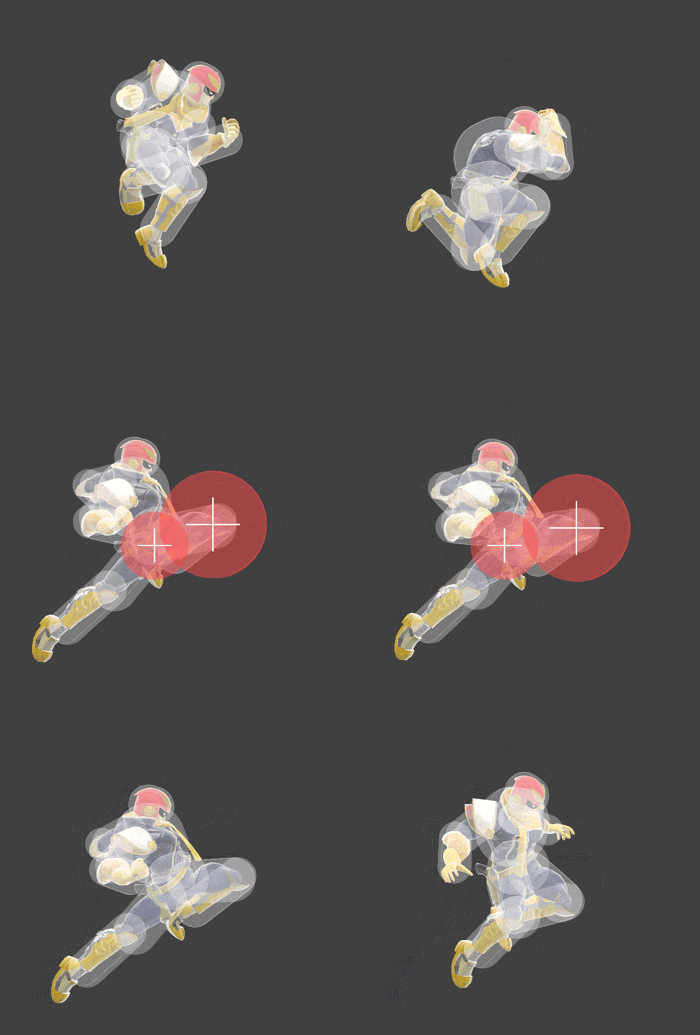
[[File:CaptainFalconFAirSSBU.gif|thumb| | [[File:CaptainFalconFAirSSBU.gif|thumb|350px|Hitbox visualization showing Captain Falcon's forward aerial.]] | ||
==Overview== | ==Overview== | ||
Captain Falcon performs | Captain Falcon performs the infamous [[Knee Smash]]. While the sweetspot only lasts one frame, it's immensely powerful when it hits. Because of its sheer power, it deals high shield damage, makes a great edgeguarding tool, combo finisher, and punishes airdodges if the player reads it correctly or whiffed aerial moves. The move can be comboed into from the first hit of his neutral aerial, his up aerial, and down aerial. The sourspot also has a purpose in edgeguards because of its [[sex kick]] properties. The sourspot can also be used to start tech chases due to its [[semi-spike]] angle. Outside of its one frame sweetspot, the move is not without its drawbacks. The move has high endlag, however this is remedied by the moves high shield-stun. Similar to other of Captain Falcon's moves, it has a rather small hitbox without any meaningful disjoint. | ||
==Update History== | |||
'''{{GameIcon|ssbu}} {{SSBU|3.1.0}}''' | |||
*{{buff|The sweetspot is larger (3.0u → 3.75u).}} | |||
==Hitboxes== | ==Hitboxes== | ||
{{UltimateHitboxTableHeader}} | {{UltimateHitboxTableHeader}} | ||
{{HitboxTableTitle|Clean hit| | {{HitboxTableTitle|Clean hit|50}} | ||
{{UltimateHitboxTableRow | {{UltimateHitboxTableRow | ||
|id=0 | |id=0 | ||
|damage=22.0% | |damage=22.0% | ||
|angle=32 | |angle=32 | ||
|af=3 | |||
|bk=30 | |bk=30 | ||
|ks=81 | |ks=81 | ||
| Line 19: | Line 22: | ||
|xpos=4.4 | |xpos=4.4 | ||
|ypos=-0.2 to 0.3 | |ypos=-0.2 to 0.3 | ||
|zpos=- | |zpos=-1.0 | ||
|ff=1.2 | |ff=1.2 | ||
|type=Knee | |type=Knee | ||
| Line 30: | Line 33: | ||
|damage=6.0% | |damage=6.0% | ||
|angle=361 | |angle=361 | ||
|af=3 | |||
|bk=35 | |bk=35 | ||
|ks=80 | |ks=80 | ||
| Line 44: | Line 48: | ||
|slvl=S | |slvl=S | ||
}} | }} | ||
{{HitboxTableTitle|Late hit| | {{HitboxTableTitle|Late hit|50}} | ||
{{UltimateHitboxTableRow | {{UltimateHitboxTableRow | ||
|id=0 | |id=0 | ||
|damage=3.0% | |damage=3.0% | ||
|angle=361 | |angle=361 | ||
|af=3 | |||
|bk=35 | |bk=35 | ||
|ks=80 | |ks=80 | ||
| Line 68: | Line 73: | ||
|damage=3.0% | |damage=3.0% | ||
|angle=361 | |angle=361 | ||
|af=3 | |||
|bk=35 | |bk=35 | ||
|ks=80 | |ks=80 | ||
| Line 114: | Line 120: | ||
===Landing lag=== | ===Landing lag=== | ||
{|class="wikitable" | {|class="wikitable" | ||
!Interruptible | |||
|19 | |||
|- | |||
!Animation length | !Animation length | ||
| | |29 | ||
|} | |} | ||
{{FrameStripStart}} | {{FrameStripStart}} | ||
{{FrameStrip|t=Lag|c=18}} | {{FrameStrip|t=Lag|c=18}}{{FrameStrip|t=Interruptible|c=11}} | ||
{{FrameStripEnd}} | {{FrameStripEnd}} | ||
{{FrameIconLegend|lag=y|hitbox=y|hitboxchange=y|autocancel=y|interruptible=y}} | {{FrameIconLegend|lag=y|hitbox=y|hitboxchange=y|autocancel=y|interruptible=y}} | ||
==Trivia== | |||
The move has [[Special Zoom]] parameters defined for a sweetspotted hit, in a similar vein to [[Falcon Punch]]. However, the Special Zoom is never applied in-game, so the data goes unused. The parameters correspond to the following: | |||
{|class="wikitable" | |||
!Parameter!!Forward aerial!!Falcon Punch | |||
|- | |||
!Duration | |||
|50 frames||40 frames | |||
|- | |||
!Slowdown magnitude | |||
|3||2 | |||
|- | |||
!Zoom rate | |||
|3.5||4.5 | |||
|- | |||
!Time before zoom | |||
|colspan=2|3 frames | |||
|- | |||
!Camera offsets | |||
|[8, -1.5]||[0, 0] | |||
|- | |||
!Background duration (non-1v1) | |||
|colspan=2|30 frames | |||
|} | |||
{{MvSubNavCaptainFalcon|g=SSBU}} | {{MvSubNavCaptainFalcon|g=SSBU}} | ||
[[Category:Captain Falcon (SSBU)]] | [[Category:Captain Falcon (SSBU)]] | ||
[[Category:Forward aerials (SSBU)]] | [[Category:Forward aerials (SSBU)]] | ||
Latest revision as of 13:52, August 29, 2024
Overview[edit]
Captain Falcon performs the infamous Knee Smash. While the sweetspot only lasts one frame, it's immensely powerful when it hits. Because of its sheer power, it deals high shield damage, makes a great edgeguarding tool, combo finisher, and punishes airdodges if the player reads it correctly or whiffed aerial moves. The move can be comboed into from the first hit of his neutral aerial, his up aerial, and down aerial. The sourspot also has a purpose in edgeguards because of its sex kick properties. The sourspot can also be used to start tech chases due to its semi-spike angle. Outside of its one frame sweetspot, the move is not without its drawbacks. The move has high endlag, however this is remedied by the moves high shield-stun. Similar to other of Captain Falcon's moves, it has a rather small hitbox without any meaningful disjoint.
Update History[edit]
 The sweetspot is larger (3.0u → 3.75u).
Hitboxes[edit]
Timing[edit]
Attack[edit]
| Initial autocancel | 1-4 |
|---|---|
| Clean hit | 14 |
| Late hit | 15-30 |
| Ending autocancel | 42- |
| Interruptible | 46 |
| Animation length | 59 |
Landing lag[edit]
| Interruptible | 19 |
|---|---|
| Animation length | 29 |
Lag time |
Hitbox |
Hitbox change |
Autocancel |
Interruptible |
Trivia[edit]
The move has Special Zoom parameters defined for a sweetspotted hit, in a similar vein to Falcon Punch. However, the Special Zoom is never applied in-game, so the data goes unused. The parameters correspond to the following:
| Parameter | Forward aerial | Falcon Punch |
|---|---|---|
| Duration | 50 frames | 40 frames |
| Slowdown magnitude | 3 | 2 |
| Zoom rate | 3.5 | 4.5 |
| Time before zoom | 3 frames | |
| Camera offsets | [8, -1.5] | [0, 0] |
| Background duration (non-1v1) | 30 frames | |
|
