Peach (SSBU)/Final Smash: Difference between revisions
Derekblue1 (talk | contribs) (A miracle, I did not know there was a Final Smash hitbox. WOW) |
ZeusDeeGoose (talk | contribs) m (→Overview: Improve wording) |
||
| (14 intermediate revisions by 7 users not shown) | |||
| Line 1: | Line 1: | ||
{{ArticleIcons|ssbu=y}} | {{ArticleIcons|ssbu=y}} | ||
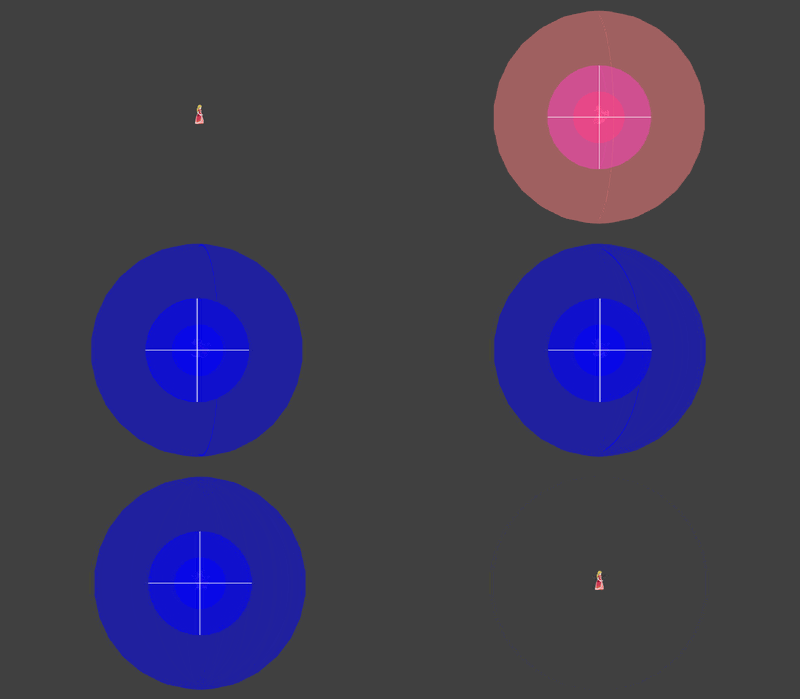
[[File:PeachPeachBlossomSSBU.gif|400px|thumb | [[File:PeachPeachBlossomSSBU.gif|400px|thumb|Hitbox visualization showing Peach's Final Smash on ground.]] | ||
==Overview== | ==Overview== | ||
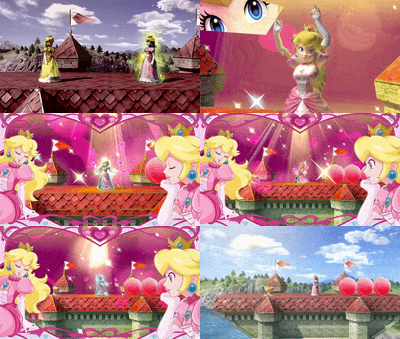
[[File:Peach Final Smash SSBU.gif|Peach's Final Smash.|200px|left|thumb]] | |||
Peach's [[Final Smash]] is '''[[Peach Blossom]]'''. Peach performs a dance, causing all of her enemies to fall [[asleep]]. The closer they are to her when she activates it, the more damage they will take and the longer they will slumber. The opponent can get away from the Final Smash if they are not on-screen when Peach Blossom is in action. While performing the Final Smash, three giant peaches appear, healing 20%. While asleep, Peach can choose how she can kill her opponent such as take advantage of charging her [[forward smash]] to the maximum (or hit them straight away if they are about to wake up). It must be noted that the sleeping victims may [[button mash]] to wake up faster. | |||
Regardless on the position of the opponent, the Final Smash will still take effect. If the opponent is stalling midair while the Final Smash takes effect, they will fall vertically until they reach the ground then sleep. Peach can take advantage of this effect if her opponents are off-stage and are right above a bottomless pit which can KO any opponent regardless of their percentage. | |||
== Update History == | == Update History == | ||
'''{{GameIcon|ssbu}} {{SSBU|3.0.0}}''' | '''{{GameIcon|ssbu}} {{SSBU|3.0.0}}''' | ||
* {{nerf|Peach Blossom has a slightly reduced sleep time period (clean: 260/200/160 (scaling) → 230/130/100, late: 210/170/140 (scaling) → 200/130/100).}} | * {{nerf|Peach Blossom has a slightly reduced sleep time period (clean: 260/200/160 (scaling) → 230/130/100, late: 210/170/140 (scaling) → 200/130/100).}} | ||
==Hitboxes== | ==Hitboxes== | ||
{{ | {{UltimateHitboxTableHeader}} | ||
{{HitboxTableTitle|Damaging hit|50}} | |||
{{UltimateHitboxTableRow | |||
|id=0 | |||
|damage=30.0% | |||
|angle=361 | |||
|bk=0 | |||
|ks=0 | |||
|fkv=0 | |||
|r=25.0 | |||
|bn=throw | |||
|xpos=0.0 | |||
|ypos=5.0 | |||
|zpos=0.0 | |||
|ff=0.0 | |||
|sdi=0.0 | |||
|clang=f | |||
|rebound=f | |||
|effect=Normal | |||
|type=Typeless | |||
|sfx=None | |||
|slvl=M | |||
|hitbits=Fighter only | |||
|blockable=f | |||
}} | |||
{{UltimateHitboxTableRow | |||
|id=1 | |||
|damage=20.0% | |||
|angle=361 | |||
|bk=0 | |||
|ks=0 | |||
|fkv=0 | |||
|r=50.0 | |||
|bn=throw | |||
|xpos=0.0 | |||
|ypos=5.0 | |||
|zpos=0.0 | |||
|ff=0.0 | |||
|sdi=0.0 | |||
|clang=f | |||
|rebound=f | |||
|effect=Normal | |||
|type=Typeless | |||
|sfx=None | |||
|slvl=M | |||
|hitbits=Fighter only | |||
|blockable=f | |||
}} | |||
{{UltimateHitboxTableRow | |||
|id=2 | |||
|damage=10.0% | |||
|angle=361 | |||
|bk=0 | |||
|ks=0 | |||
|fkv=0 | |||
|r=100.0 | |||
|bn=throw | |||
|xpos=0.0 | |||
|ypos=5.0 | |||
|zpos=0.0 | |||
|ff=0.0 | |||
|sdi=0.0 | |||
|clang=f | |||
|rebound=f | |||
|effect=Normal | |||
|type=Typeless | |||
|sfx=None | |||
|slvl=M | |||
|hitbits=Fighter only | |||
|blockable=f | |||
}} | |||
{{HitboxTableTitle|Clean sleep|50}} | |||
{{UltimateHitboxTableRow | |||
|id=4 | |||
|damage=0.0% | |||
|angle=0 | |||
|bk=0 | |||
|ks=230 | |||
|fkv=0 | |||
|r=25.0 | |||
|bn=throw | |||
|xpos=0.0 | |||
|ypos=5.0 | |||
|zpos=0.0 | |||
|ff=0.0 | |||
|sdi=0.0 | |||
|clang=f | |||
|rebound=f | |||
|effect=Sleep | |||
|type=Typeless | |||
|sfx=None | |||
|slvl=M | |||
|hitbits=Fighter only | |||
|blockable=f | |||
}} | |||
{{UltimateHitboxTableRow | |||
|id=5 | |||
|damage=0.0% | |||
|angle=0 | |||
|bk=0 | |||
|ks=130 | |||
|fkv=0 | |||
|r=50.0 | |||
|bn=throw | |||
|xpos=0.0 | |||
|ypos=5.0 | |||
|zpos=0.0 | |||
|ff=0.0 | |||
|sdi=0.0 | |||
|clang=f | |||
|rebound=f | |||
|effect=Sleep | |||
|type=Typeless | |||
|sfx=None | |||
|slvl=M | |||
|hitbits=Fighter only | |||
|blockable=f | |||
}} | |||
{{UltimateHitboxTableRow | |||
|id=6 | |||
|damage=0.0% | |||
|angle=0 | |||
|bk=0 | |||
|ks=100 | |||
|fkv=0 | |||
|r=100.0 | |||
|bn=throw | |||
|xpos=0.0 | |||
|ypos=5.0 | |||
|zpos=0.0 | |||
|ff=0.0 | |||
|sdi=0.0 | |||
|clang=f | |||
|rebound=f | |||
|a=f | |||
|effect=Sleep | |||
|type=Typeless | |||
|sfx=None | |||
|slvl=M | |||
|hitbits=Fighter only | |||
|blockable=f | |||
}} | |||
{{HitboxTableTitle|Late sleep|50}} | |||
{{UltimateHitboxTableRow | |||
|id=4 | |||
|damage=0.0% | |||
|angle=0 | |||
|bk=0 | |||
|ks=200 | |||
|fkv=0 | |||
|r=25.0 | |||
|bn=throw | |||
|xpos=0.0 | |||
|ypos=5.0 | |||
|zpos=0.0 | |||
|ff=0.0 | |||
|sdi=0.0 | |||
|clang=f | |||
|rebound=f | |||
|effect=Sleep | |||
|type=Typeless | |||
|sfx=None | |||
|slvl=M | |||
|hitbits=Fighter only | |||
|blockable=f | |||
}} | |||
{{UltimateHitboxTableRow | |||
|id=5 | |||
|damage=0.0% | |||
|angle=0 | |||
|bk=0 | |||
|ks=130 | |||
|fkv=0 | |||
|r=50.0 | |||
|bn=throw | |||
|xpos=0.0 | |||
|ypos=5.0 | |||
|zpos=0.0 | |||
|ff=0.0 | |||
|sdi=0.0 | |||
|clang=f | |||
|rebound=f | |||
|a=f | |||
|effect=Sleep | |||
|type=Typeless | |||
|sfx=None | |||
|slvl=M | |||
|hitbits=Fighter only | |||
|blockable=f | |||
}} | |||
{{UltimateHitboxTableRow | |||
|id=6 | |||
|damage=0.0% | |||
|angle=0 | |||
|bk=0 | |||
|ks=100 | |||
|fkv=0 | |||
|r=100.0 | |||
|bn=throw | |||
|xpos=0.0 | |||
|ypos=5.0 | |||
|zpos=0.0 | |||
|ff=0.0 | |||
|sdi=0.0 | |||
|clang=f | |||
|rebound=f | |||
|a=f | |||
|effect=Sleep | |||
|type=Typeless | |||
|sfx=None | |||
|slvl=M | |||
|hitbits=Fighter only | |||
|blockable=f | |||
}} | |||
|} | |||
==Timing== | ==Timing== | ||
{{ | {|class="wikitable" | ||
!Damaging hit | |||
|40-61 | |||
|- | |||
!Clean sleep | |||
|62-140 | |||
|- | |||
!Late sleep | |||
|141-230 | |||
|- | |||
!Interruptible | |||
|248 | |||
|- | |||
!Animation length | |||
|255 | |||
|} | |||
{{FrameStripStart}} | |||
{{FrameStrip|t=Lag|c=39}}{{FrameStrip|t=Hitbox|c=21|e=HitboxChangeS}}{{FrameStrip|t=Hitbox|c=78|s=HitboxChangeE}}{{FrameStrip|t=Hitbox|c=90|s=HitboxChangeE}}{{FrameStrip|t=Lag|c=17}}{{FrameStrip|t=Interruptible|c=8}} | |||
{{FrameStripEnd}} | |||
{{MvSubNavPeach|g=SSBU}} | {{MvSubNavPeach|g=SSBU}} | ||
[[Category:Peach (SSBU)]] | [[Category:Peach (SSBU)]] | ||
[[Category:Final Smashes (SSBU)]] | [[Category:Final Smashes (SSBU)]] | ||
Latest revision as of 13:21, August 18, 2024
Overview[edit]
Peach's Final Smash is Peach Blossom. Peach performs a dance, causing all of her enemies to fall asleep. The closer they are to her when she activates it, the more damage they will take and the longer they will slumber. The opponent can get away from the Final Smash if they are not on-screen when Peach Blossom is in action. While performing the Final Smash, three giant peaches appear, healing 20%. While asleep, Peach can choose how she can kill her opponent such as take advantage of charging her forward smash to the maximum (or hit them straight away if they are about to wake up). It must be noted that the sleeping victims may button mash to wake up faster.
Regardless on the position of the opponent, the Final Smash will still take effect. If the opponent is stalling midair while the Final Smash takes effect, they will fall vertically until they reach the ground then sleep. Peach can take advantage of this effect if her opponents are off-stage and are right above a bottomless pit which can KO any opponent regardless of their percentage.
Update History[edit]
 Peach Blossom has a slightly reduced sleep time period (clean: 260/200/160 (scaling) → 230/130/100, late: 210/170/140 (scaling) → 200/130/100).
Hitboxes[edit]
Timing[edit]
| Damaging hit | 40-61 |
|---|---|
| Clean sleep | 62-140 |
| Late sleep | 141-230 |
| Interruptible | 248 |
| Animation length | 255 |
|

