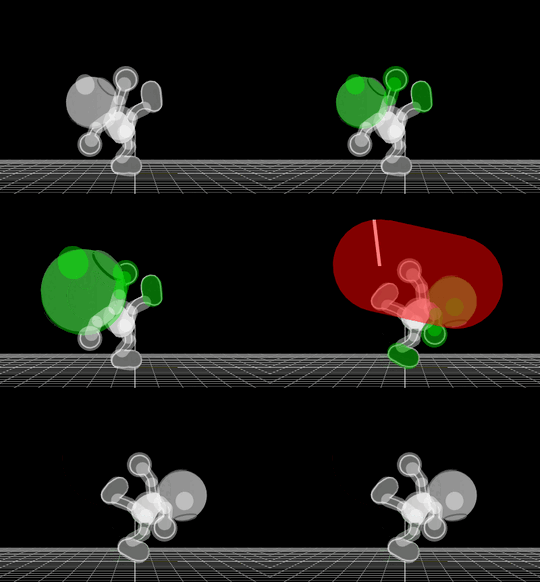
Mr. Game & Watch (SSB4)/Up smash: Difference between revisions
m (→Timing) |
(→Timing: This is simply not true. G&W doesn't have mirrored stance.) |
||
| (12 intermediate revisions by 5 users not shown) | |||
| Line 1: | Line 1: | ||
{{ArticleIcons|ssb4=y}} | {{ArticleIcons|ssb4=y}} | ||
[[File: | [[File:MrG&WUpSmash.gif|thumb|270px|Hitbox visualization showing Mr. Game & Watch's up smash.]] | ||
==Overview== | ==Overview== | ||
Mr. Game & Watch performs a powerful headbutt while wearing a diving helmet. One very short [[hitbox]], with a long period of [[invincibility]] on his head and middle-body [[hurtbox]]es right up until it comes out. Defensively, this is one of the best [[up smash]]es in the game. The biggest weakness of the move is the [[lag]] time before the hitbox comes out and some after it ends; but the invincibility helps circumvent this, making it a legitimate counter-based kill move. His legs are still vulnerable during the invincibility period, thus making some grounded moves capable of hitting. If approaching with an aerial, this move is a hard [[punish]] and can easily [[KO]] most characters at under 100%. When it whiffs altogether, it can be used again if they are too slow to punish the first one. Spamming it is viable when opponents are in KO percentages, but this is of course risky. If used on shield, | Mr. Game & Watch performs a powerful headbutt while wearing a diving helmet. One very short [[hitbox]], with a long period of [[invincibility]] on his head and middle-body [[hurtbox]]es right up until it comes out. Defensively, this is one of the best [[up smash]]es in the game. The biggest weakness of the move is the [[lag]] time before the hitbox comes out and some after it ends; but the invincibility helps circumvent this, making it a legitimate counter-based kill move. His legs are still vulnerable during the invincibility period, thus making some grounded moves capable of hitting. If approaching with an aerial, this move is a hard [[punish]] and can easily [[KO]] most characters at under 100%. When it whiffs altogether, it can be used again if they are too slow to punish the first one. Spamming it is viable when opponents are in KO percentages, but this is of course risky. If used on shield, it is completely safe at only -3 (along with high shield pushback). An opponent could be punished for dropping shield with a tilt, jab, or dash attack. Charging it at ledge as a get-up read or simply as a mixup can get even earlier KOs. | ||
==Hitboxes== | ==Hitboxes== | ||
{{SSB4HitboxTableHeader}} | {{SSB4HitboxTableHeader|stretch=y}} | ||
{{SSB4HitboxTableRow | {{SSB4HitboxTableRow | ||
|id=0 | |id=0 | ||
|part=0 | |part=0 | ||
|damage=16 | |damage={{ChargedSmashDmgSSB4|16}} | ||
|angle=83 | |angle=83 | ||
|bk=40 | |bk=40 | ||
| Line 19: | Line 19: | ||
|xpos=0.0 | |xpos=0.0 | ||
|ypos=12.0 | |ypos=12.0 | ||
|ystretch=10.0 | |||
|zpos=-3.0 | |zpos=-3.0 | ||
|zstretch=6.0 | |||
|type=Head | |type=Head | ||
|sdi=1.0 | |sdi=1.0 | ||
| Line 30: | Line 32: | ||
==Timing== | ==Timing== | ||
{|class="wikitable" | {|class="wikitable" | ||
!Head/ | !Head/side limbs invincibility | ||
|4-25 | |4-25 | ||
|- | |- | ||
| Line 43: | Line 45: | ||
|- | |- | ||
!Animation length | !Animation length | ||
| | |43 | ||
|} | |} | ||
{{FrameStripStart}} | {{FrameStripStart}} | ||
|Hitboxes {{FrameStrip|t=Lag|c=17|e=LagChargeS}}{{FrameStrip|t=Lag|c=6|s=LagChargeE}}{{FrameStrip|t=Hitbox|c=2}}{{FrameStrip|t=Lag|c=13}}{{FrameStrip|t=Interruptible|c= | |Hitboxes {{FrameStrip|t=Lag|c=17|e=LagChargeS}}{{FrameStrip|t=Lag|c=6|s=LagChargeE}}{{FrameStrip|t=Hitbox|c=2}}{{FrameStrip|t=Lag|c=13}}{{FrameStrip|t=Interruptible|c=5}} | ||
|- | |- | ||
| | |Invincibility {{FrameStrip|t=Vulnerable|c=3}}{{FrameStrip|t=Invincible|c=22}}{{FrameStrip|t=Vulnerable|c=18}} | ||
{{FrameStripEnd}} | {{FrameStripEnd}} | ||
Latest revision as of 09:45, July 13, 2024
Overview[edit]
Mr. Game & Watch performs a powerful headbutt while wearing a diving helmet. One very short hitbox, with a long period of invincibility on his head and middle-body hurtboxes right up until it comes out. Defensively, this is one of the best up smashes in the game. The biggest weakness of the move is the lag time before the hitbox comes out and some after it ends; but the invincibility helps circumvent this, making it a legitimate counter-based kill move. His legs are still vulnerable during the invincibility period, thus making some grounded moves capable of hitting. If approaching with an aerial, this move is a hard punish and can easily KO most characters at under 100%. When it whiffs altogether, it can be used again if they are too slow to punish the first one. Spamming it is viable when opponents are in KO percentages, but this is of course risky. If used on shield, it is completely safe at only -3 (along with high shield pushback). An opponent could be punished for dropping shield with a tilt, jab, or dash attack. Charging it at ledge as a get-up read or simply as a mixup can get even earlier KOs.
Hitboxes[edit]
| ID | Part | Damage | SD | Angle | BK | KS | FKV | Radius | Bone | Offset | SDIx | H× | T% | Clang | Rebound | Type | Effect | G | A | Sound | Direct | Stretch | ||||
|---|---|---|---|---|---|---|---|---|---|---|---|---|---|---|---|---|---|---|---|---|---|---|---|---|---|---|
| 0 | 0 | 16% | 0 | 40 | 93 | 0 | 5.5 | 0 | 0.0 | 12.0 | -3.0 | 1.0x | 1.0x | 0% | 0.0 | 10.0 | 6.0 | |||||||||
Timing[edit]
| Head/side limbs invincibility | 4-25 |
|---|---|
| Charges between | 17-18 |
| Hitbox | 24-25 |
| Interruptible | 39 |
| Animation length | 43 |
| Hitboxes | |||||||||||||||||||||||||||||||||||||||||||
| Invincibility |
Lag time |
Charge interval |
Hitbox |
Vulnerable |
Invincible |
Interruptible |
|
