SSBU Icon.png

Ice Climbers (SSBU)/Side special: Difference between revisions

From SmashWiki, the Super Smash Bros. wiki
Jump to navigationJump to search
(→‎Overview: Continuing to elaborate...)
m (→‎Overview: links.)
 
Line 5: Line 5:
The duo twirls back-to-back with its mallets extended, happily swinging up and out at the end. If separated, the climber who is present twirls on their tiptoes and ends by swinging out horizontally. It sports a relatively fast startup and a long-lasting multihit nature, with adjustable trajectory and vertical gain, and deals great damage if the move connects in its entirety. During all but the ending lag of the move, pressing B will make the Ice Climbers hop off the ground, even flying through the air if pressed repeatedly. Despite technically being very unsafe on shield, it's quite difficult to difficult to punish since players can put a significant distance between them and their foes at the end of the move, made extra unpredictable by its ability to [[Cross-up|cross up]] shields. On top of being disjointed, the move sports comically high priority, able to overcome such powerful moves as [[Ganondorf (SSBU)/Forward smash|Ganondorf's forward smash]] and [[Villager (SSBU)/Down special|Villager's down special]]. Similarly to their [[Ice Climbers (SSBU)/Up special|up special]], using Squall Hammer teleports the partner climber to the leader's position in order to use its dual variant (provided the partner is not using a different special move, in [[hitstun]], grabbing the [[edge]], or outside of its search radius) This also doubles as a way to quickly regroup the duo and cancel the 2nd Climber's move during a [[Desynching|desync]]. A side special can be done out of a short hop to turn the move into an out of shield option. While the collective 13 frame startup is a little slow for a punish, the partner's shield lag somewhat nullifies this flaw, and the payoff for punishing with a side special is well worth the downside, anyway. For inexperienced players, Squall Hammer is an attractive option due to its great versatility and ease of use, and can lead to spam playstyles early on. Its high speed, priority, and damage output incentivizes excessive use of the move at low-level play, and even at higher levels if abused unpredictably.


At low percentages, a side special can lead to an [[Ice Climbers (SSBU)/Up tilt|up tilt]] or [[Ice Climbers (SSBU)/Up aerial|up aerial]], inducing monstrous combos with the up airs that often follow. While conversions out of Squall hammer are seldom true, they're often only a few frames away, and usually work since the opponents won't have enough time to escape anyway. The move occasionally works as a combo finisher after an up aerial, but this is situational, since it's difficult to get the entire move to land from below an opponent and often requires the duo to travel relatively far offstage. With some desyncing, one of the two can be made to perform their single variant of their side special. This can be used to surround and protect the other climber with disjointed hitboxes while giving them freedom to use any other move, or to trap victims in a prolonged attack that allows the other climber to land a variety of followups. A desynced Squall Hammer with just the 1st Climber can carry the opposition across a large chunk of the stage while granting the 2nd Climber plenty of time to spike the opponent. When attempting this, their forward air should be done out of a dash to make sure they're close enough to land it if the aforementioned Squall Hammer knocks the target away. The moves can also be done the other way around, having the duo's leader use a forward air. While this can KO at high percents, it's not nearly as potent as the one that spikes. Additionally, a single side special performed this way can confirm into grabs and initiate a slew of other deadly setups, such as their infamous forward throw to forward aerial confirm. When desynced only slightly, each of the duo will perform their single-climber variant as if they were separated. This can often occur as a result of buffering the move right after taking a hit or using a different special. This is usually undesireable because it won't have the damage or combo potential of its stronger form, but if positioned just right, opponents can get pulled in between the climbers, taking more of multihits than they're supposed to and actually putting on more damage than the dual variant would've dealt.
At low percentages, a side special can lead to an [[Ice Climbers (SSBU)/Up tilt|up tilt]] or [[Ice Climbers (SSBU)/Up aerial|up aerial]], inducing monstrous combos with the up airs that often follow. While conversions out of Squall hammer are seldom true, they're often only a few frames away, and usually work since the opponents won't have enough time to escape anyway. The move occasionally works as a combo finisher after an up aerial, but this is situational, since it's difficult to get the entire move to land from below an opponent and puts the duo in [[Helpless|freefall]] afterwards. With some desyncing, one of the two can be made to perform their single variant of their side special. This can be used to surround and protect the other climber with disjointed hitboxes while giving them freedom to use any other move, or to trap victims in a prolonged attack that allows the other climber to land a variety of followups. A desynced Squall Hammer with just the 1st Climber can carry the opposition across a large chunk of the stage while granting the 2nd Climber plenty of time to spike the opponent with a [[Ice Climbers (SSBU)/Forward aerial|forward aerial]]. When attempting this, their forward air should be done out of a dash to make sure they're close enough to land it if the aforementioned Squall Hammer knocks the target away. The moves can also be done the other way around, having the duo's leader use a forward air. While this can KO at high percents, it's not nearly as potent as the one that spikes. Additionally, a single side special performed this way can confirm into grabs and initiate a slew of other deadly setups, such as their infamous [[Ice Climbers (SSBU)/Forward throw|forward throw]] to forward aerial confirm. When desynced only slightly, each of the duo will perform their single-climber variant as if they were separated. This can often occur as a result of [[buffering]] the move right after taking a hit or using a different special. This is usually undesireable because it won't have the damage or combo potential of its stronger form, but if positioned just right, opponents can get pulled in between the climbers, taking more of multihits than they're supposed to and actually putting on more damage than the dual variant would've dealt.


When used offstage, it serves as a very impressive horizontal recovery option, with passable verticality on top of that. However, it can be interrupted by transcendent projectiles. If only one climber is hit, the other may become helpless, potentially gimping the duo if the player reacts poorly. Another thing to note is that if the move is hitting an opponent, it won't respond to player input during the hitlag, so hitting an enemy while offstage can hinder recovery attempts. This issue is compounded by the move's inability to snap to the ledge, requiring careful usage off stage. As such, it should be saved for use as a mixup or in situations where Belay wouldn't go far enough horizontally.
When used offstage, it serves as a very impressive horizontal recovery option, with passable verticality on top of that. However, it can be interrupted by transcendent projectiles. If only one climber is hit, the other may become [[helpless]], potentially [[Gimp|gimping]] the duo if the player reacts poorly. Another thing to note is that if the move is hitting an opponent, it won't respond to player input during the hitlag, so hitting an enemy while offstage can hinder recovery attempts. This issue is compounded by the move's inability to snap to the ledge, requiring careful usage off stage. As such, it should be saved for use as a mixup or in situations where [[Ice Climbers (SSBU)/Up special|Belay]] wouldn't go far enough horizontally.


By surrounding the user in prioritized, disjointed hitboxes and allowing them to air-stall or descend quickly, Squall Hammer sometimes comes in handy when dealing with opposing juggles. The ability to mix up one's momentum in several directions and speeds combined with a flurry of attacks makes the move surprisingly difficult to intercept
By surrounding the user in prioritized, disjointed hitboxes and allowing them to air-stall or descend quickly, Squall Hammer sometimes comes in handy when dealing with opposing [[Juggling|juggles]]. The ability to mix up one's momentum in several directions and speeds combined with a flurry of attacks makes the move surprisingly difficult to intercept


Upon isolation, side special's finisher hit only covers one side, and packs a horizontal launch angle rather than a diagonal one. This changes its utility significantly, setting up tech chases rather than combos or juggles. On top of that, it deals much less damage and no longer gains height when used midair. While the single and dual variants of Squall Hammer are quite different, the dual variant is unsurprisingly much better, and an incredible move in general. But the single variant is not bad by any means.
Upon isolation, side special's finisher hit only covers one side, and packs a horizontal launch angle rather than a diagonal one. This changes its utility significantly, setting up [[Tech-chasing|tech chases]] rather than combos or juggles. On top of that, it deals much less damage and no longer gains height when used midair. While the single and dual variants of Squall Hammer are quite different, the dual variant is unsurprisingly much better, and an incredible move in general. But the single variant is not bad by any means.


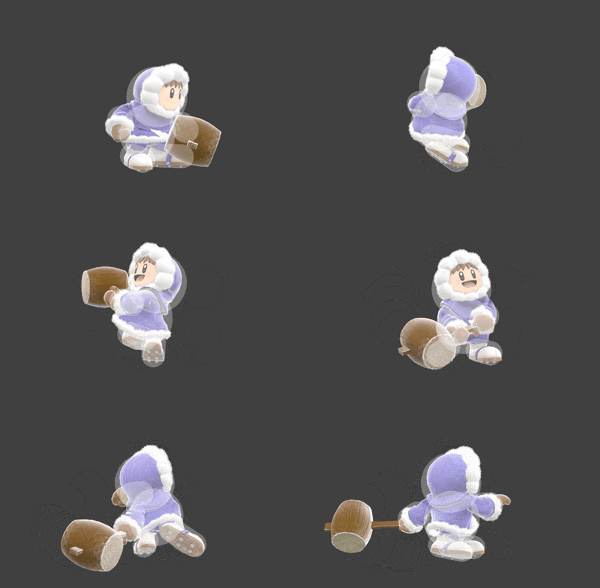
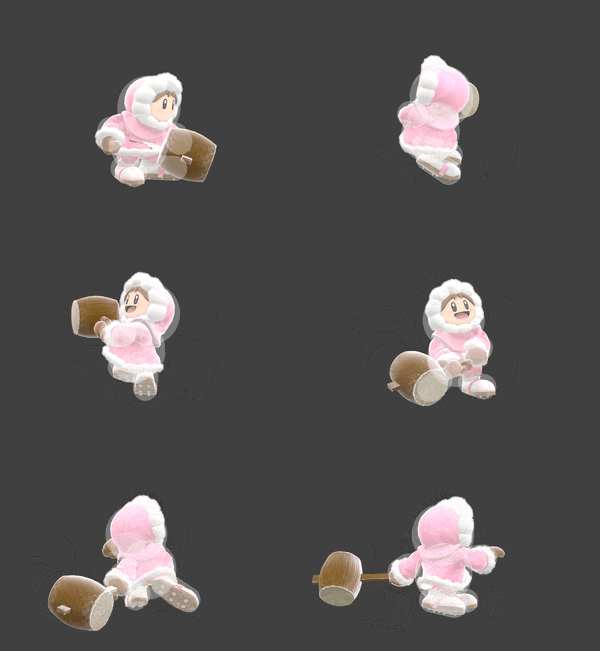
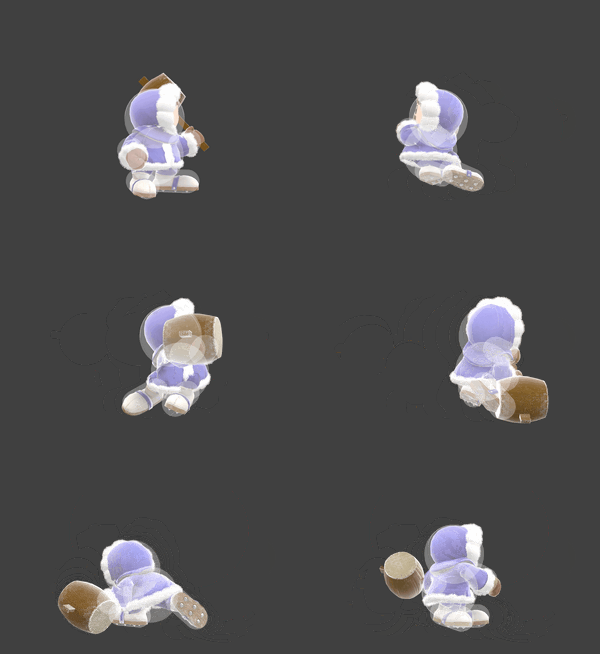
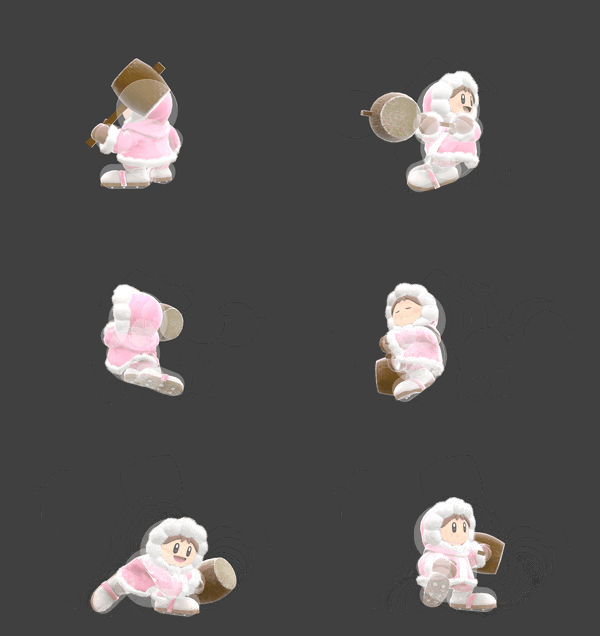
==Hitbox visualizations==

Latest revision as of 16:52, May 29, 2024

This article is about the hitbox visualization in Super Smash Bros. Ultimate. For the move itself, see Squall Hammer.

Overview[edit]

The duo twirls back-to-back with its mallets extended, happily swinging up and out at the end. If separated, the climber who is present twirls on their tiptoes and ends by swinging out horizontally. It sports a relatively fast startup and a long-lasting multihit nature, with adjustable trajectory and vertical gain, and deals great damage if the move connects in its entirety. During all but the ending lag of the move, pressing B will make the Ice Climbers hop off the ground, even flying through the air if pressed repeatedly. Despite technically being very unsafe on shield, it's quite difficult to difficult to punish since players can put a significant distance between them and their foes at the end of the move, made extra unpredictable by its ability to cross up shields. On top of being disjointed, the move sports comically high priority, able to overcome such powerful moves as Ganondorf's forward smash and Villager's down special. Similarly to their up special, using Squall Hammer teleports the partner climber to the leader's position in order to use its dual variant (provided the partner is not using a different special move, in hitstun, grabbing the edge, or outside of its search radius) This also doubles as a way to quickly regroup the duo and cancel the 2nd Climber's move during a desync. A side special can be done out of a short hop to turn the move into an out of shield option. While the collective 13 frame startup is a little slow for a punish, the partner's shield lag somewhat nullifies this flaw, and the payoff for punishing with a side special is well worth the downside, anyway. For inexperienced players, Squall Hammer is an attractive option due to its great versatility and ease of use, and can lead to spam playstyles early on. Its high speed, priority, and damage output incentivizes excessive use of the move at low-level play, and even at higher levels if abused unpredictably.

At low percentages, a side special can lead to an up tilt or up aerial, inducing monstrous combos with the up airs that often follow. While conversions out of Squall hammer are seldom true, they're often only a few frames away, and usually work since the opponents won't have enough time to escape anyway. The move occasionally works as a combo finisher after an up aerial, but this is situational, since it's difficult to get the entire move to land from below an opponent and puts the duo in freefall afterwards. With some desyncing, one of the two can be made to perform their single variant of their side special. This can be used to surround and protect the other climber with disjointed hitboxes while giving them freedom to use any other move, or to trap victims in a prolonged attack that allows the other climber to land a variety of followups. A desynced Squall Hammer with just the 1st Climber can carry the opposition across a large chunk of the stage while granting the 2nd Climber plenty of time to spike the opponent with a forward aerial. When attempting this, their forward air should be done out of a dash to make sure they're close enough to land it if the aforementioned Squall Hammer knocks the target away. The moves can also be done the other way around, having the duo's leader use a forward air. While this can KO at high percents, it's not nearly as potent as the one that spikes. Additionally, a single side special performed this way can confirm into grabs and initiate a slew of other deadly setups, such as their infamous forward throw to forward aerial confirm. When desynced only slightly, each of the duo will perform their single-climber variant as if they were separated. This can often occur as a result of buffering the move right after taking a hit or using a different special. This is usually undesireable because it won't have the damage or combo potential of its stronger form, but if positioned just right, opponents can get pulled in between the climbers, taking more of multihits than they're supposed to and actually putting on more damage than the dual variant would've dealt.

When used offstage, it serves as a very impressive horizontal recovery option, with passable verticality on top of that. However, it can be interrupted by transcendent projectiles. If only one climber is hit, the other may become helpless, potentially gimping the duo if the player reacts poorly. Another thing to note is that if the move is hitting an opponent, it won't respond to player input during the hitlag, so hitting an enemy while offstage can hinder recovery attempts. This issue is compounded by the move's inability to snap to the ledge, requiring careful usage off stage. As such, it should be saved for use as a mixup or in situations where Belay wouldn't go far enough horizontally.

By surrounding the user in prioritized, disjointed hitboxes and allowing them to air-stall or descend quickly, Squall Hammer sometimes comes in handy when dealing with opposing juggles. The ability to mix up one's momentum in several directions and speeds combined with a flurry of attacks makes the move surprisingly difficult to intercept

Upon isolation, side special's finisher hit only covers one side, and packs a horizontal launch angle rather than a diagonal one. This changes its utility significantly, setting up tech chases rather than combos or juggles. On top of that, it deals much less damage and no longer gains height when used midair. While the single and dual variants of Squall Hammer are quite different, the dual variant is unsurprisingly much better, and an incredible move in general. But the single variant is not bad by any means.

Hitbox visualizations[edit]

Leader Partner
Singular PopoSquallHammerSoloSSBU.gif NanaSquallHammerSoloSSBU.gif
Dual PopoSquallHammerDuoSSBU.gif NanaSquallHammerDuoSSBU.gif


Hitboxes[edit]

Singular (leader)[edit]

ID Part Rehit rate Damage SD Angle Angle type BK KS FKV Set weight Radius Bone Offset SDI× T% Clang Rebound Effect Type G A Sound Direct Hit bits Hit part Blockable Reflectable Absorbable Flinchless No GFX Heedless
Front hits 1-5
0 0 0 1.3% 0 AngleIcon25.png Forward 25 95 0 HitboxTableIcon(False).png 3.5 top 0.0 7.5 3.0 0.7× 1.3× 0% HitboxTableIcon(Clang).png HitboxTableIcon(Rebound).png EffectIcon(Normal).png TypeIcon(Hammer).png HitboxTableIcon(GroundedTrue).png HitboxTableIcon(AerialTrue).png M Kick SpecialsDirect.png All All HitboxTableIcon(Blockable).png HitboxTableIcon(Unreflectable).png HitboxTableIcon(Unabsorbable).png HitboxTableIcon(False).png HitboxTableIcon(False).png HitboxTableIcon(False).png
1 0 0 1.3% 0 AngleIcon32.png Forward 13 95 0 HitboxTableIcon(False).png 4.0 top 0.0 8.0 8.5 0.7× 1.3× 0% HitboxTableIcon(Clang).png HitboxTableIcon(Rebound).png EffectIcon(Normal).png TypeIcon(Hammer).png HitboxTableIcon(GroundedTrue).png HitboxTableIcon(AerialTrue).png M Kick SpecialsDirect.png All All HitboxTableIcon(Blockable).png HitboxTableIcon(Unreflectable).png HitboxTableIcon(Unabsorbable).png HitboxTableIcon(False).png HitboxTableIcon(False).png HitboxTableIcon(False).png
Back hits 1-5
2 0 0 1.3% 0 AngleIcon25.png Standard 25 95 0 HitboxTableIcon(False).png 3.5 top 0.0 7.5 -3.0 0.7× 1.3× 0% HitboxTableIcon(Clang).png HitboxTableIcon(Rebound).png EffectIcon(Normal).png TypeIcon(Hammer).png HitboxTableIcon(GroundedTrue).png HitboxTableIcon(AerialTrue).png M Kick SpecialsDirect.png All All HitboxTableIcon(Blockable).png HitboxTableIcon(Unreflectable).png HitboxTableIcon(Unabsorbable).png HitboxTableIcon(False).png HitboxTableIcon(False).png HitboxTableIcon(False).png
3 0 0 1.3% 0 AngleIcon32.png Standard 13 95 0 HitboxTableIcon(False).png 4.0 top 0.0 8.0 -8.5 0.7× 1.3× 0% HitboxTableIcon(Clang).png HitboxTableIcon(Rebound).png EffectIcon(Normal).png TypeIcon(Hammer).png HitboxTableIcon(GroundedTrue).png HitboxTableIcon(AerialTrue).png M Kick SpecialsDirect.png All All HitboxTableIcon(Blockable).png HitboxTableIcon(Unreflectable).png HitboxTableIcon(Unabsorbable).png HitboxTableIcon(False).png HitboxTableIcon(False).png HitboxTableIcon(False).png
Final hit
0 0 0 2.0% 0 Sakurai angle Forward 50 100 0 HitboxTableIcon(False).png 3.5 top 0.0 7.5 4.0 1.0× 1.5× 0% HitboxTableIcon(Clang).png HitboxTableIcon(Rebound).png EffectIcon(Normal).png TypeIcon(Hammer).png HitboxTableIcon(GroundedTrue).png HitboxTableIcon(AerialTrue).png M Kick SpecialsDirect.png All All HitboxTableIcon(Blockable).png HitboxTableIcon(Unreflectable).png HitboxTableIcon(Unabsorbable).png HitboxTableIcon(False).png HitboxTableIcon(False).png HitboxTableIcon(False).png
1 0 0 2.0% 0 Sakurai angle Forward 50 100 0 HitboxTableIcon(False).png 5.0 top 0.0 8.0 10.0 1.0× 1.5× 0% HitboxTableIcon(Clang).png HitboxTableIcon(Rebound).png EffectIcon(Normal).png TypeIcon(Hammer).png HitboxTableIcon(GroundedTrue).png HitboxTableIcon(AerialTrue).png M Kick SpecialsDirect.png All All HitboxTableIcon(Blockable).png HitboxTableIcon(Unreflectable).png HitboxTableIcon(Unabsorbable).png HitboxTableIcon(False).png HitboxTableIcon(False).png HitboxTableIcon(False).png

Singular (partner)[edit]

ID Part Rehit rate Damage SD Angle Angle type BK KS FKV Set weight Radius Bone Offset SDI× T% Clang Rebound Effect Type G A Sound Direct Hit bits Hit part Blockable Reflectable Absorbable Flinchless No GFX Heedless
Front hits 1-5
0 0 0 0.975% 0 AngleIcon25.png Forward 25 95 0 HitboxTableIcon(False).png 3.5 top 0.0 7.5 3.0 0.7× 1.3× 0% HitboxTableIcon(Clang).png HitboxTableIcon(Rebound).png EffectIcon(Normal).png TypeIcon(Hammer).png HitboxTableIcon(GroundedTrue).png HitboxTableIcon(AerialTrue).png M Kick SpecialsDirect.png All All HitboxTableIcon(Blockable).png HitboxTableIcon(Unreflectable).png HitboxTableIcon(Unabsorbable).png HitboxTableIcon(False).png HitboxTableIcon(False).png HitboxTableIcon(False).png
1 0 0 0.975% 0 AngleIcon32.png Forward 13 95 0 HitboxTableIcon(False).png 4.0 top 0.0 8.0 8.5 0.7× 1.3× 0% HitboxTableIcon(Clang).png HitboxTableIcon(Rebound).png EffectIcon(Normal).png TypeIcon(Hammer).png HitboxTableIcon(GroundedTrue).png HitboxTableIcon(AerialTrue).png M Kick SpecialsDirect.png All All HitboxTableIcon(Blockable).png HitboxTableIcon(Unreflectable).png HitboxTableIcon(Unabsorbable).png HitboxTableIcon(False).png HitboxTableIcon(False).png HitboxTableIcon(False).png
Back hits 1-5
2 0 0 0.975% 0 AngleIcon25.png Standard 25 95 0 HitboxTableIcon(False).png 3.5 top 0.0 7.5 -3.0 0.7× 1.3× 0% HitboxTableIcon(Clang).png HitboxTableIcon(Rebound).png EffectIcon(Normal).png TypeIcon(Hammer).png HitboxTableIcon(GroundedTrue).png HitboxTableIcon(AerialTrue).png M Kick SpecialsDirect.png All All HitboxTableIcon(Blockable).png HitboxTableIcon(Unreflectable).png HitboxTableIcon(Unabsorbable).png HitboxTableIcon(False).png HitboxTableIcon(False).png HitboxTableIcon(False).png
3 0 0 0.975% 0 AngleIcon32.png Standard 13 95 0 HitboxTableIcon(False).png 4.0 top 0.0 8.0 -8.5 0.7× 1.3× 0% HitboxTableIcon(Clang).png HitboxTableIcon(Rebound).png EffectIcon(Normal).png TypeIcon(Hammer).png HitboxTableIcon(GroundedTrue).png HitboxTableIcon(AerialTrue).png M Kick SpecialsDirect.png All All HitboxTableIcon(Blockable).png HitboxTableIcon(Unreflectable).png HitboxTableIcon(Unabsorbable).png HitboxTableIcon(False).png HitboxTableIcon(False).png HitboxTableIcon(False).png
Final hit
0 0 0 1.5% 0 Sakurai angle Forward 50 100 0 HitboxTableIcon(False).png 3.5 top 0.0 7.5 4.0 1.0× 1.5× 0% HitboxTableIcon(Clang).png HitboxTableIcon(Rebound).png EffectIcon(Normal).png TypeIcon(Hammer).png HitboxTableIcon(GroundedTrue).png HitboxTableIcon(AerialTrue).png M Kick SpecialsDirect.png All All HitboxTableIcon(Blockable).png HitboxTableIcon(Unreflectable).png HitboxTableIcon(Unabsorbable).png HitboxTableIcon(False).png HitboxTableIcon(False).png HitboxTableIcon(False).png
1 0 0 1.5% 0 Sakurai angle Forward 50 100 0 HitboxTableIcon(False).png 5.0 top 0.0 8.0 10.0 1.0× 1.5× 0% HitboxTableIcon(Clang).png HitboxTableIcon(Rebound).png EffectIcon(Normal).png TypeIcon(Hammer).png HitboxTableIcon(GroundedTrue).png HitboxTableIcon(AerialTrue).png M Kick SpecialsDirect.png All All HitboxTableIcon(Blockable).png HitboxTableIcon(Unreflectable).png HitboxTableIcon(Unabsorbable).png HitboxTableIcon(False).png HitboxTableIcon(False).png HitboxTableIcon(False).png

Dual[edit]

ID Part Rehit rate Damage SD Angle Angle type BK KS FKV Set weight Radius Bone Offset SDI× T% Clang Rebound Effect Type G A Sound Direct Hit bits Hit part Blockable Reflectable Absorbable Flinchless No GFX Heedless
Hits 1-7
0 0 0 2.2% 0 AngleIcon25.png Forward 25 60 0 HitboxTableIcon(False).png 3.5 top 0.0 7.5 4.5 0.7× 1.3× 0% HitboxTableIcon(Clang).png HitboxTableIcon(Rebound).png EffectIcon(Normal).png TypeIcon(Hammer).png HitboxTableIcon(GroundedTrue).png HitboxTableIcon(AerialTrue).png M Kick SpecialsDirect.png All All HitboxTableIcon(Blockable).png HitboxTableIcon(Unreflectable).png HitboxTableIcon(Unabsorbable).png HitboxTableIcon(False).png HitboxTableIcon(False).png HitboxTableIcon(False).png
1 0 0 2.2% 0 AngleIcon32.png Forward 13 60 0 HitboxTableIcon(False).png 4.5 top 0.0 8.0 10.0 0.7× 1.3× 0% HitboxTableIcon(Clang).png HitboxTableIcon(Rebound).png EffectIcon(Normal).png TypeIcon(Hammer).png HitboxTableIcon(GroundedTrue).png HitboxTableIcon(AerialTrue).png M Kick SpecialsDirect.png All All HitboxTableIcon(Blockable).png HitboxTableIcon(Unreflectable).png HitboxTableIcon(Unabsorbable).png HitboxTableIcon(False).png HitboxTableIcon(False).png HitboxTableIcon(False).png
2 0 0 2.2% 0 AngleIcon25.png Standard 25 50 0 HitboxTableIcon(False).png 3.5 top 0.0 7.5 -4.0 0.7× 1.3× 0% HitboxTableIcon(Clang).png HitboxTableIcon(Rebound).png EffectIcon(Normal).png TypeIcon(Hammer).png HitboxTableIcon(GroundedTrue).png HitboxTableIcon(AerialTrue).png M Kick SpecialsDirect.png All All HitboxTableIcon(Blockable).png HitboxTableIcon(Unreflectable).png HitboxTableIcon(Unabsorbable).png HitboxTableIcon(False).png HitboxTableIcon(False).png HitboxTableIcon(False).png
3 0 0 2.2% 0 AngleIcon32.png Standard 13 50 0 HitboxTableIcon(False).png 4.0 top 0.0 8.0 -10.0 0.7× 1.3× 0% HitboxTableIcon(Clang).png HitboxTableIcon(Rebound).png EffectIcon(Normal).png TypeIcon(Hammer).png HitboxTableIcon(GroundedTrue).png HitboxTableIcon(AerialTrue).png M Kick SpecialsDirect.png All All HitboxTableIcon(Blockable).png HitboxTableIcon(Unreflectable).png HitboxTableIcon(Unabsorbable).png HitboxTableIcon(False).png HitboxTableIcon(False).png HitboxTableIcon(False).png
Final hit (early)
0 0 0 4.0% 0 AngleIcon70.png Standard 50 140 0 HitboxTableIcon(False).png 5.0 top 0.0 6.0 to 12.0 10.0 1.5× 1.0× 0% HitboxTableIcon(Clang).png HitboxTableIcon(Rebound).png EffectIcon(Normal).png TypeIcon(Hammer).png HitboxTableIcon(GroundedTrue).png HitboxTableIcon(AerialTrue).png L Kick SpecialsDirect.png All All HitboxTableIcon(Blockable).png HitboxTableIcon(Unreflectable).png HitboxTableIcon(Unabsorbable).png HitboxTableIcon(False).png HitboxTableIcon(False).png HitboxTableIcon(False).png
1 0 0 4.0% 0 AngleIcon70.png Standard 50 140 0 HitboxTableIcon(False).png 5.0 top 0.0 6.0 to 12.0 -10.0 1.5× 1.0× 0% HitboxTableIcon(Clang).png HitboxTableIcon(Rebound).png EffectIcon(Normal).png TypeIcon(Hammer).png HitboxTableIcon(GroundedTrue).png HitboxTableIcon(AerialTrue).png L Kick SpecialsDirect.png All All HitboxTableIcon(Blockable).png HitboxTableIcon(Unreflectable).png HitboxTableIcon(Unabsorbable).png HitboxTableIcon(False).png HitboxTableIcon(False).png HitboxTableIcon(False).png
Final hit (late)
0 0 0 4.0% 0 AngleIcon70.png Standard 50 140 0 HitboxTableIcon(False).png 7.0 top 0.0 12.0 4.0 to -4.0 1.5× 1.0× 0% HitboxTableIcon(Clang).png HitboxTableIcon(Rebound).png EffectIcon(Normal).png TypeIcon(Hammer).png HitboxTableIcon(GroundedTrue).png HitboxTableIcon(AerialTrue).png L Kick SpecialsDirect.png All All HitboxTableIcon(Blockable).png HitboxTableIcon(Unreflectable).png HitboxTableIcon(Unabsorbable).png HitboxTableIcon(False).png HitboxTableIcon(False).png HitboxTableIcon(False).png

Timing[edit]

Singular[edit]

In the air, the move enables ledge grabs from both sides starting on frame 56.

Front hits 1-5 10, 15, 21, 28, 37
Back hits 1-5 13, 18, 24, 32, 42
Final hit 49-50
Interruptible (grounded) 78
Animation length 94
Grounded  FrameIcon(Lag).png FrameIcon(Lag).png FrameIcon(Lag).png FrameIcon(Lag).png FrameIcon(Lag).png FrameIcon(Lag).png FrameIcon(Lag).png FrameIcon(Lag).png FrameIcon(Lag).png FrameIcon(Hitbox).png FrameIcon(Lag).png FrameIcon(Lag).png FrameIcon(Hitbox).png FrameIcon(Lag).png FrameIcon(Hitbox).png FrameIcon(Lag).png FrameIcon(Lag).png FrameIcon(Hitbox).png FrameIcon(Lag).png FrameIcon(Lag).png FrameIcon(Hitbox).png FrameIcon(Lag).png FrameIcon(Lag).png FrameIcon(Hitbox).png FrameIcon(Lag).png FrameIcon(Lag).png FrameIcon(Lag).png FrameIcon(Hitbox).png FrameIcon(Lag).png FrameIcon(Lag).png FrameIcon(Lag).png FrameIcon(Hitbox).png FrameIcon(Lag).png FrameIcon(Lag).png FrameIcon(Lag).png FrameIcon(Lag).png FrameIcon(Hitbox).png FrameIcon(Lag).png FrameIcon(Lag).png FrameIcon(Lag).png FrameIcon(Lag).png FrameIcon(Hitbox).png FrameIcon(Lag).png FrameIcon(Lag).png FrameIcon(Lag).png FrameIcon(Lag).png FrameIcon(Lag).png FrameIcon(Lag).png FrameIcon(Hitbox).png FrameIcon(Hitbox).png FrameIcon(Lag).png FrameIcon(Lag).png FrameIcon(Lag).png FrameIcon(Lag).png FrameIcon(Lag).png FrameIcon(Lag).png FrameIcon(Lag).png FrameIcon(Lag).png FrameIcon(Lag).png FrameIcon(Lag).png FrameIcon(Lag).png FrameIcon(Lag).png FrameIcon(Lag).png FrameIcon(Lag).png FrameIcon(Lag).png FrameIcon(Lag).png FrameIcon(Lag).png FrameIcon(Lag).png FrameIcon(Lag).png FrameIcon(Lag).png FrameIcon(Lag).png FrameIcon(Lag).png FrameIcon(Lag).png FrameIcon(Lag).png FrameIcon(Lag).png FrameIcon(Lag).png FrameIcon(Lag).png FrameIcon(Interruptible).png FrameIcon(Interruptible).png FrameIcon(Interruptible).png FrameIcon(Interruptible).png FrameIcon(Interruptible).png FrameIcon(Interruptible).png FrameIcon(Interruptible).png FrameIcon(Interruptible).png FrameIcon(Interruptible).png FrameIcon(Interruptible).png FrameIcon(Interruptible).png FrameIcon(Interruptible).png FrameIcon(Interruptible).png FrameIcon(Interruptible).png FrameIcon(Interruptible).png FrameIcon(Interruptible).png FrameIcon(Interruptible).png
Aerial  FrameIcon(Lag).png FrameIcon(Lag).png FrameIcon(Lag).png FrameIcon(Lag).png FrameIcon(Lag).png FrameIcon(Lag).png FrameIcon(Lag).png FrameIcon(Lag).png FrameIcon(Lag).png FrameIcon(Hitbox).png FrameIcon(Lag).png FrameIcon(Lag).png FrameIcon(Hitbox).png FrameIcon(Lag).png FrameIcon(Hitbox).png FrameIcon(Lag).png FrameIcon(Lag).png FrameIcon(Hitbox).png FrameIcon(Lag).png FrameIcon(Lag).png FrameIcon(Hitbox).png FrameIcon(Lag).png FrameIcon(Lag).png FrameIcon(Hitbox).png FrameIcon(Lag).png FrameIcon(Lag).png FrameIcon(Lag).png FrameIcon(Hitbox).png FrameIcon(Lag).png FrameIcon(Lag).png FrameIcon(Lag).png FrameIcon(Hitbox).png FrameIcon(Lag).png FrameIcon(Lag).png FrameIcon(Lag).png FrameIcon(Lag).png FrameIcon(Hitbox).png FrameIcon(Lag).png FrameIcon(Lag).png FrameIcon(Lag).png FrameIcon(Lag).png FrameIcon(Hitbox).png FrameIcon(Lag).png FrameIcon(Lag).png FrameIcon(Lag).png FrameIcon(Lag).png FrameIcon(Lag).png FrameIcon(Lag).png FrameIcon(Hitbox).png FrameIcon(Hitbox).png FrameIcon(Lag).png FrameIcon(Lag).png FrameIcon(Lag).png FrameIcon(Lag).png FrameIcon(Lag).png FrameIcon(Lag).png FrameIcon(Lag).png FrameIcon(Lag).png FrameIcon(Lag).png FrameIcon(Lag).png FrameIcon(Lag).png FrameIcon(Lag).png FrameIcon(Lag).png FrameIcon(Lag).png FrameIcon(Lag).png FrameIcon(Lag).png FrameIcon(Lag).png FrameIcon(Lag).png FrameIcon(Lag).png FrameIcon(Lag).png FrameIcon(Lag).png FrameIcon(Lag).png FrameIcon(Lag).png FrameIcon(Lag).png FrameIcon(Lag).png FrameIcon(Lag).png FrameIcon(Lag).png FrameIcon(Lag).png FrameIcon(Lag).png FrameIcon(Lag).png FrameIcon(Lag).png FrameIcon(Lag).png FrameIcon(Lag).png FrameIcon(Lag).png FrameIcon(Lag).png FrameIcon(Lag).png FrameIcon(Lag).png FrameIcon(Lag).png FrameIcon(Lag).png FrameIcon(Lag).png FrameIcon(Lag).png FrameIcon(Lag).png FrameIcon(Lag).png FrameIcon(Lag).png

Dual[edit]

In the air, the move enables ledge grabs from both sides starting on frame 58.

Hits 1-7 10, 14, 18, 23, 28, 34, 40
Final hit (early, late) 51, 52
Interruptible (grounded) 78
Animation length 83
Grounded  FrameIcon(Lag).png FrameIcon(Lag).png FrameIcon(Lag).png FrameIcon(Lag).png FrameIcon(Lag).png FrameIcon(Lag).png FrameIcon(Lag).png FrameIcon(Lag).png FrameIcon(Lag).png FrameIcon(Hitbox).png FrameIcon(Lag).png FrameIcon(Lag).png FrameIcon(Lag).png FrameIcon(Hitbox).png FrameIcon(Lag).png FrameIcon(Lag).png FrameIcon(Lag).png FrameIcon(Hitbox).png FrameIcon(Lag).png FrameIcon(Lag).png FrameIcon(Lag).png FrameIcon(Lag).png FrameIcon(Hitbox).png FrameIcon(Lag).png FrameIcon(Lag).png FrameIcon(Lag).png FrameIcon(Lag).png FrameIcon(Hitbox).png FrameIcon(Lag).png FrameIcon(Lag).png FrameIcon(Lag).png FrameIcon(Lag).png FrameIcon(Lag).png FrameIcon(Hitbox).png FrameIcon(Lag).png FrameIcon(Lag).png FrameIcon(Lag).png FrameIcon(Lag).png FrameIcon(Lag).png FrameIcon(Hitbox).png FrameIcon(Lag).png FrameIcon(Lag).png FrameIcon(Lag).png FrameIcon(Lag).png FrameIcon(Lag).png FrameIcon(Lag).png FrameIcon(Lag).png FrameIcon(Lag).png FrameIcon(Lag).png FrameIcon(Lag).png FrameIcon(HitboxChangeS).png FrameIcon(HitboxChangeE).png FrameIcon(Lag).png FrameIcon(Lag).png FrameIcon(Lag).png FrameIcon(Lag).png FrameIcon(Lag).png FrameIcon(Lag).png FrameIcon(Lag).png FrameIcon(Lag).png FrameIcon(Lag).png FrameIcon(Lag).png FrameIcon(Lag).png FrameIcon(Lag).png FrameIcon(Lag).png FrameIcon(Lag).png FrameIcon(Lag).png FrameIcon(Lag).png FrameIcon(Lag).png FrameIcon(Lag).png FrameIcon(Lag).png FrameIcon(Lag).png FrameIcon(Lag).png FrameIcon(Lag).png FrameIcon(Lag).png FrameIcon(Lag).png FrameIcon(Lag).png FrameIcon(Interruptible).png FrameIcon(Interruptible).png FrameIcon(Interruptible).png FrameIcon(Interruptible).png FrameIcon(Interruptible).png FrameIcon(Interruptible).png
Aerial  FrameIcon(Lag).png FrameIcon(Lag).png FrameIcon(Lag).png FrameIcon(Lag).png FrameIcon(Lag).png FrameIcon(Lag).png FrameIcon(Lag).png FrameIcon(Lag).png FrameIcon(Lag).png FrameIcon(Hitbox).png FrameIcon(Lag).png FrameIcon(Lag).png FrameIcon(Lag).png FrameIcon(Hitbox).png FrameIcon(Lag).png FrameIcon(Lag).png FrameIcon(Lag).png FrameIcon(Hitbox).png FrameIcon(Lag).png FrameIcon(Lag).png FrameIcon(Lag).png FrameIcon(Lag).png FrameIcon(Hitbox).png FrameIcon(Lag).png FrameIcon(Lag).png FrameIcon(Lag).png FrameIcon(Lag).png FrameIcon(Hitbox).png FrameIcon(Lag).png FrameIcon(Lag).png FrameIcon(Lag).png FrameIcon(Lag).png FrameIcon(Lag).png FrameIcon(Hitbox).png FrameIcon(Lag).png FrameIcon(Lag).png FrameIcon(Lag).png FrameIcon(Lag).png FrameIcon(Lag).png FrameIcon(Hitbox).png FrameIcon(Lag).png FrameIcon(Lag).png FrameIcon(Lag).png FrameIcon(Lag).png FrameIcon(Lag).png FrameIcon(Lag).png FrameIcon(Lag).png FrameIcon(Lag).png FrameIcon(Lag).png FrameIcon(Lag).png FrameIcon(HitboxChangeS).png FrameIcon(HitboxChangeE).png FrameIcon(Lag).png FrameIcon(Lag).png FrameIcon(Lag).png FrameIcon(Lag).png FrameIcon(Lag).png FrameIcon(Lag).png FrameIcon(Lag).png FrameIcon(Lag).png FrameIcon(Lag).png FrameIcon(Lag).png FrameIcon(Lag).png FrameIcon(Lag).png FrameIcon(Lag).png FrameIcon(Lag).png FrameIcon(Lag).png FrameIcon(Lag).png FrameIcon(Lag).png FrameIcon(Lag).png FrameIcon(Lag).png FrameIcon(Lag).png FrameIcon(Lag).png FrameIcon(Lag).png FrameIcon(Lag).png FrameIcon(Lag).png FrameIcon(Lag).png FrameIcon(Lag).png FrameIcon(Lag).png FrameIcon(Lag).png FrameIcon(Lag).png FrameIcon(Lag).png FrameIcon(Lag).png

Helplessness landing[edit]

Interruptible 30
Animation length 37
FrameIcon(Lag).png FrameIcon(Lag).png FrameIcon(Lag).png FrameIcon(Lag).png FrameIcon(Lag).png FrameIcon(Lag).png FrameIcon(Lag).png FrameIcon(Lag).png FrameIcon(Lag).png FrameIcon(Lag).png FrameIcon(Lag).png FrameIcon(Lag).png FrameIcon(Lag).png FrameIcon(Lag).png FrameIcon(Lag).png FrameIcon(Lag).png FrameIcon(Lag).png FrameIcon(Lag).png FrameIcon(Lag).png FrameIcon(Lag).png FrameIcon(Lag).png FrameIcon(Lag).png FrameIcon(Lag).png FrameIcon(Lag).png FrameIcon(Lag).png FrameIcon(Lag).png FrameIcon(Lag).png FrameIcon(Lag).png FrameIcon(Lag).png FrameIcon(Interruptible).png FrameIcon(Interruptible).png FrameIcon(Interruptible).png FrameIcon(Interruptible).png FrameIcon(Interruptible).png FrameIcon(Interruptible).png FrameIcon(Interruptible).png FrameIcon(Interruptible).png
Legend (1 square = 1 frame)
FrameIcon(Lag).png
Lag time
FrameIcon(Hitbox).png
Hitbox
FrameIcon(HitboxChangeS).pngFrameIcon(HitboxChangeE).png
Hitbox change
FrameIcon(Interruptible).png
Interruptible

Parameters[edit]

The move alters the Ice Climbers' physics until frame 51 for a singular attack, and frame 53 for a dual attack, period during which it can also gain height by pressing the special move button.

Maximum distance between climbers to attack together 30
Initial horizontal speed 0.8 (grounded)
1 (aerial)
Horizontal acceleration by input 0.12 (grounded)
0.08 (aerial)
Minimum stick sensitivity for acceleration 0.25
Horizontal speed modifier on slopes 0.25
Speed multiplier when bouncing off wall 0.5
Minimum speed when bouncing off wall 0.4
Maximum horizontal speed 1.1 (grounded)
1.3 (aerial)
Initial upward speed in the air 0.6 (singular)
1.2 (dual)
Gravity 0.1
Falling speed 2.8
Added upward speed via button press 0.8 (singular)
1 (dual)
Delay between button presses 10 frames