Welcome to SmashWiki! Log in or create an account and join the community, and don't forget to read this first!
Notices
The Skill parameter has been removed from Smasher infoboxes, and in its place are the new "Best historical ranking" and "Best tournament result" parameters. SmashWiki needs help adding these new parameters to Smasher infoboxes, refer to the guidelines here for what should be included in these new parameters.
When adding results to Smasher pages, include each tournament's entrant number in addition to the player's placement, and use the {{Trn}} template with the matching game specified. Please also fix old results on Smasher pages that do not abide to this standard. Refer to our Smasher article guidelines to see how results tables should be formatted.
Check out our project page for ongoing projects that SmashWiki needs help with.
Super Smash Bros. Ultimate

Byleth (SSBU)/Down throw: Difference between revisions

From SmashWiki, the Super Smash Bros. wiki
Jump to navigationJump to search
m (Description added.)
Tag: Mobile edit
 
(2 intermediate revisions by 2 users not shown)
Line 6: Line 6:
|-
|-
|}
|}
{{competitive expertise}}


==Overview==
==Overview==
A downward slash with the sword in its whip form. It sends opponents directly in front of Byleth, allowing it to start [[combo]]s at 0%, usually into [[Byleth (SSBU)/Forward tilt|forward tilt]] or [[Byleth (SSBU)/Forward aerial|forward aerial]]. Does 3% when hit in the ground and 2% for the throw.
A simple whip that sends at a diagonally upward angle. The move can immediately be followed up by forward aerial, forward tilt, and neutral aerial, the latter of which can be used repetitively to extend combos for more damage, or be used to drag down an opponent, to then extend the combo. The move can also be followed up with a back aerial as a kill confirm, which can kill early as around 50% at the ledge on smaller stages with the [[tipper]].
 
==Throw and Hitbox Data==
{{UltimateHitboxTableHeader}}
{{HitboxTableTitle|Hitbox|24}}
{{HitboxTableTitle|Hitbox|42}}
{{UltimateHitboxTableRow
|id=0
|id=0
Line 44: Line 46:
|fkv=0
|fkv=0
|ff=0.0
|ff=0.0
|effect=Normal
|sfx=None
|slvl=S
}}
{{UltimateThrowTableRow
|kind=1
|id=0
|type=Throwing
|damage=3.0%
|angle=361
|bk=40
|ks=100
|fkv=0
|effect=Normal
|effect=Normal
|sfx=None
|sfx=None

Latest revision as of 21:39, April 11, 2024

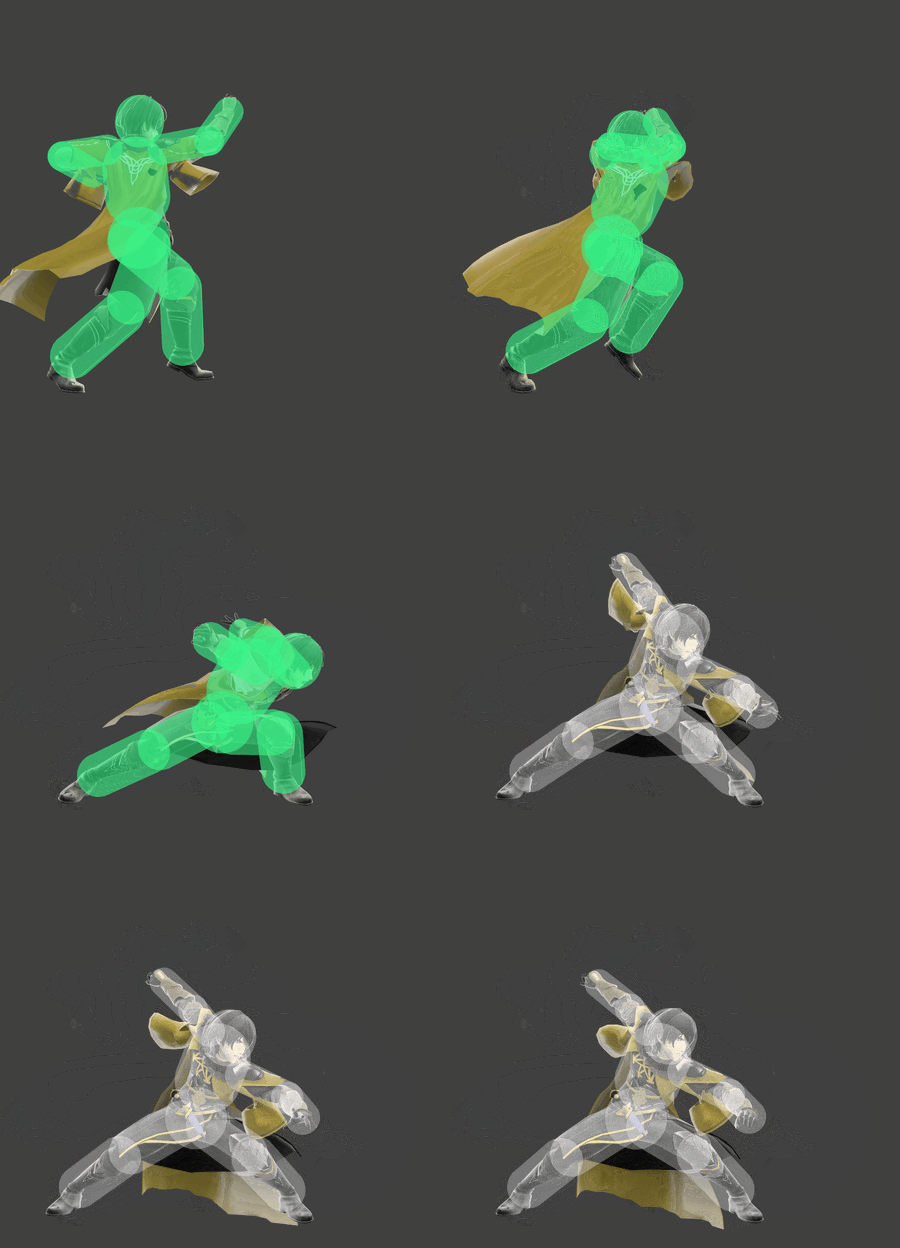
Byleth down throw hurtbox and hitbox visualization
BylethDThrow.gif
Competitive.png This article or section may require competitive expertise.
You can discuss this issue on the talk page or edit this page to improve it.

Overview[edit]

A simple whip that sends at a diagonally upward angle. The move can immediately be followed up by forward aerial, forward tilt, and neutral aerial, the latter of which can be used repetitively to extend combos for more damage, or be used to drag down an opponent, to then extend the combo. The move can also be followed up with a back aerial as a kill confirm, which can kill early as around 50% at the ledge on smaller stages with the tipper.

Throw and Hitbox Data[edit]

ID Part Rehit rate Damage SD Angle Angle type BK KS FKV Set weight Radius Bone Offset SDI× T% Clang Rebound Effect Type G A Sound Direct Hit bits Hit part Blockable Reflectable Absorbable Flinchless No GFX Heedless
Hitbox
0 0 0 3.0% 0 AngleIcon48.png Standard 60 100 0 HitboxTableIcon(False).png 6.0 top 0.0 6.0 9.0 1.1× 1.0× 0% HitboxTableIcon(NoClang).png HitboxTableIcon(NoRebound).png Slash (effect) Sword (type) HitboxTableIcon(GroundedTrue).png HitboxTableIcon(AerialTrue).png S Slash SpecialsDirect.png All All HitboxTableIcon(Blockable).png HitboxTableIcon(Unreflectable).png HitboxTableIcon(Unabsorbable).png HitboxTableIcon(False).png HitboxTableIcon(False).png HitboxTableIcon(False).png
Kind ID Damage Angle Angle type BK KS FKV Effect Type Sound
Throw
Throw 0 2.0% AngleIcon74.png Forward 50 150 0 0.0× Normal (effect) Throwing (type) S None
Break 0 3.0% Sakurai angle Forward 40 100 0 0.0× Normal (effect) Throwing (type) S None

Timing[edit]

Invincibility 1-13
Hitbox 12
Throw Release 13
Interruptible 32
Animation length 63
FrameIcon(Lag).png FrameIcon(Lag).png FrameIcon(Lag).png FrameIcon(Lag).png FrameIcon(Lag).png FrameIcon(Lag).png FrameIcon(Lag).png FrameIcon(Lag).png FrameIcon(Lag).png FrameIcon(Lag).png FrameIcon(Lag).png FrameIcon(HitboxThrowS).png FrameIcon(LagThrowE).png FrameIcon(Lag).png FrameIcon(Lag).png FrameIcon(Lag).png FrameIcon(Lag).png FrameIcon(Lag).png FrameIcon(Lag).png FrameIcon(Lag).png FrameIcon(Lag).png FrameIcon(Lag).png FrameIcon(Lag).png FrameIcon(Lag).png FrameIcon(Lag).png FrameIcon(Lag).png FrameIcon(Lag).png FrameIcon(Lag).png FrameIcon(Lag).png FrameIcon(Lag).png FrameIcon(Lag).png FrameIcon(Interruptible).png FrameIcon(Interruptible).png FrameIcon(Interruptible).png FrameIcon(Interruptible).png FrameIcon(Interruptible).png FrameIcon(Interruptible).png FrameIcon(Interruptible).png FrameIcon(Interruptible).png FrameIcon(Interruptible).png FrameIcon(Interruptible).png FrameIcon(Interruptible).png FrameIcon(Interruptible).png FrameIcon(Interruptible).png FrameIcon(Interruptible).png FrameIcon(Interruptible).png FrameIcon(Interruptible).png FrameIcon(Interruptible).png FrameIcon(Interruptible).png FrameIcon(Interruptible).png FrameIcon(Interruptible).png FrameIcon(Interruptible).png FrameIcon(Interruptible).png FrameIcon(Interruptible).png FrameIcon(Interruptible).png FrameIcon(Interruptible).png FrameIcon(Interruptible).png FrameIcon(Interruptible).png FrameIcon(Interruptible).png FrameIcon(Interruptible).png FrameIcon(Interruptible).png FrameIcon(Interruptible).png FrameIcon(Interruptible).png
FrameIcon(Invincible).png FrameIcon(Invincible).png FrameIcon(Invincible).png FrameIcon(Invincible).png FrameIcon(Invincible).png FrameIcon(Invincible).png FrameIcon(Invincible).png FrameIcon(Invincible).png FrameIcon(Invincible).png FrameIcon(Invincible).png FrameIcon(Invincible).png FrameIcon(Invincible).png FrameIcon(Invincible).png FrameIcon(Vulnerable).png FrameIcon(Vulnerable).png FrameIcon(Vulnerable).png FrameIcon(Vulnerable).png FrameIcon(Vulnerable).png FrameIcon(Vulnerable).png FrameIcon(Vulnerable).png FrameIcon(Vulnerable).png FrameIcon(Vulnerable).png FrameIcon(Vulnerable).png FrameIcon(Vulnerable).png FrameIcon(Vulnerable).png FrameIcon(Vulnerable).png FrameIcon(Vulnerable).png FrameIcon(Vulnerable).png FrameIcon(Vulnerable).png FrameIcon(Vulnerable).png FrameIcon(Vulnerable).png FrameIcon(Vulnerable).png FrameIcon(Vulnerable).png FrameIcon(Vulnerable).png FrameIcon(Vulnerable).png FrameIcon(Vulnerable).png FrameIcon(Vulnerable).png FrameIcon(Vulnerable).png FrameIcon(Vulnerable).png FrameIcon(Vulnerable).png FrameIcon(Vulnerable).png FrameIcon(Vulnerable).png FrameIcon(Vulnerable).png FrameIcon(Vulnerable).png FrameIcon(Vulnerable).png FrameIcon(Vulnerable).png FrameIcon(Vulnerable).png FrameIcon(Vulnerable).png FrameIcon(Vulnerable).png FrameIcon(Vulnerable).png FrameIcon(Vulnerable).png FrameIcon(Vulnerable).png FrameIcon(Vulnerable).png FrameIcon(Vulnerable).png FrameIcon(Vulnerable).png FrameIcon(Vulnerable).png FrameIcon(Vulnerable).png FrameIcon(Vulnerable).png FrameIcon(Vulnerable).png FrameIcon(Vulnerable).png FrameIcon(Vulnerable).png FrameIcon(Vulnerable).png FrameIcon(Vulnerable).png
Legend (1 square = 1 frame)
Lag
Lag time
Hitbox
Hitbox
FrameIcon(Vulnerable).png
Vulnerable
Invincibility
Invincible
ThrowThrow
Throw point
Interruptibility
Interruptible