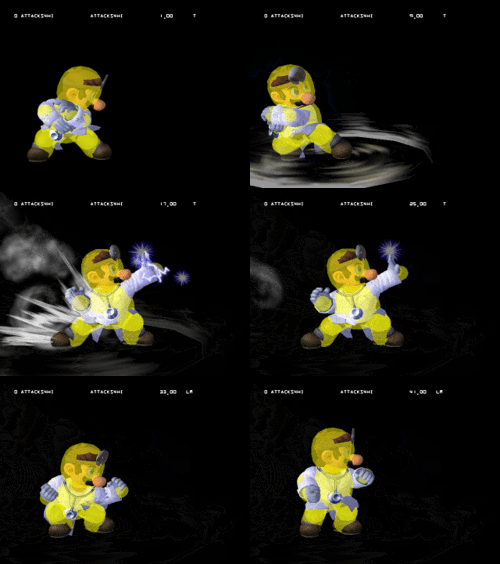
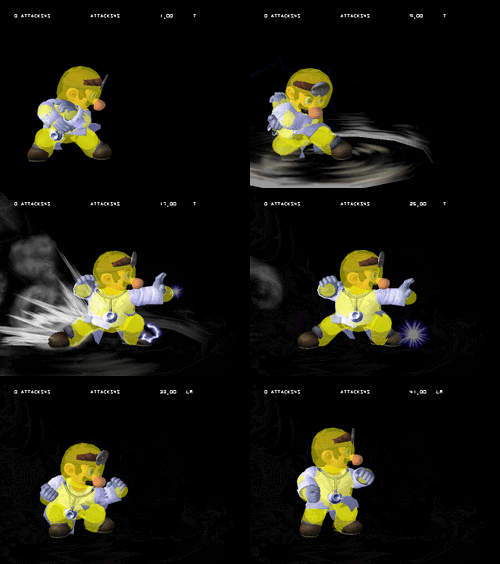
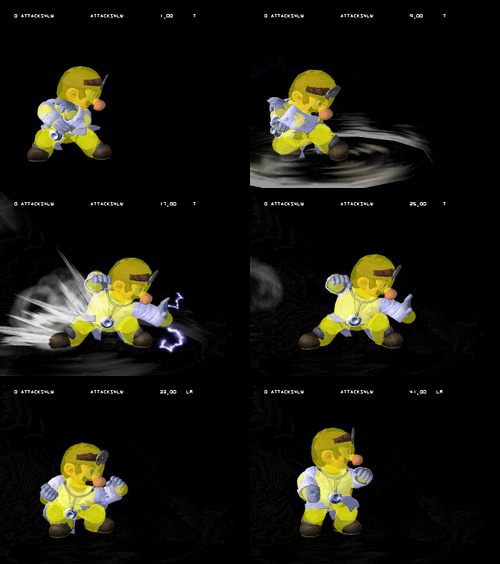
Dr. Mario (SSBM)/Forward smash: Difference between revisions
From SmashWiki, the Super Smash Bros. wiki
Jump to navigationJump to search
m (→Overview) |
Omega Tyrant (talk | contribs) m (Undid edit by Amber Blackstar: There's a single small paragraph here that only gives a very general overview of the move) |
||
| (8 intermediate revisions by 8 users not shown) | |||
| Line 1: | Line 1: | ||
{{ArticleIcons|ssbm=y}} | {{ArticleIcons|ssbm=y}} | ||
{{competitive expertise}} | |||
{|class="wikitable" style="float:right; margin:4pt;" | |||
!colspan=5|Dr. Mario forward smash hitboxes | |||
|- | |||
!↗ | |||
|[[File:Dr Mario Forward Smash Hitbox Angled Up Melee.gif|250px]] | |||
|- | |||
!→ | |||
|[[File:Dr Mario Forward Smash Hitbox Melee.gif|250px]] | |||
|- | |||
!↘ | |||
|[[File:Dr Mario Forward Smash Hitbox Angled Down Melee.gif|250px]] | |||
|- | |||
|} | |||
==Overview== | ==Overview== | ||
Dr. Mario launches his palm forward. Unlike Mario's, it produces an [[electric]] effect, has no [[sourspot]], has shorter range, and is much more powerful. It can reliably KO at just under 100%, making it a good finisher. It is also usable as a [[combo]] finisher. However, like a lot of his moves, short [[range]] limits its effectiveness against some characters, especially those with [[disjointed]] hitboxes such as {{SSBM|Marth}}. | |||
Dr. Mario launches his palm forward. Unlike | |||
==Hitboxes== | ==Hitboxes== | ||
| Line 17: | Line 30: | ||
|ks=97 | |ks=97 | ||
|fkv=0 | |fkv=0 | ||
|r= | |r=900 | ||
|bn=0 | |bn=0 | ||
|ypos= | |ypos=2500 | ||
|zpos= | |zpos=2200 | ||
|effect=Electric | |effect=Electric | ||
|slvl=L | |slvl=L | ||
| Line 32: | Line 45: | ||
|ks=97 | |ks=97 | ||
|fkv=0 | |fkv=0 | ||
|r= | |r=500 | ||
|bn=6 | |bn=6 | ||
|effect=Electric | |effect=Electric | ||
| Line 45: | Line 58: | ||
|ks=97 | |ks=97 | ||
|fkv=0 | |fkv=0 | ||
|r= | |r=500 | ||
|bn=29 | |bn=29 | ||
|effect=Electric | |effect=Electric | ||
| Line 59: | Line 72: | ||
|ks=97 | |ks=97 | ||
|fkv=0 | |fkv=0 | ||
|r= | |r=900 | ||
|bn=0 | |bn=0 | ||
|ypos= | |ypos=1900 | ||
|zpos= | |zpos=2400 | ||
|effect=Electric | |effect=Electric | ||
|slvl=L | |slvl=L | ||
| Line 74: | Line 87: | ||
|ks=97 | |ks=97 | ||
|fkv=0 | |fkv=0 | ||
|r= | |r=500 | ||
|bn=6 | |bn=6 | ||
|effect=Electric | |effect=Electric | ||
| Line 87: | Line 100: | ||
|ks=97 | |ks=97 | ||
|fkv=0 | |fkv=0 | ||
|r= | |r=500 | ||
|bn=29 | |bn=29 | ||
|effect=Electric | |effect=Electric | ||
| Line 101: | Line 114: | ||
|ks=97 | |ks=97 | ||
|fkv=0 | |fkv=0 | ||
|r= | |r=900 | ||
|bn=0 | |bn=0 | ||
|ypos= | |ypos=1100 | ||
|zpos= | |zpos=2300 | ||
|effect=Electric | |effect=Electric | ||
|slvl=L | |slvl=L | ||
| Line 116: | Line 129: | ||
|ks=97 | |ks=97 | ||
|fkv=0 | |fkv=0 | ||
|r= | |r=500 | ||
|bn=6 | |bn=6 | ||
|effect=Electric | |effect=Electric | ||
| Line 129: | Line 142: | ||
|ks=97 | |ks=97 | ||
|fkv=0 | |fkv=0 | ||
|r= | |r=500 | ||
|bn=29 | |bn=29 | ||
|effect=Electric | |effect=Electric | ||
| Line 149: | Line 162: | ||
|41 | |41 | ||
|- | |- | ||
|} | |} | ||
{{FrameStripStart}} | {{FrameStripStart}} | ||
{{FrameStrip|t=Lag|c=5|e=LagChargeS}}{{FrameStrip|t=Lag|c=6|s=LagChargeE}}{{FrameStrip|t=Hitbox|c=5}}{{FrameStrip|t=Lag|c=25}} | {{FrameStrip|t=Lag|c=5|e=LagChargeS}}{{FrameStrip|t=Lag|c=6|s=LagChargeE}}{{FrameStrip|t=Hitbox|c=5}}{{FrameStrip|t=Lag|c=25}} | ||
{{FrameStripEnd}} | |||
{{FrameIconLegend|lag=y|charge=y|hitbox=y}} | {{FrameIconLegend|lag=y|charge=y|hitbox=y}} | ||
{{MvSubNavDrMario|g=SSBM}} | {{MvSubNavDrMario|g=SSBM}} | ||
[[Category:Dr. Mario (SSBM)]] | [[Category:Dr. Mario (SSBM)]] | ||
[[Category:Forward smashes]] | [[Category:Forward smashes (SSBM)]] | ||
Latest revision as of 03:00, June 26, 2023
| Dr. Mario forward smash hitboxes | ||||
|---|---|---|---|---|
| ↗ | 
| |||
| → | 
| |||
| ↘ | 
| |||
Overview[edit]
Dr. Mario launches his palm forward. Unlike Mario's, it produces an electric effect, has no sourspot, has shorter range, and is much more powerful. It can reliably KO at just under 100%, making it a good finisher. It is also usable as a combo finisher. However, like a lot of his moves, short range limits its effectiveness against some characters, especially those with disjointed hitboxes such as Marth.
Hitboxes[edit]
Timing[edit]
| Charge interval | 5-6 |
|---|---|
| Hitboxes | 12-16 |
| Animation length | 41 |
Lag time |
Charge interval |
Hitbox |
|
