Joker (SSBU)/Forward tilt: Difference between revisions
(Gave the page a little fix, as well as including some data from my labs. Included resources as reference pieces, if they're not the type you want simply remove them.) |
(Looks much cleaner this way. Also Joker and Arsene's hits have always been able to connect on the same frame; that's how hitboxes with different part numbers work, and ftilt is no exception) |
||
| (6 intermediate revisions by 3 users not shown) | |||
| Line 29: | Line 29: | ||
==Hitboxes== | ==Hitboxes== | ||
===Angled | ===Angled up=== | ||
{{UltimateHitboxTableHeader}} | {{UltimateHitboxTableHeader}} | ||
!Shieldstun | |||
{{HitboxTableTitle|Hit 1|42}} | {{HitboxTableTitle|Hit 1|42}} | ||
{{UltimateHitboxTableRow | {{UltimateHitboxTableRow | ||
|id=1 | |id=1 | ||
|damage=3 | |damage=3.0% | ||
|angle=180 | |angle=180 | ||
|af=3 | |||
|bk=0 | |bk=0 | ||
|ks=100 | |ks=100 | ||
|fkv=10 | |fkv=10 | ||
|setweight=t | |||
|r=2.5 | |r=2.5 | ||
|bn=knife | |bn=knife | ||
| Line 44: | Line 47: | ||
|ypos=4.0 | |ypos=4.0 | ||
|zpos=0.0 | |zpos=0.0 | ||
|ff=0 | |ff=1.0 | ||
|type=Sword | |type=Sword | ||
|effect= | |effect=Stab | ||
|sfx=Slash | |sfx=Slash | ||
|slvl=M | |slvl=M | ||
}} | }} | ||
|— | |||
{{UltimateHitboxTableRow | {{UltimateHitboxTableRow | ||
|id=2 | |id=2 | ||
|damage=3 | |damage=3.0% | ||
|angle=35 | |angle=35 | ||
|af=3 | |||
|bk=0 | |bk=0 | ||
|ks=100 | |ks=100 | ||
|fkv= | |fkv=25 | ||
|setweight=t | |||
|r=2.5 | |r=2.5 | ||
|bn=knife | |bn=knife | ||
|xpos=0.0 | |xpos=0.0 | ||
|ypos=-3.0 | |ypos=-3.0 to 4.0 | ||
|zpos=0.0 | |zpos=0.0 | ||
|ff=0 | |ff=1.0 | ||
|type=Sword | |type=Sword | ||
|effect= | |effect=Stab | ||
|sfx=Slash | |sfx=Slash | ||
|slvl=M | |slvl=M | ||
}} | }} | ||
{{HitboxTableTitle|Hit 2|42}} | |— | ||
{{HitboxTableTitle|Hit 2 (without Arsene)|42}} | |||
{{UltimateHitboxTableRow | {{UltimateHitboxTableRow | ||
|id=2 | |id=2 | ||
|damage=5 | |damage=5.0% | ||
|angle=45 | |angle=45 | ||
|af=3 | |||
|bk=45 | |bk=45 | ||
|ks=128 | |ks=128 | ||
| Line 79: | Line 87: | ||
|bn=knife | |bn=knife | ||
|xpos=0.0 | |xpos=0.0 | ||
|ypos=-3.0 | |ypos=-3.0 to 4.0 | ||
|zpos=0.0 | |zpos=0.0 | ||
|ff=0 | |ff=1.0 | ||
|type=Sword | |type=Sword | ||
|effect= | |effect=Stab | ||
|sfx=Slash | |sfx=Slash | ||
|slvl=M | |slvl=M | ||
}} | }} | ||
| | |— | ||
{{HitboxTableTitle|Hit 2 (with Arsene)|42}} | |||
{{HitboxTableTitle|Hit | |||
{{UltimateHitboxTableRow | {{UltimateHitboxTableRow | ||
|id= | |id=0 | ||
|damage= | |damage=5.0% | ||
|angle= | |angle=45 | ||
|bk= | |af=3 | ||
|ks= | |bk=60 | ||
|fkv= | |ks=121 | ||
|r= | |fkv=0 | ||
|r=4.0 | |||
|bn=knife | |bn=knife | ||
|xpos=0.0 | |xpos=0.0 | ||
|ypos=4. | |ypos=3.5 to 4.5 | ||
|zpos=0.0 | |zpos=0.0 | ||
|ff= | |ff=1.7 | ||
|type=Sword | |type=Sword | ||
|effect= | |effect=Stab | ||
|sfx=Slash | |sfx=Slash | ||
|slvl=M | |slvl=M | ||
}} | }} | ||
|2× | |||
{{UltimateHitboxTableRow | {{UltimateHitboxTableRow | ||
|id= | |id=1 | ||
| | |part=1 | ||
| | |damage=5.0% | ||
|angle=45 | |||
|af=3 | |||
|bk=60 | |||
|ks=121 | |||
| | |||
| | |||
|bk= | |||
|ks= | |||
|fkv=0 | |fkv=0 | ||
|r= | |r=4.0 | ||
|bn=knife | |bn=knife | ||
|xpos=0.0 | |xpos=0.0 | ||
|ypos=3. | |ypos=3.5 to 4.5 | ||
|zpos=0.0 | |zpos=0.0 | ||
|ff= | |ff=1.7 | ||
|type= | |type=Explosive | ||
|effect= | |effect=Darkness | ||
|sfx= | |sfx=Fire | ||
|slvl= | |slvl=L | ||
|clang=f | |||
|rebound=f | |||
}} | }} | ||
|2× | |||
|} | |} | ||
===Angled | ===Angled forward=== | ||
{{UltimateHitboxTableHeader}} | {{UltimateHitboxTableHeader}} | ||
!Shieldstun | |||
{{HitboxTableTitle|Hit 1|42}} | {{HitboxTableTitle|Hit 1|42}} | ||
{{UltimateHitboxTableRow | {{UltimateHitboxTableRow | ||
|id=1 | |id=1 | ||
|damage=3 | |damage=3.0% | ||
|angle=93 | |angle=93 | ||
|af=3 | |||
|bk=0 | |bk=0 | ||
|ks=100 | |ks=100 | ||
|fkv= | |fkv=20 | ||
|setweight=t | |||
|r=2.5 | |r=2.5 | ||
|bn=knife | |bn=knife | ||
| Line 164: | Line 160: | ||
|ypos=4.0 | |ypos=4.0 | ||
|zpos=0.0 | |zpos=0.0 | ||
|ff=0 | |ff=1.0 | ||
|type=Sword | |type=Sword | ||
|effect= | |effect=Stab | ||
|sfx=Slash | |sfx=Slash | ||
|slvl=M | |slvl=M | ||
}} | }} | ||
|— | |||
{{UltimateHitboxTableRow | {{UltimateHitboxTableRow | ||
|id=2 | |id=2 | ||
|damage=3 | |damage=3.0% | ||
|angle=40 | |angle=40 | ||
|af=3 | |||
|bk=0 | |bk=0 | ||
|ks=100 | |ks=100 | ||
|fkv=20 | |fkv=20 | ||
|setweight=t | |||
|r=2.5 | |r=2.5 | ||
|bn=knife | |bn=knife | ||
|xpos=0.0 | |xpos=0.0 | ||
|ypos=-3.0 | |ypos=-3.0 to 4.0 | ||
|zpos=0.0 | |zpos=0.0 | ||
|ff=0 | |ff=1.0 | ||
|type=Sword | |type=Sword | ||
|effect= | |effect=Stab | ||
|sfx=Slash | |sfx=Slash | ||
|slvl=M | |slvl=M | ||
}} | }} | ||
{{HitboxTableTitle|Hit 2|42}} | |— | ||
{{HitboxTableTitle|Hit 2 (without Arsene)|42}} | |||
{{UltimateHitboxTableRow | {{UltimateHitboxTableRow | ||
|id=2 | |id=2 | ||
|damage=5 | |damage=5.0% | ||
|angle= | |angle=35 | ||
|af=3 | |||
|bk=45 | |bk=45 | ||
|ks= | |ks=110 | ||
|fkv=0 | |fkv=0 | ||
|r=2.5 | |r=2.5 | ||
|bn=knife | |bn=knife | ||
|xpos=0.0 | |xpos=0.0 | ||
|ypos=3.0 | |ypos=-3.0 to 4.0 | ||
|zpos=0.0 | |zpos=0.0 | ||
|ff=0 | |ff=1.0 | ||
|type=Sword | |type=Sword | ||
|effect= | |effect=Stab | ||
|sfx=Slash | |sfx=Slash | ||
|slvl=M | |slvl=M | ||
}} | }} | ||
| | |— | ||
{{HitboxTableTitle|Hit 2 (with Arsene)|42}} | |||
{{HitboxTableTitle|Hit 2 | |||
{{UltimateHitboxTableRow | {{UltimateHitboxTableRow | ||
|id=1 | |id=1 | ||
|damage=5 | |damage=5.0% | ||
|angle= | |angle=35 | ||
|af=3 | |||
|bk=60 | |bk=60 | ||
|ks= | |ks=106 | ||
|fkv=0 | |fkv=0 | ||
|r=4.0 | |r=4.0 | ||
|bn=knife | |bn=knife | ||
|xpos=0.0 | |xpos=0.0 | ||
|ypos=3.5 | |ypos=0.5 to 3.5 | ||
|zpos=0.0 | |zpos=0.0 | ||
|ff=1.7 | |ff=1.7 | ||
|type=Sword | |type=Sword | ||
|effect= | |effect=Stab | ||
|sfx=Slash | |sfx=Slash | ||
|slvl=M | |slvl=M | ||
}} | }} | ||
|2× | |||
{{UltimateHitboxTableRow | {{UltimateHitboxTableRow | ||
|id=0 | |id=0 | ||
|damage=5 | |part=1 | ||
|angle= | |damage=5.0% | ||
|angle=35 | |||
|af=3 | |||
|bk=60 | |bk=60 | ||
|ks= | |ks=106 | ||
|fkv=0 | |fkv=0 | ||
|r=4.0 | |r=4.0 | ||
|bn=knife | |bn=knife | ||
|xpos=0.0 | |xpos=0.0 | ||
|ypos=3.5 | |ypos=0.5 to 3.5 | ||
|zpos=0.0 | |zpos=0.0 | ||
|ff=1.7 | |ff=1.7 | ||
|type=Explosive | |type=Explosive | ||
|effect= | |effect=Darkness | ||
|sfx=Fire | |sfx=Fire | ||
|slvl=L | |slvl=L | ||
|clang=f | |||
|rebound=f | |||
}} | }} | ||
|2× | |||
|} | |} | ||
===Angled | ===Angled down=== | ||
{{UltimateHitboxTableHeader}} | {{UltimateHitboxTableHeader}} | ||
{{HitboxTableTitle|Hit | !Shieldstun | ||
{{HitboxTableTitle|Hit 1|42}} | |||
{{UltimateHitboxTableRow | {{UltimateHitboxTableRow | ||
|id=1 | |id=1 | ||
|damage= | |damage=3.0% | ||
|angle= | |angle=93 | ||
|bk= | |af=3 | ||
|ks= | |bk=0 | ||
|fkv=0 | |ks=100 | ||
| | |fkv=10 | ||
|setweight=t | |||
|r=2.5 | |||
|bn=knife | |||
|xpos=0.0 | |||
|ypos=4.0 | |||
|zpos=0.0 | |||
|ff=1.0 | |||
|type=Sword | |||
|effect=Stab | |||
|sfx=Slash | |||
|slvl=M | |||
}} | |||
|— | |||
{{UltimateHitboxTableRow | |||
|id=2 | |||
|damage=3.0% | |||
|angle=40 | |||
|af=3 | |||
|bk=0 | |||
|ks=100 | |||
|fkv=20 | |||
|setweight=t | |||
|r=2.5 | |||
|bn=knife | |bn=knife | ||
|xpos=0.0 | |xpos=0.0 | ||
|ypos=0. | |ypos=-3.0 to 4.0 | ||
|zpos=0.0 | |zpos=0.0 | ||
|ff=1. | |ff=1.0 | ||
|type=Sword | |type=Sword | ||
|effect= | |effect=Stab | ||
|sfx=Slash | |sfx=Slash | ||
|slvl=M | |slvl=M | ||
}} | }} | ||
{{HitboxTableTitle|Hit 2 Arsene|42}} | |— | ||
{{HitboxTableTitle|Hit 2 (without Arsene)|42}} | |||
{{UltimateHitboxTableRow | {{UltimateHitboxTableRow | ||
|id= | |id=2 | ||
|damage=5 | |damage=5.0% | ||
|angle= | |angle=25 | ||
|bk= | |af=3 | ||
|ks= | |bk=45 | ||
|ks=105 | |||
|fkv=0 | |fkv=0 | ||
|r= | |r=2.5 | ||
|bn=knife | |bn=knife | ||
|xpos=0.0 | |xpos=0.0 | ||
|ypos=0. | |ypos=-3.0 to 4.0 | ||
|zpos=0.0 | |zpos=0.0 | ||
|ff=1. | |ff=1.0 | ||
|type= | |type=Sword | ||
|effect= | |effect=Stab | ||
|sfx= | |sfx=Slash | ||
|slvl= | |slvl=M | ||
}} | }} | ||
| | |— | ||
{{HitboxTableTitle|Hit 2 (with Arsene)|42}} | |||
{{HitboxTableTitle|Hit 2 | |||
{{UltimateHitboxTableRow | {{UltimateHitboxTableRow | ||
|id=1 | |id=1 | ||
|damage=5 | |damage=5.0% | ||
|angle=25 | |angle=25 | ||
|af=3 | |||
|bk=60 | |bk=60 | ||
|ks=106 | |ks=106 | ||
| Line 309: | Line 334: | ||
|bn=knife | |bn=knife | ||
|xpos=0.0 | |xpos=0.0 | ||
|ypos=0.5 | |ypos=0.5 to 2.5 | ||
|zpos=0.0 | |zpos=0.0 | ||
|ff=1.7 | |ff=1.7 | ||
|type=Sword | |type=Sword | ||
|effect= | |effect=Stab | ||
|sfx=Slash | |sfx=Slash | ||
|slvl=M | |slvl=M | ||
}} | }} | ||
|2× | |||
{{UltimateHitboxTableRow | {{UltimateHitboxTableRow | ||
|id=0 | |id=0 | ||
|damage=5 | |part=1 | ||
|damage=5.0% | |||
|angle=25 | |angle=25 | ||
|af=3 | |||
|bk=60 | |bk=60 | ||
|ks=106 | |ks=106 | ||
| Line 328: | Line 355: | ||
|bn=knife | |bn=knife | ||
|xpos=0.0 | |xpos=0.0 | ||
|ypos=0.5 | |ypos=0.5 to 2.5 | ||
|zpos=0.0 | |zpos=0.0 | ||
|ff=1.7 | |ff=1.7 | ||
|type=Explosive | |type=Explosive | ||
|effect= | |effect=Darkness | ||
|sfx=Fire | |sfx=Fire | ||
|slvl=L | |slvl=L | ||
|clang=f | |||
|rebound=f | |||
}} | }} | ||
|2× | |||
|} | |} | ||
==Timing== | ==Timing== | ||
{|class="wikitable" | {|class="wikitable" | ||
! | !Hit 1 | ||
|8-9 | |8-9 | ||
|- | |- | ||
! | !Hit 2 (without Arsene) | ||
| | |13-15 | ||
|- | |- | ||
! | !Hit 2 (with Arsene) | ||
|13-19 | |||
| | |||
|- | |- | ||
!Interruptible | !Interruptible | ||
| Line 365: | Line 383: | ||
|- | |- | ||
!Animation length | !Animation length | ||
| | |79 | ||
|} | |} | ||
{{FrameStripStart}} | {{FrameStripStart}} | ||
{{FrameStrip|t=Lag|c=7}}{{FrameStrip|t=Hitbox|c=2}}{{FrameStrip|t=Lag|c=3}}{{FrameStrip|t=Hitbox|c=7}}{{FrameStrip|t=Lag|c=15}}{{FrameStrip|t=Interruptible|c= | !Without Arsene {{FrameStrip|t=Lag|c=7}}{{FrameStrip|t=Hitbox|c=2}}{{FrameStrip|t=Lag|c=3}}{{FrameStrip|t=Hitbox|c=3}}{{FrameStrip|t=Lag|c=19}}{{FrameStrip|t=Interruptible|c=45}} | ||
|- | |||
!With Arsene {{FrameStrip|t=Lag|c=7}}{{FrameStrip|t=Hitbox|c=2}}{{FrameStrip|t=Lag|c=3}}{{FrameStrip|t=Hitbox|c=7}}{{FrameStrip|t=Lag|c=15}}{{FrameStrip|t=Interruptible|c=45}} | |||
{{FrameStripEnd}} | {{FrameStripEnd}} | ||
{{FrameIconLegend|lag=y|hitbox=y|interruptible=y}} | {{FrameIconLegend|lag=y|hitbox=y|interruptible=y}} | ||
{{MvSubNavJoker|g=SSBU}} | {{MvSubNavJoker|g=SSBU}} | ||
[[Category:Joker (SSBU)]] | [[Category:Joker (SSBU)]] | ||
[[Category:Forward tilts (SSBU)]] | [[Category:Forward tilts (SSBU)]] | ||
Latest revision as of 18:40, August 5, 2022
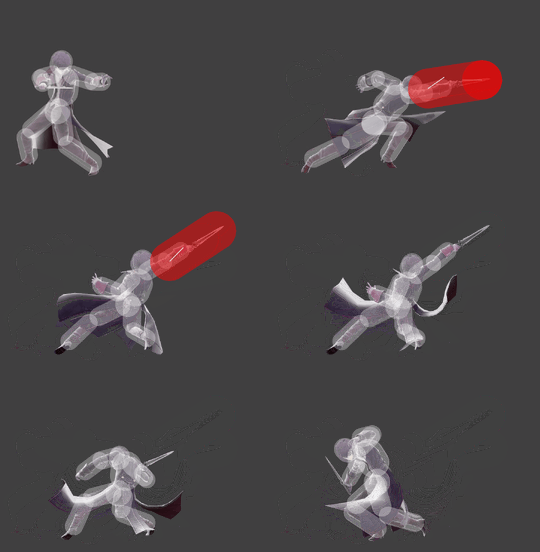
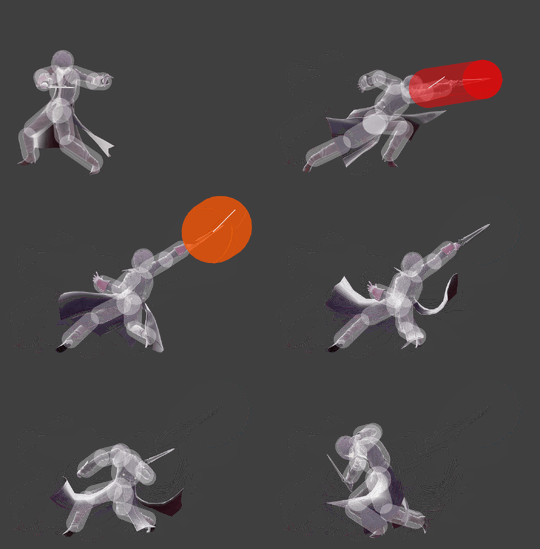
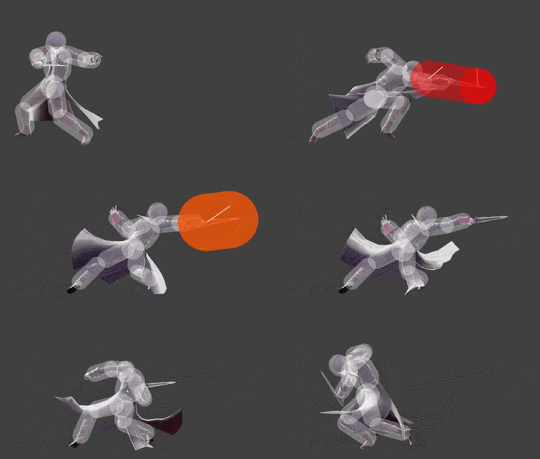
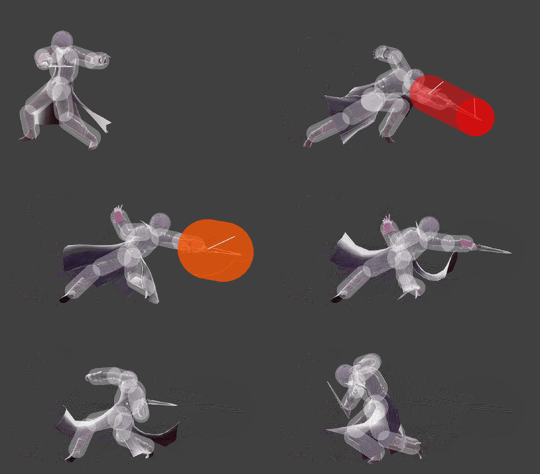
| Joker forward tilt hitbox visualization | ||
|---|---|---|
| ↗ | 
|

|
| → | 
|

|
| ↘ | 
|

|
Overview[edit]
Joker's forward tilt is a very powerful, two hit spacing tool. It has extremely long range, most notably outranging Lucina's forward tilt. Given it's also frame 8, it can be used in neutral against reckless approaches to force the opponent to use other options. Forward tilt can be angled as well, allowing for a high degree of flexibility in its uses (such as the upward angle beating numerous short hop approaches). Given this uses Joker's knife, the disjoint is decently large as well. As a result, forward tilt is often used defensively.
With Arsene active, forward tilt gains a larger disjoint along with a slightly lingering hitbox, improving its utility when it comes to stopping approaches. It also becomes slightly stronger, with +15 base Knockback and +1 Knockback Growth, and added damage from Arsene. Given the base knockback gets the highest increase, this means that the move will send opponents further away at lower percentages, allowing it to further be used as a defensive option. In addition, there is a shieldstun multiplier of 2 applied to the second hit, improving its safety on shield slightly. Given the way Arsene works, if Joker hits on Frame 19, Arsene will connect on Frame 20, effectively giving the hitboxes a slight extension.
All of forward tilt's angles also have different knockback stats. Angled up has a substantial increase (+15 - +18) compared to the other two, although with an angle of 45. It is most optimal to angle forward tilt downwards when it comes to going for the KO; especially with Arsene. This is because downward angled forward tilt also has a knockback angle of 25, which is a solid semi-spike angle for gimping if the player is facing characters like Little Mac. This angle is also substantially harder to DI than the others.
On shield, forward tilt remains the same regardless of angle: -22 on Hit 1, and -15 on Hit 2[1]. While this sounds unsafe, Hit 2's formidable range makes it very safe when spaced correctly. In addition, Arsene makes it just -11, with very few characters being able to punish it without Joker being able to respond. As a result, this move can be used in neutral as a niche shield pressure option while Arsene is around.
In terms of safety on hit, the safest version is the angled up one, being +6 at 0%[2]. However, the low angled variant KOs the earliest, although the advantage becomes more consistent at around 125% (+19 Unangled, +21 Up, +18 Low on Mario). If a Joker player wishes to go for maximum hit advantage, starting with the up angled variant and gradually moving to the lower angled one is a viable strategy to make use of.
Hitboxes[edit]
Angled up[edit]
Angled forward[edit]
Angled down[edit]
Timing[edit]
| Hit 1 | 8-9 |
|---|---|
| Hit 2 (without Arsene) | 13-15 |
| Hit 2 (with Arsene) | 13-19 |
| Interruptible | 35 |
| Animation length | 79 |
| Without Arsene | |||||||||||||||||||||||||||||||||||||||||||||||||||||||||||||||||||||||||||||||
|---|---|---|---|---|---|---|---|---|---|---|---|---|---|---|---|---|---|---|---|---|---|---|---|---|---|---|---|---|---|---|---|---|---|---|---|---|---|---|---|---|---|---|---|---|---|---|---|---|---|---|---|---|---|---|---|---|---|---|---|---|---|---|---|---|---|---|---|---|---|---|---|---|---|---|---|---|---|---|---|
| With Arsene |
Lag time |
Hitbox |
Interruptible |
|