Richter (SSBU)/Neutral attack/Hit 2: Difference between revisions
From SmashWiki, the Super Smash Bros. wiki
Jump to navigationJump to search
Raul Retana (talk | contribs) m (Added hitstun) |
No edit summary |
||
| (One intermediate revision by one other user not shown) | |||
| Line 1: | Line 1: | ||
{{ArticleIcons|ssbu=y}} | {{ArticleIcons|ssbu=y}} | ||
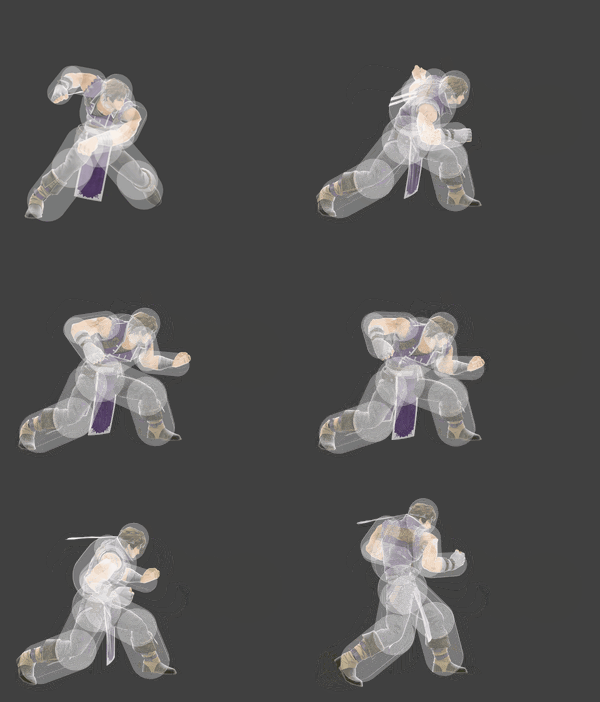
[[File:RichterJab2.gif|thumb| | [[File:RichterJab2.gif|thumb|300px|Hitbox visualization showing Richter's second jab.]] | ||
{{competitive expertise}} | {{competitive expertise}} | ||
==Overview== | ==Overview== | ||
| Line 10: | Line 10: | ||
|damage=2.0% | |damage=2.0% | ||
|angle=361 | |angle=361 | ||
|af=3 | |||
|bk=30 | |bk=30 | ||
|ks=25 | |ks=25 | ||
| Line 21: | Line 22: | ||
|type=Whip | |type=Whip | ||
|effect=Normal | |effect=Normal | ||
|sfx= | |sfx=Richter Whip | ||
|slvl=M | |slvl=M | ||
}} | }} | ||
| Line 29: | Line 30: | ||
|damage=2.0% | |damage=2.0% | ||
|angle=361 | |angle=361 | ||
|af=3 | |||
|bk=30 | |bk=30 | ||
|ks=25 | |ks=25 | ||
| Line 40: | Line 42: | ||
|type=Whip | |type=Whip | ||
|effect=Normal | |effect=Normal | ||
|sfx= | |sfx=Richter Whip | ||
|slvl=M | |slvl=M | ||
}} | }} | ||
| Line 48: | Line 50: | ||
|damage=2.0% | |damage=2.0% | ||
|angle=361 | |angle=361 | ||
|af=3 | |||
|bk=20 | |bk=20 | ||
|ks=15 | |ks=15 | ||
| Line 59: | Line 62: | ||
|type=Whip | |type=Whip | ||
|effect=Normal | |effect=Normal | ||
|sfx= | |sfx=Richter Whip | ||
|slvl=M | |slvl=M | ||
}} | }} | ||
|'''+2''' frames | |'''+2''' frames | ||
|} | |} | ||
==Timing== | ==Timing== | ||
Upon reaching the continuability window, the move transitions into the rapid jab if the button has been pressed and released at least 3 times since the neutral attack's first hit. | |||
{|class="wikitable" | {|class="wikitable" | ||
!Hitboxes | !Hitboxes | ||
|3-4 | |3-4 | ||
|- | |- | ||
! | !Continuability window | ||
| | |5-10 | ||
|- | |- | ||
!Interruptible | !Interruptible | ||
| Line 80: | Line 85: | ||
{{FrameStripStart}} | {{FrameStripStart}} | ||
{{FrameStrip|t=Lag|c=2}}{{FrameStrip|t=Hitbox|c=2}}{{FrameStrip|t=Lag|c= | {{FrameStrip|t=Lag|c=2}}{{FrameStrip|t=Hitbox|c=2|e=HitboxContinuableS}}{{FrameStrip|t=Lag|c=25|s=LagContinuableE}}{{FrameStrip|t=Interruptible|c=3}} | ||
|- | |||
{{FrameStrip|t=Blank|c=4}}{{FrameStrip|t=Continuable|c=6}}{{FrameStrip|t=Blank|c=22}} | |||
{{FrameStripEnd}} | {{FrameStripEnd}} | ||
{{FrameIconLegend|lag=y|hitbox=y|earliestcontinuable=y|interruptible=y}} | {{FrameIconLegend|lag=y|hitbox=y|earliestcontinuable=y|continuable=y|interruptible=y}} | ||
{{MvSubNavRichter|g=SSBU}} | {{MvSubNavRichter|g=SSBU}} | ||
[[Category:Richter (SSBU)]] | [[Category:Richter (SSBU)]] | ||
[[Category:Neutral attacks (SSBU)]] | [[Category:Neutral attacks (SSBU)]] | ||
Latest revision as of 15:25, August 5, 2022
Overview[edit]
Hitboxes[edit]
Timing[edit]
Upon reaching the continuability window, the move transitions into the rapid jab if the button has been pressed and released at least 3 times since the neutral attack's first hit.
| Hitboxes | 3-4 |
|---|---|
| Continuability window | 5-10 |
| Interruptible | 30 |
| Animation length | 32 |
Lag time |
Hitbox |
Continuable |
Earliest continuable point |
Interruptible |
|

