Dr. Mario (SSBU)/Back throw: Difference between revisions
From SmashWiki, the Super Smash Bros. wiki
Jump to navigationJump to search
m (→Overview) Tags: Mobile edit Advanced mobile edit |
|||
| (3 intermediate revisions by 2 users not shown) | |||
| Line 28: | Line 28: | ||
==Throw and Hitbox Data== | ==Throw and Hitbox Data== | ||
The damage values are listed as coded in the game's scripts, without Dr. Mario's 1.176× damage multiplier. | |||
{{UltimateThrowTableHeader}} | {{UltimateThrowTableHeader}} | ||
{{UltimateThrowTableRow | {{UltimateThrowTableRow | ||
|id=0 | |id=0 | ||
|type=Throwing | |type=Throwing | ||
|damage=11.0% | |damage={{rollover|11.0%|12.936% with Dr. Mario's damage multiplier|y}} | ||
|angle=45 | |angle=45 | ||
|bk=70 | |bk=70 | ||
| Line 43: | Line 43: | ||
|slvl=S | |slvl=S | ||
}} | }} | ||
{{ | {{UltimateThrowTableRow | ||
|kind=1 | |||
|id=0 | |||
|type=Throwing | |||
|damage={{rollover|3.0%|3.528% with Dr. Mario's damage multiplier|y}} | |||
|angle=361 | |||
|bk=40 | |||
|ks=100 | |||
|fkv=0 | |||
|effect=Normal | |||
|sfx=None | |||
|slvl=S | |||
}} | |||
|} | |} | ||
| Line 50: | Line 62: | ||
!Invincibility | !Invincibility | ||
|1-30 | |1-30 | ||
|- | |||
!Turnaround | |||
|20 | |||
|- | |- | ||
!Throw Release | !Throw Release | ||
| Line 63: | Line 78: | ||
{{FrameStrip|t=Lag|c=29|e=LagThrowS}}{{FrameStrip|t=Lag|c=30|s=LagThrowE}}{{FrameStrip|t=Interruptible|c=15}} | {{FrameStrip|t=Lag|c=29|e=LagThrowS}}{{FrameStrip|t=Lag|c=30|s=LagThrowE}}{{FrameStrip|t=Interruptible|c=15}} | ||
|- | |- | ||
{{FrameStrip|t=Invincible|c= | {{FrameStrip|t=Invincible|c=19|e=InvincibleStateS}}{{FrameStrip|t=Invincible|c=11|s=InvincibleStateE}}{{FrameStrip|t=Vulnerable|c=44}} | ||
{{FrameStripEnd}} | {{FrameStripEnd}} | ||
{{FrameIconLegend|lag=y|throw=y|interruptible=y|vulnerable=y|invincible=y}} | {{FrameIconLegend|lag=y|throw=y|interruptible=y|vulnerable=y|invincible=y|state=y}} | ||
{{MvSubNavDrMario|g=SSBU}} | {{MvSubNavDrMario|g=SSBU}} | ||
Latest revision as of 22:42, July 19, 2022
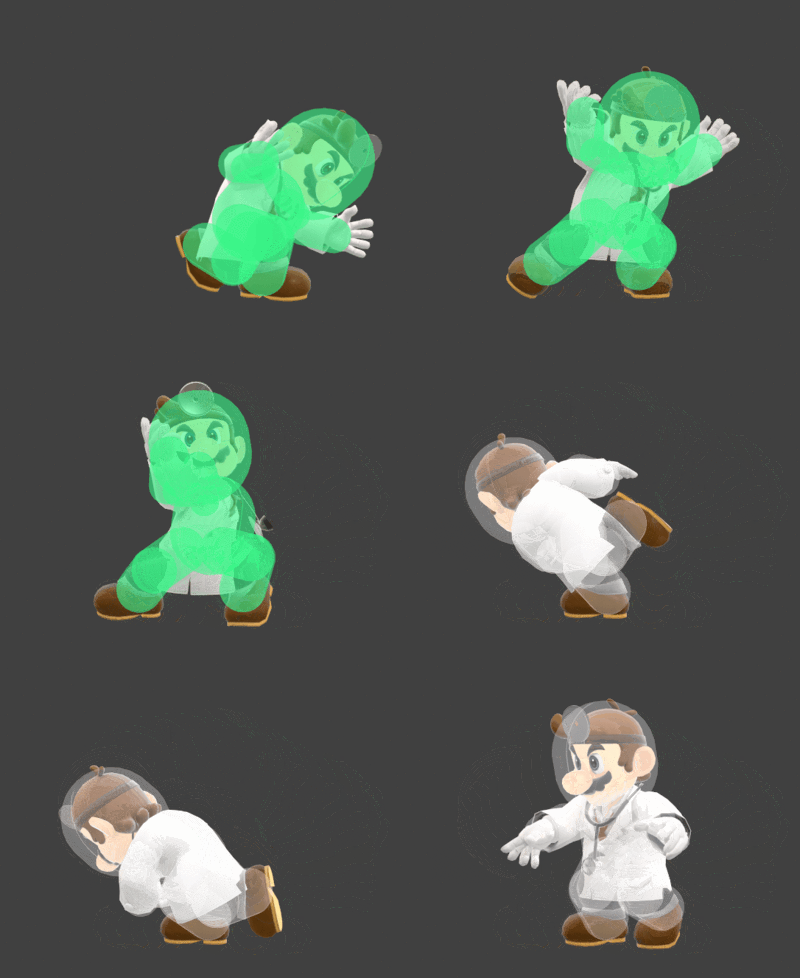
| Dr. Mario back throw hurtbox visualization | ||||
|---|---|---|---|---|

| ||||
Overview[edit]
Dr. Mario lifts the opponent on his shoulders and then throws them away, similarly to throws used in wrestling. It's one of the strongest throws in the game, even competing with Ness's back throw, and compared to Mario's, it's faster and thus, more reliable for KOing. Unlike Mario's back throw, however, it can't hit bystanders.
| Dr. Mario Back Throw KO%s on Final Destination VS Mario w/Optimal DI | ||
|---|---|---|
| Circumstance | Kill% | Stick angle |
| At the ledge | 152.04% | 159° |
| At the ledge (max rage) | 125.12% | 159° |
| Center | 215.06% | 191° |
| Center (max rage) | 182.4% | 191° |
Throw and Hitbox Data[edit]
The damage values are listed as coded in the game's scripts, without Dr. Mario's 1.176× damage multiplier.
| Kind | ID | Damage | Angle | Angle type | BK | KS | FKV | H× | Effect | Type | Sound |
|---|---|---|---|---|---|---|---|---|---|---|---|
| Throw | 0 | 11.0% | Forward | 70 | 68 | 0 | 0.0× | ||||
| Break | 0 | 3.0% | Forward | 40 | 100 | 0 | 0.0× |
Timing[edit]
| Invincibility | 1-30 |
|---|---|
| Turnaround | 20 |
| Throw Release | 30 |
| Interruptible | 60 |
| Animation length | 74 |
Lag time |
Vulnerable |
Invincible |
State change |
Throw point |
Interruptible |
|
