Samus (SSBU)/Up aerial: Difference between revisions
From SmashWiki, the Super Smash Bros. wiki
Jump to navigationJump to search
m (Removed protection from "Samus (SSBU)/Up aerial": Bot: Unprotecting a list of files) |
(→Timing) |
||
| (8 intermediate revisions by 4 users not shown) | |||
| Line 1: | Line 1: | ||
{{ArticleIcons|ssbu=y}} | {{ArticleIcons|ssbu=y}} | ||
[[File:SamusUAirSSBU.gif|thumb| | [[File:SamusUAirSSBU.gif|thumb|300px|Hitbox visualization showing Samus's up aerial.]] | ||
{{competitive expertise}} | {{competitive expertise}} | ||
==Overview== | ==Overview== | ||
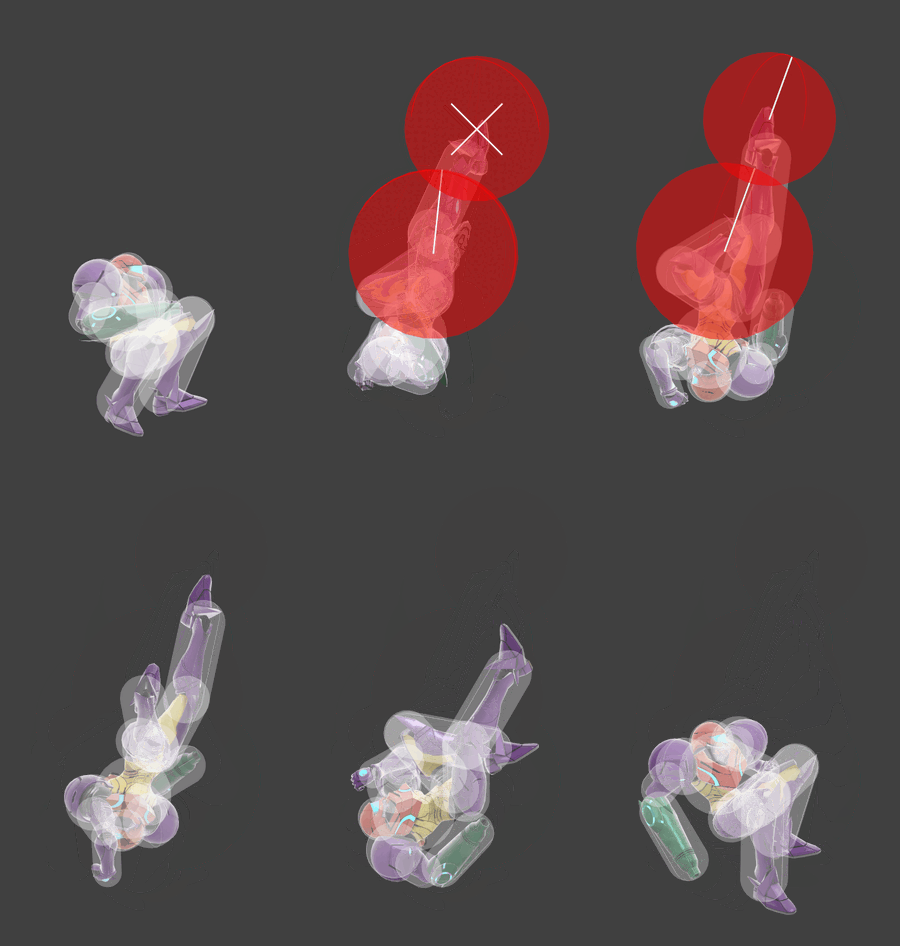
Samus drills above her with her right leg, hitting multiple | Samus drills above her with her right leg, hitting multiple times. She then thrusts upwards to launch her opponents. | ||
==Hitboxes== | ==Hitboxes== | ||
For hit 1 and the multihits, only the ID 0 hitbox has a hitstun modifier specified in the scripts, but it applies to all their hitboxes [[Hitstun#List of moves with hitstun modifiers|due to a glitch]]. | |||
{{UltimateHitboxTableHeader}} | {{UltimateHitboxTableHeader}} | ||
{{HitboxTableTitle|Hit 1| | ! Hitstun | ||
{{HitboxTableTitle|Hit 1|50}} | |||
{{UltimateHitboxTableRow | {{UltimateHitboxTableRow | ||
|id=0 | |id=0 | ||
|damage=3.0% | |damage=3.0% | ||
|af=3 | |||
|angle=84 | |angle=84 | ||
|bk=0 | |bk=0 | ||
| Line 25: | Line 29: | ||
|slvl=M | |slvl=M | ||
}} | }} | ||
|'''-10''' frames | |||
{{UltimateHitboxTableRow | {{UltimateHitboxTableRow | ||
|id=1 | |id=1 | ||
|damage=3.0% | |damage=3.0% | ||
|angle=367 | |angle=367 | ||
|af=3 | |||
|bk=0 | |bk=0 | ||
|ks=100 | |ks=100 | ||
|fkv=25 | |fkv=25 | ||
|r= | |r=5.5 | ||
|bn=toer | |bn=toer | ||
|xpos=1.0 | |xpos=1.0 | ||
| Line 43: | Line 49: | ||
|slvl=M | |slvl=M | ||
}} | }} | ||
{{HitboxTableTitle|Multihits| | |— | ||
{{HitboxTableTitle|Multihits|50}} | |||
{{UltimateHitboxTableRow | {{UltimateHitboxTableRow | ||
|id=0 | |id=0 | ||
| Line 49: | Line 56: | ||
|damage=1.3% | |damage=1.3% | ||
|angle=84 | |angle=84 | ||
|af=3 | |||
|bk=0 | |bk=0 | ||
|ks=100 | |ks=100 | ||
| Line 63: | Line 71: | ||
|slvl=S | |slvl=S | ||
}} | }} | ||
|'''-10''' frames | |||
{{UltimateHitboxTableRow | {{UltimateHitboxTableRow | ||
|id=1 | |id=1 | ||
| Line 68: | Line 77: | ||
|damage=1.3% | |damage=1.3% | ||
|angle=367 | |angle=367 | ||
|af=3 | |||
|bk=0 | |bk=0 | ||
|ks=100 | |ks=100 | ||
|fkv=25 | |fkv=25 | ||
|r= | |r=5.5 | ||
|bn=toer | |bn=toer | ||
|xpos=1.0 | |xpos=1.0 | ||
| Line 82: | Line 92: | ||
|slvl=S | |slvl=S | ||
}} | }} | ||
{{HitboxTableTitle|Final hit| | |— | ||
{{HitboxTableTitle|Final hit|50}} | |||
{{UltimateHitboxTableRow | {{UltimateHitboxTableRow | ||
|id=0 | |id=0 | ||
|damage=4.0% | |damage=4.0% | ||
|angle=70 | |angle=70 | ||
|af=3 | |||
|bk=40 | |bk=40 | ||
|ks=160 | |ks=160 | ||
| Line 101: | Line 113: | ||
|slvl=L | |slvl=L | ||
}} | }} | ||
|— | |||
{{UltimateHitboxTableRow | {{UltimateHitboxTableRow | ||
|id=1 | |id=1 | ||
|damage=4.0% | |damage=4.0% | ||
|angle=70 | |angle=70 | ||
|af=3 | |||
|bk=40 | |bk=40 | ||
|ks=160 | |ks=160 | ||
|fkv=0 | |fkv=0 | ||
|r= | |r=5.5 | ||
|bn=toer | |bn=toer | ||
|xpos=1.0 | |xpos=1.0 | ||
| Line 119: | Line 133: | ||
|slvl=L | |slvl=L | ||
}} | }} | ||
|— | |||
|} | |} | ||
==Timing== | ==Timing== | ||
===Attack=== | ===Attack=== | ||
| Line 130: | Line 146: | ||
|- | |- | ||
!Multihits | !Multihits | ||
|7-14 | |7-14 (rehit rate: 3) | ||
|- | |- | ||
!Final hit | !Final hit | ||
| Line 153: | Line 169: | ||
===Landing lag=== | ===Landing lag=== | ||
{|class="wikitable" | {|class="wikitable" | ||
!Interruptible | |||
|19 | |||
|- | |||
!Animation length | !Animation length | ||
| | |40 | ||
|} | |} | ||
{{FrameStripStart}} | {{FrameStripStart}} | ||
{{FrameStrip|t=Lag|c=18}} | {{FrameStrip|t=Lag|c=18}}{{FrameStrip|t=Interruptible|c=22}} | ||
{{FrameStripEnd}} | {{FrameStripEnd}} | ||
{{FrameIconLegend|lag=y|hitbox=y|autocancel=y|interruptible=y}} | {{FrameIconLegend|lag=y|hitbox=y|autocancel=y|interruptible=y}} | ||
==Trivia== | ==Trivia== | ||
*The hitbox | *The ID 1 hitbox for the first hit and multihits is coded as an extended hitbox despite not actually being extended. This prevents it from interpolating. | ||
{{MvSubNavSamus|g=SSBU}} | {{MvSubNavSamus|g=SSBU}} | ||
[[Category:Samus (SSBU)]] | [[Category:Samus (SSBU)]] | ||
[[Category:Up aerials (SSBU)]] | [[Category:Up aerials (SSBU)]] | ||
Latest revision as of 09:58, July 15, 2022
Overview[edit]
Samus drills above her with her right leg, hitting multiple times. She then thrusts upwards to launch her opponents.
Hitboxes[edit]
For hit 1 and the multihits, only the ID 0 hitbox has a hitstun modifier specified in the scripts, but it applies to all their hitboxes due to a glitch.
Timing[edit]
Attack[edit]
| Initial autocancel | 1-2 |
|---|---|
| Hit 1 | 5 |
| Multihits | 7-14 (rehit rate: 3) |
| Final hit | 16-17 |
| Ending autocancel | 34- |
| Interruptible | 40 |
| Animation length | 53 |
Landing lag[edit]
| Interruptible | 19 |
|---|---|
| Animation length | 40 |
Lag time |
Hitbox |
Autocancel |
Interruptible |
Trivia[edit]
- The ID 1 hitbox for the first hit and multihits is coded as an extended hitbox despite not actually being extended. This prevents it from interpolating.
|

