Captain Falcon (SSB)/Up special: Difference between revisions
No edit summary |
m (DI didn't even exist yet.) |
||
| (17 intermediate revisions by 7 users not shown) | |||
| Line 1: | Line 1: | ||
{{ArticleIcons|ssb=y}} | {{ArticleIcons|ssb=y}} | ||
{{disambig2|the hitbox visualization in ''[[Super Smash Bros.]]''|the move itself|Falcon Dive}} | |||
==Overview== | ==Overview== | ||
[[File:Captain Falcon Up Special Ground Hitboxes Smash 64.gif|thumb|Hitboxes of the move when used from the ground.]] | [[File:Captain Falcon Up Special Ground Hitboxes Smash 64.gif|thumb|Hitboxes of the move when used from the ground.]] | ||
[[File:Captain Falcon Up Special Air Hitboxes Smash 64.gif|thumb|Hitboxes of the move when used in the air.]] | [[File:Captain Falcon Up Special Air Hitboxes Smash 64.gif|thumb|Hitboxes of the move when used in the air.]] | ||
Known as '''[[Falcon Dive]]''', Captain Falcon leaps up in the air. If he comes into contact with any opponent, he [[grab]]s them, and launches them on a diagonal upward trajectory, doing 20% damage and some decent knockback accompanied by an explosion and the " | Known as '''[[Falcon Dive]]''', Captain Falcon leaps up in the air. If he comes into contact with any opponent, he [[grab]]s them, and launches them on a diagonal upward trajectory, doing 20% damage and some decent knockback accompanied by an explosion and the "YES!" SFX. Normally, the move makes Captain Falcon [[helpless]], but if he grabs an opponent, he will be able to use it again. This move is Captain Falcon's primary [[recovery]] move, but it travels a rather short distance, is predictable, and cannot grab [[edgehog]]gers. When combined with Captain Falcon's rather large size, it makes him easy to [[edgeguard]]. However, the move is notable for being a [[combo]] finisher to a string of {{mvsub|Captain Falcon|SSB|up aerial}}s launching the opponent upward. This combo is seen commonly in competitive play due to being easy to perform yet very effective. | ||
However, if Falcon misses with the move, whether used in a combo or not, he will be left highly vulnerable until he lands; therefore opponents can easily [[punish]] him. This can happen during up aerial combos if the last up aerial is misplaced, or the percentage is high enough so that the Falcon Dive just misses the opponent. If whiffed in general, the move is easily punishable, though Falcon's very high [[falling speed]] can help this problem slightly. Furthermore, the Falcon Dive can be used to [[tech-chase]] opponents as the initial frames allow Falcon to change directions before "diving". This is particularly useful on {{SSB|Dream Land}}, as Falcon can land on the high middle platform if he misses the opponent, resulting in much less significant punishing. | |||
{{ | Captain Falcon can cancel his [[midair jump]] while recovering by using Falcon Dive into an [[edge sweet spot]], allowing him to quickly execute any [[edge]] option immediately after, referred to as a '''Falcon Dive cancel'''. To do it Falcon must use his second jump, then use this move at the exact frame for Falcon to cancel his dive into grabbing the edge. Too far away, or too close, and this would not be realizable. If a player can perform it consistenly, it is quite useful against characters who can [[edgeguard]] well, such as {{SSB|Pikachu}} and {{SSB|Mario}}, as it allows Falcon to reach the edge quickly, to potentially set up ledge play with moves such as up aerial, {{mvsub|Captain Falcon|SSB|back aerial}}, and so on, which is especially helpful against quick recoveries (Pikachu and Mario/{{SSB|Luigi}} to some extent). | ||
==Grabboxes and throw== | |||
===Early Grabboxes=== | |||
{{SSB64HitboxTableHeader}} | |||
{{SSB64HitboxTableRow | |||
|id=0 | |||
|damage=1% | |||
|sd=0 | |||
|angle=361 | |||
|bk=0 | |||
|ks=100 | |||
|fkv=0 | |||
|r=100 | |||
|ypos=260 | |||
|zpos=180 | |||
|bn=0 | |||
|effect=Grab | |||
|slvl=M | |||
|sfx=Punch | |||
}} | |||
{{SSB64HitboxTableRow | |||
|id=1 | |||
|damage=1% | |||
|sd=0 | |||
|angle=361 | |||
|bk=0 | |||
|ks=100 | |||
|fkv=0 | |||
|r=150 | |||
|ypos=260 | |||
|zpos=400 | |||
|bn=0 | |||
|effect=Grab | |||
|a=n | |||
|slvl=M | |||
|sfx=Punch | |||
}} | |||
|} | |||
===Late Grabbox=== | |||
{{SSB64HitboxTableHeader}} | |||
{{SSB64HitboxTableRow | |||
|id=0 | |||
|damage=1% | |||
|sd=0 | |||
|angle=361 | |||
|bk=0 | |||
|ks=100 | |||
|fkv=0 | |||
|r=100 | |||
|ypos=260 | |||
|zpos=180 | |||
|bn=0 | |||
|effect=Grab | |||
|slvl=M | |||
|sfx=Punch | |||
}} | |||
|} | |||
===Throw=== | |||
{{SSB64ThrowTableHeader}} | |||
{{SSB64ThrowTableRow | |||
|id=0 | |||
|type=Throwing | |||
|damage=20% | |||
|angle=361 | |||
|bk=30 | |||
|ks=82 | |||
|fkv=0 | |||
|ff=0.0 | |||
|effect=Flame | |||
|sfx=Explosion | |||
|slvl=L | |||
}} | |||
|} | |||
==Timing== | |||
===Rising=== | |||
{|class="wikitable" | |||
!Early grabboxes | |||
|13 | |||
|- | |||
!Late grabbox | |||
|14-44 | |||
|- | |||
!Animation length | |||
|64 | |||
|} | |||
{{FrameStripStart}} | |||
{{FrameStrip|t=Lag|c=12}}{{FrameStrip|t=Hitbox|c=1|e=GrabChangeS}}{{FrameStrip|t=Grab|c=31|s=GrabChangeE}}{{FrameStrip|t=Lag|c=20}} | |||
{{FrameStripEnd}} | |||
===Throw=== | |||
{|class="wikitable" | |||
!Throw release | |||
|16 | |||
|- | |||
!Animation length | |||
|74 | |||
|} | |||
{{FrameStripStart}} | |||
{{FrameStrip|t=Lag|c=15|e=LagThrowS}}{{FrameStrip|t=Lag|c=58|s=LagThrowE}} | |||
{{FrameStripEnd}} | |||
===[[Landing lag]]=== | |||
{|class="wikitable" | |||
|- | |||
!Animation length | |||
|17 | |||
|} | |||
{{FrameStripStart}} | |||
{{FrameStrip|t=Lag|c=17}} | |||
{{FrameStripEnd}} | |||
{{FrameIconLegend|lag=y|grabchange=y|grab=y}} | |||
==Gallery== | ==Gallery== | ||
| Line 19: | Line 139: | ||
[[Category:Captain Falcon (SSB)]] | [[Category:Captain Falcon (SSB)]] | ||
[[Category:Up special moves]] | [[Category:Up special moves (SSB)]] | ||
[[Category:Flame attacks]] | [[Category:Flame attacks (SSB)]] | ||
Latest revision as of 23:24, November 23, 2021
Overview[edit]
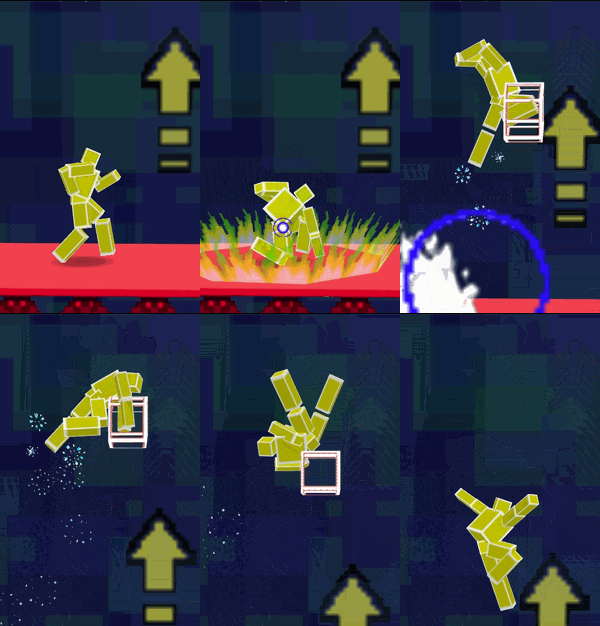
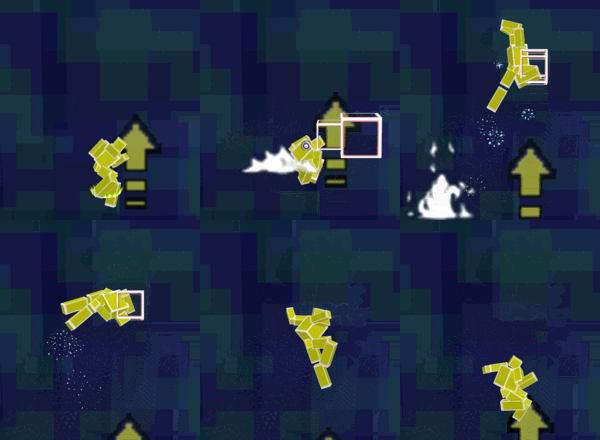
Known as Falcon Dive, Captain Falcon leaps up in the air. If he comes into contact with any opponent, he grabs them, and launches them on a diagonal upward trajectory, doing 20% damage and some decent knockback accompanied by an explosion and the "YES!" SFX. Normally, the move makes Captain Falcon helpless, but if he grabs an opponent, he will be able to use it again. This move is Captain Falcon's primary recovery move, but it travels a rather short distance, is predictable, and cannot grab edgehoggers. When combined with Captain Falcon's rather large size, it makes him easy to edgeguard. However, the move is notable for being a combo finisher to a string of up aerials launching the opponent upward. This combo is seen commonly in competitive play due to being easy to perform yet very effective.
However, if Falcon misses with the move, whether used in a combo or not, he will be left highly vulnerable until he lands; therefore opponents can easily punish him. This can happen during up aerial combos if the last up aerial is misplaced, or the percentage is high enough so that the Falcon Dive just misses the opponent. If whiffed in general, the move is easily punishable, though Falcon's very high falling speed can help this problem slightly. Furthermore, the Falcon Dive can be used to tech-chase opponents as the initial frames allow Falcon to change directions before "diving". This is particularly useful on Dream Land, as Falcon can land on the high middle platform if he misses the opponent, resulting in much less significant punishing.
Captain Falcon can cancel his midair jump while recovering by using Falcon Dive into an edge sweet spot, allowing him to quickly execute any edge option immediately after, referred to as a Falcon Dive cancel. To do it Falcon must use his second jump, then use this move at the exact frame for Falcon to cancel his dive into grabbing the edge. Too far away, or too close, and this would not be realizable. If a player can perform it consistenly, it is quite useful against characters who can edgeguard well, such as Pikachu and Mario, as it allows Falcon to reach the edge quickly, to potentially set up ledge play with moves such as up aerial, back aerial, and so on, which is especially helpful against quick recoveries (Pikachu and Mario/Luigi to some extent).
Grabboxes and throw[edit]
Early Grabboxes[edit]
| ID | Part | Damage | SD | Angle | BK | KS | FKV | Radius | Bone | Offset | Clang | Effect | G | A | Sound | ||
|---|---|---|---|---|---|---|---|---|---|---|---|---|---|---|---|---|---|
| 0 | 0 | 1% | 0 | 0 | 100 | 0 | 100 | 0 | 0 | 260 | 180 | ||||||
| 1 | 0 | 1% | 0 | 0 | 100 | 0 | 150 | 0 | 0 | 260 | 400 | ||||||
Late Grabbox[edit]
| ID | Part | Damage | SD | Angle | BK | KS | FKV | Radius | Bone | Offset | Clang | Effect | G | A | Sound | ||
|---|---|---|---|---|---|---|---|---|---|---|---|---|---|---|---|---|---|
| 0 | 0 | 1% | 0 | 0 | 100 | 0 | 100 | 0 | 0 | 260 | 180 | ||||||
Throw[edit]
| Bone | Damage | Angle | BK | KS | FKV | Effect | |
|---|---|---|---|---|---|---|---|
| Throwing | bn! | 20% | 30 | 82 | 0 |
Timing[edit]
Rising[edit]
| Early grabboxes | 13 |
|---|---|
| Late grabbox | 14-44 |
| Animation length | 64 |
Throw[edit]
| Throw release | 16 |
|---|---|
| Animation length | 74 |
Landing lag[edit]
| Animation length | 17 |
|---|
Lag time |
Grab |
Gallery[edit]
|


