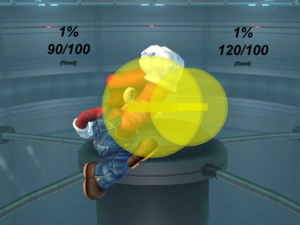
Autolink angle: Difference between revisions
No edit summary |
m (→By characters) |
||
| Line 21: | Line 21: | ||
|rowspan=2|[[Dr. Mario]] | |rowspan=2|[[Dr. Mario]] | ||
|[[Down aerial]] | |[[Down aerial]] | ||
|rowspan= | |rowspan=8|{{GameIcon|SSB4}} | ||
|- | |- | ||
|[[Dr. Tornado]] (aerial) | |[[Dr. Tornado]] (aerial) | ||
| Line 27: | Line 27: | ||
|rowspan=2|[[Falco]] | |rowspan=2|[[Falco]] | ||
|[[Neutral aerial]] | |[[Neutral aerial]] | ||
|- | |- | ||
|Forward aerial | |Forward aerial | ||
|- | |- | ||
|rowspan=1|[[Fox]] | |rowspan=1|[[Fox]] | ||
|[[Forward aerial]] | |[[Forward aerial]] | ||
|- | |- | ||
|rowspan=1|[[Greninja]] | |rowspan=1|[[Greninja]] | ||
|[[Up aerial]] | |[[Up aerial]] | ||
|- | |- | ||
|rowspan=1|[[King Dedede]] | |rowspan=1|[[King Dedede]] | ||
|Up aerial | |Up aerial | ||
|- | |- | ||
|rowspan=2|[[Kirby]] | |rowspan=2|[[Kirby]] | ||
|Forward aerial | |Forward aerial | ||
|- | |- | ||
|Down aerial | |Down aerial | ||
|{{GameIcon|SSBB}}{{GameIcon|SSB4}} | |rowspan=3|{{GameIcon|SSBB}}{{GameIcon|SSB4}} | ||
|- | |- | ||
|rowspan=1|[[Mario]] | |rowspan=1|[[Mario]] | ||
|[[Super Jump Punch]] | |[[Super Jump Punch]] | ||
|- | |- | ||
|rowspan=2|[[Meta Knight]] | |rowspan=2|[[Meta Knight]] | ||
|Forward aerial<br>(pre-[[1.0.4]] in ''Smash 4'') | |Forward aerial<br>(pre-[[1.0.4]] in ''Smash 4'') | ||
|- | |- | ||
|[[Back aerial]] | |[[Back aerial]] | ||
|{{GameIcon|SSB4}} | |rowspan=10|{{GameIcon|SSB4}} | ||
|- | |- | ||
|rowspan=3|[[Palutena]] | |rowspan=3|[[Palutena]] | ||
|Neutral aerial | |Neutral aerial | ||
|- | |- | ||
|Up aerial | |Up aerial | ||
|- | |- | ||
|[[Black Hole Laser]] | |[[Black Hole Laser]] | ||
|- | |- | ||
|rowspan=1|[[Pikachu]] | |rowspan=1|[[Pikachu]] | ||
|Back aerial | |Back aerial | ||
|- | |- | ||
|rowspan=1|[[Samus]] | |rowspan=1|[[Samus]] | ||
|Forward aerial | |Forward aerial | ||
|- | |- | ||
|rowspan=1|[[Sheik]] | |rowspan=1|[[Sheik]] | ||
|Up aerial | |Up aerial | ||
|- | |- | ||
|rowspan=1|[[Yoshi]] | |rowspan=1|[[Yoshi]] | ||
|Back aerial | |Back aerial | ||
|- | |- | ||
|rowspan=2|[[Zelda]] | |rowspan=2|[[Zelda]] | ||
|Up smash | |Up smash | ||
|- | |- | ||
|Neutral aerial | |Neutral aerial | ||
Revision as of 09:50, May 17, 2016

The autolink angle is a special knockback angle programmed into certain attacks in Brawl and Smash 4. While it reads in the game data as an angle of 362, 365, 366, or 367 degrees (363 degrees in Brawl), the game treats it rather differently - instead, targets are sent in whatever direction the attacker is moving.
The primary use of the angle is to ensure that enemies will stay trapped by certain multi-hitting moves that cause or require their users to move, almost always through the air; the angle manifests itself in the likes of Super Jump Punch, as well as a sizable quantity of multi-hitting aerial attacks.
The angle does not exist in Smash 64 or Melee; attacks with the angle in Brawl have fixed angles in the other two games. The angle is notably much more common in Smash 4 than Brawl, as many characters possessing multi-hitting aerial attacks had these moves adjusted to include it. It is typically considered favorable for an attack to employ the autolink angle, as it allows the move to be connect more reliably and sometimes be used in more versatile ways than one that has a static, unchanging angle.
List of attacks that use the autolink angle
By characters
| Character | Move(s) | Games |
|---|---|---|
| Dr. Mario | Down aerial | |
| Dr. Tornado (aerial) | ||
| Falco | Neutral aerial | |
| Forward aerial | ||
| Fox | Forward aerial | |
| Greninja | Up aerial | |
| King Dedede | Up aerial | |
| Kirby | Forward aerial | |
| Down aerial | ||
| Mario | Super Jump Punch | |
| Meta Knight | Forward aerial (pre-1.0.4 in Smash 4) | |
| Back aerial | ||
| Palutena | Neutral aerial | |
| Up aerial | ||
| Black Hole Laser | ||
| Pikachu | Back aerial | |
| Samus | Forward aerial | |
| Sheik | Up aerial | |
| Yoshi | Back aerial | |
| Zelda | Up smash | |
| Neutral aerial |
