Super Smash Bros. Ultimate

Palutena (SSBU)/Neutral aerial: Difference between revisions

From SmashWiki, the Super Smash Bros. wiki
Jump to navigationJump to search
 
Line 10: Line 10:
The autolink angle easily sucks opponents into Palutena's range, making the move very flexible and consistent. Most importantly, because the final hit always launches in the direction Palutena faces, Palutena can simply hold hard forward, minimizing the distance between her and the launched opponent and giving the move very easy combo potential from a short hop, regardless of where or when the move connects. It can notoriously chain into itself at low percentages as many as four times, or combo into her other aerials for a great amount of damage. For opponents, getting caught by the move at low percents will consistently result in taking an all but guaranteed 30%-40% or more, as demonstrated in the GIF.


In addition to combos from full execution of the move, the looping hits can also combo and convert into KOs. The aerial looping hits have no base knockback, but they have high knockback scaling. This gives the move drag-down combo potential at higher percents. The knockback is affected both by weight and rage, so a combination of high rage and low-weight opponents will enable drag-down combos earlier. On frames 24-27, however, a negative hitstun modifier negates any possible frame advantage until ridiculous percents, so it is essential to land before these frames. Possible follow-ups include up tilt, jab and grab. At extreme percents, other follow-ups become possible, but the knockback also becomes high enough to incur tumble and thus enable techs.
In addition to combos from full execution of the move, the looping hits can also combo and convert into KOs. The aerial looping hits have no base knockback, but they have high knockback scaling. This gives the move drag-down combo potential at higher percents. The knockback is affected both by weight and rage, so a combination of high rage and low-weight opponents will enable drag-down combos earlier. On frames 24-27, however, they switch to set knockback, with a negative hitstun modifier negating any possible frame advantage, so it is essential to land before these frames. Possible follow-ups include up tilt, jab and grab. At extreme percents, other follow-ups become possible, but the knockback also becomes high enough to incur tumble and thus enable techs.


The grounded looping hits do not use the autolink angle, instead popping opponents up and slightly inward. They use set knockback, which means staleness, rage and percentage have no effect on their knockback; however, they are still weight dependent, so they will inflict more knockback/hitstun on lighter opponents. A single hit on grounded opponents can consistently combo at any percent, most reliably into up tilt. On frames 5-6 only, the staff's bottom hitbox deals slightly higher set knockback; this makes it strong enough inflict tumble and enable DI with fighters lighter than Sonic and Duck Hunt. It has the lowest priority, so on large opponents, in order to successfully land it, Palutena must space her nair correctly. With this hit, more follow-ups become possible, including even up smash on lightweights. The negative hitstun applied to the aerial looping hits on frames 24-27 also applies to the grounded hits; therefore, on these frames, single-hit pop-up combos are not possible.

Latest revision as of 02:51, November 17, 2024

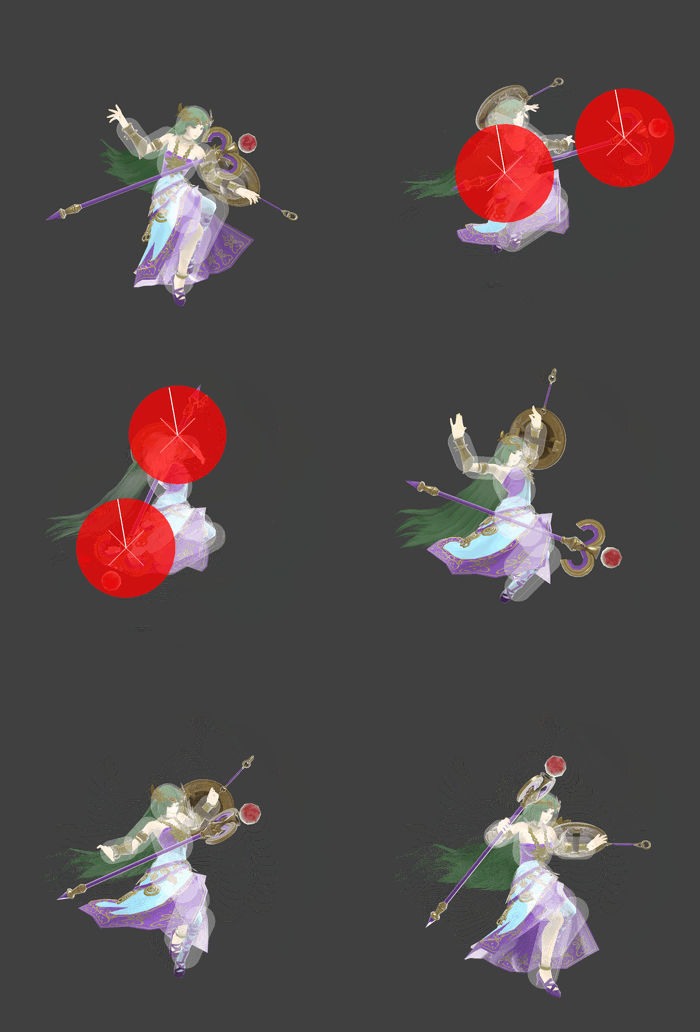
Hitbox visualization showing Palutena's neutral aerial.

Overview[edit]

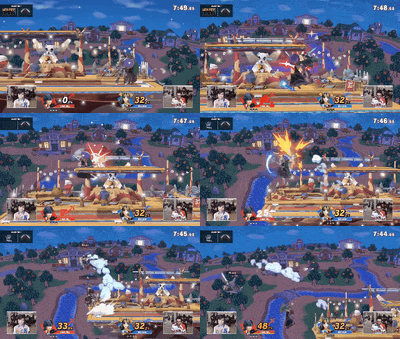
Palutena (Nairo) performing three neutral aerials and a back aerial on Chrom (Shoyo James).

Also known as Omnidirectional Circle (四方の環), Palutena telekinetically spins her staff while it is adjacent to her right arm. It has the lowest amount of startup lag in her moveset, coming out on frame 5.

The move has a generous range that covers all around Palutena, with a long hitbox duration and hitting up to seven times for a maximum of 13.4% damage. It auto-cancels in a full hop, but is most effective when buffered in a short hop, as she has hitbox coverage for nearly her entire short hop, and can land right after the final hit for low ending lag; while this can make it difficult to deal with and whiff punish, it is still notably unsafe on shield.

The autolink angle easily sucks opponents into Palutena's range, making the move very flexible and consistent. Most importantly, because the final hit always launches in the direction Palutena faces, Palutena can simply hold hard forward, minimizing the distance between her and the launched opponent and giving the move very easy combo potential from a short hop, regardless of where or when the move connects. It can notoriously chain into itself at low percentages as many as four times, or combo into her other aerials for a great amount of damage. For opponents, getting caught by the move at low percents will consistently result in taking an all but guaranteed 30%-40% or more, as demonstrated in the GIF.

In addition to combos from full execution of the move, the looping hits can also combo and convert into KOs. The aerial looping hits have no base knockback, but they have high knockback scaling. This gives the move drag-down combo potential at higher percents. The knockback is affected both by weight and rage, so a combination of high rage and low-weight opponents will enable drag-down combos earlier. On frames 24-27, however, they switch to set knockback, with a negative hitstun modifier negating any possible frame advantage, so it is essential to land before these frames. Possible follow-ups include up tilt, jab and grab. At extreme percents, other follow-ups become possible, but the knockback also becomes high enough to incur tumble and thus enable techs.

The grounded looping hits do not use the autolink angle, instead popping opponents up and slightly inward. They use set knockback, which means staleness, rage and percentage have no effect on their knockback; however, they are still weight dependent, so they will inflict more knockback/hitstun on lighter opponents. A single hit on grounded opponents can consistently combo at any percent, most reliably into up tilt. On frames 5-6 only, the staff's bottom hitbox deals slightly higher set knockback; this makes it strong enough inflict tumble and enable DI with fighters lighter than Sonic and Duck Hunt. It has the lowest priority, so on large opponents, in order to successfully land it, Palutena must space her nair correctly. With this hit, more follow-ups become possible, including even up smash on lightweights. The negative hitstun applied to the aerial looping hits on frames 24-27 also applies to the grounded hits; therefore, on these frames, single-hit pop-up combos are not possible.

Aside from its conversions into other moves, on its own, neutral aerial also can easily set up as an edge-guard when fast fallen, and due to its high knockback scaling, it becomes strong enough to KO middleweights at around 150% near the edge of Final Destination. All these traits combined give it high utility, making it one of her best moves and arguably one of the best moves in the game.

Update History[edit]

Super Smash Bros. Ultimate 2.0.0

  • Change Reduced hitlag on neutral air, allowing it to execute faster.

Super Smash Bros. Ultimate 7.0.0

  • Nerf Neutral aerial's last hit deals less knockback (30 base/180 scaling → 35/155). While this slightly improves its combo potential at low percents, it more drastically hinders its KO potential at high percents.
  • Nerf Neutral aerial's last hit has a smaller hitbox against aerial opponents (11.5u → 9.8u).
  • Nerf Neutral aerial's penultimate hit inflicts 13 less frames of hitstun, worsening the move's drag-down setups and removing its infinites against certain opponents on platforms (such as Ridley).

Hitboxes[edit]

For the late multihits, the scripts only specify hitstun modifiers for the ID 0 and 1 hitboxes, but due to a glitch, they also apply to the ID 2 and 3 hitboxes.

ID Part Rehit rate Damage SD Angle Angle type BK KS FKV Set weight Radius Bone Offset SDI× T% Clang Rebound Effect Type G A Sound Direct Hit bits Hit part Blockable Reflectable Absorbable Flinchless No GFX Heedless Hitstun
Multihits (early)
0 0 4 1.4% 1.0 Autolink angle (367) Standard 0 100 0 HitboxTableIcon(False).png 4.2 stick 0.0 5.2 0.0 0.5× 0.3× 0% HitboxTableIcon(Clang).png HitboxTableIcon(NoRebound).png Rapid (effect) Magic (type) HitboxTableIcon(GroundedFalse).png HitboxTableIcon(AerialTrue).png M Magic SpecialsDirect.png All All HitboxTableIcon(Blockable).png HitboxTableIcon(Unreflectable).png HitboxTableIcon(Unabsorbable).png HitboxTableIcon(False).png HitboxTableIcon(False).png HitboxTableIcon(False).png
1 0 4 1.4% 1.0 Autolink angle (367) Standard 0 100 0 HitboxTableIcon(False).png 4.2 stick 0.0 -5.4 0.0 0.5× 0.3× 0% HitboxTableIcon(Clang).png HitboxTableIcon(NoRebound).png Rapid (effect) Magic (type) HitboxTableIcon(GroundedFalse).png HitboxTableIcon(AerialTrue).png M Magic SpecialsDirect.png All All HitboxTableIcon(Blockable).png HitboxTableIcon(Unreflectable).png HitboxTableIcon(Unabsorbable).png HitboxTableIcon(False).png HitboxTableIcon(False).png HitboxTableIcon(False).png
2 0 4 1.4% 1.0 AngleIcon100.png Standard 0 100 65 HitboxTableIcon(False).png 4.2 stick 0.0 5.2 0.0 0.5× 0.3× 0% HitboxTableIcon(Clang).png HitboxTableIcon(NoRebound).png Rapid (effect) Magic (type) HitboxTableIcon(GroundedTrue).png HitboxTableIcon(AerialFalse).png M Magic SpecialsDirect.png All All HitboxTableIcon(Blockable).png HitboxTableIcon(Unreflectable).png HitboxTableIcon(Unabsorbable).png HitboxTableIcon(False).png HitboxTableIcon(False).png HitboxTableIcon(False).png
3 0 4 1.4% 1.0 AngleIcon95.png Standard 0 100 80 HitboxTableIcon(False).png 4.2 stick 0.0 -5.4 0.0 0.5× 0.3× 0% HitboxTableIcon(Clang).png HitboxTableIcon(NoRebound).png Rapid (effect) Magic (type) HitboxTableIcon(GroundedTrue).png HitboxTableIcon(AerialFalse).png M Magic SpecialsDirect.png All All HitboxTableIcon(Blockable).png HitboxTableIcon(Unreflectable).png HitboxTableIcon(Unabsorbable).png HitboxTableIcon(False).png HitboxTableIcon(False).png HitboxTableIcon(False).png
Multihits (mid)
0 0 4 1.4% 1.0 Autolink angle (367) Standard 0 100 0 HitboxTableIcon(False).png 4.2 stick 0.0 5.2 0.0 0.5× 0.3× 0% HitboxTableIcon(Clang).png HitboxTableIcon(NoRebound).png Rapid (effect) Magic (type) HitboxTableIcon(GroundedFalse).png HitboxTableIcon(AerialTrue).png M Magic SpecialsDirect.png All All HitboxTableIcon(Blockable).png HitboxTableIcon(Unreflectable).png HitboxTableIcon(Unabsorbable).png HitboxTableIcon(False).png HitboxTableIcon(False).png HitboxTableIcon(False).png
1 0 4 1.4% 1.0 Autolink angle (367) Standard 0 100 0 HitboxTableIcon(False).png 4.2 stick 0.0 -5.4 0.0 0.5× 0.3× 0% HitboxTableIcon(Clang).png HitboxTableIcon(NoRebound).png Rapid (effect) Magic (type) HitboxTableIcon(GroundedFalse).png HitboxTableIcon(AerialTrue).png M Magic SpecialsDirect.png All All HitboxTableIcon(Blockable).png HitboxTableIcon(Unreflectable).png HitboxTableIcon(Unabsorbable).png HitboxTableIcon(False).png HitboxTableIcon(False).png HitboxTableIcon(False).png
2 0 4 1.4% 1.0 AngleIcon100.png Standard 0 100 65 HitboxTableIcon(False).png 4.2 stick 0.0 5.2 0.0 0.5× 0.3× 0% HitboxTableIcon(Clang).png HitboxTableIcon(NoRebound).png Rapid (effect) Magic (type) HitboxTableIcon(GroundedTrue).png HitboxTableIcon(AerialFalse).png M Magic SpecialsDirect.png All All HitboxTableIcon(Blockable).png HitboxTableIcon(Unreflectable).png HitboxTableIcon(Unabsorbable).png HitboxTableIcon(False).png HitboxTableIcon(False).png HitboxTableIcon(False).png
3 0 4 1.4% 1.0 AngleIcon100.png Standard 0 100 65 HitboxTableIcon(False).png 4.2 stick 0.0 -5.4 0.0 0.5× 0.3× 0% HitboxTableIcon(Clang).png HitboxTableIcon(NoRebound).png Rapid (effect) Magic (type) HitboxTableIcon(GroundedTrue).png HitboxTableIcon(AerialFalse).png M Magic SpecialsDirect.png All All HitboxTableIcon(Blockable).png HitboxTableIcon(Unreflectable).png HitboxTableIcon(Unabsorbable).png HitboxTableIcon(False).png HitboxTableIcon(False).png HitboxTableIcon(False).png
Multihits (late)
0 0 4 1.4% 1.0 Autolink angle (367) Standard 0 100 65 HitboxTableIcon(False).png 4.2 stick 0.0 5.2 0.0 0.5× 0.0× 0% HitboxTableIcon(Clang).png HitboxTableIcon(NoRebound).png Rapid (effect) Magic (type) HitboxTableIcon(GroundedFalse).png HitboxTableIcon(AerialTrue).png M Magic SpecialsDirect.png All All HitboxTableIcon(Blockable).png HitboxTableIcon(Unreflectable).png HitboxTableIcon(Unabsorbable).png HitboxTableIcon(False).png HitboxTableIcon(False).png HitboxTableIcon(False).png -13 frames
1 0 4 1.4% 1.0 Autolink angle (367) Standard 0 100 65 HitboxTableIcon(False).png 4.2 stick 0.0 -5.4 0.0 0.5× 0.0× 0% HitboxTableIcon(Clang).png HitboxTableIcon(NoRebound).png Rapid (effect) Magic (type) HitboxTableIcon(GroundedFalse).png HitboxTableIcon(AerialTrue).png M Magic SpecialsDirect.png All All HitboxTableIcon(Blockable).png HitboxTableIcon(Unreflectable).png HitboxTableIcon(Unabsorbable).png HitboxTableIcon(False).png HitboxTableIcon(False).png HitboxTableIcon(False).png -13 frames
2 0 4 1.4% 1.0 AngleIcon100.png Standard 0 100 65 HitboxTableIcon(False).png 4.2 stick 0.0 5.2 0.0 0.5× 0.3× 0% HitboxTableIcon(Clang).png HitboxTableIcon(NoRebound).png Rapid (effect) Magic (type) HitboxTableIcon(GroundedTrue).png HitboxTableIcon(AerialFalse).png M Magic SpecialsDirect.png All All HitboxTableIcon(Blockable).png HitboxTableIcon(Unreflectable).png HitboxTableIcon(Unabsorbable).png HitboxTableIcon(False).png HitboxTableIcon(False).png HitboxTableIcon(False).png
3 0 4 1.4% 1.0 AngleIcon100.png Standard 0 100 65 HitboxTableIcon(False).png 4.2 stick 0.0 -5.4 0.0 0.5× 0.3× 0% HitboxTableIcon(Clang).png HitboxTableIcon(NoRebound).png Rapid (effect) Magic (type) HitboxTableIcon(GroundedTrue).png HitboxTableIcon(AerialFalse).png M Magic SpecialsDirect.png All All HitboxTableIcon(Blockable).png HitboxTableIcon(Unreflectable).png HitboxTableIcon(Unabsorbable).png HitboxTableIcon(False).png HitboxTableIcon(False).png HitboxTableIcon(False).png
Final hit
0 0 0 5.1% 3.0 AngleIcon55.png Forward 35 155 0 HitboxTableIcon(False).png 9.8 stick 0.0 0.0 0.0 1.5× 1.0× 0% HitboxTableIcon(Clang).png HitboxTableIcon(NoRebound).png Normal (effect) Magic (type) HitboxTableIcon(GroundedFalse).png HitboxTableIcon(AerialTrue).png L Magic SpecialsDirect.png All All HitboxTableIcon(Blockable).png HitboxTableIcon(Unreflectable).png HitboxTableIcon(Unabsorbable).png HitboxTableIcon(False).png HitboxTableIcon(False).png HitboxTableIcon(False).png
1 0 0 5.1% 3.0 AngleIcon55.png Forward 35 155 0 HitboxTableIcon(False).png 11.5 stick 0.0 0.0 0.0 1.5× 1.0× 0% HitboxTableIcon(Clang).png HitboxTableIcon(NoRebound).png Normal (effect) Magic (type) HitboxTableIcon(GroundedTrue).png HitboxTableIcon(AerialFalse).png L Magic SpecialsDirect.png All All HitboxTableIcon(Blockable).png HitboxTableIcon(Unreflectable).png HitboxTableIcon(Unabsorbable).png HitboxTableIcon(False).png HitboxTableIcon(False).png HitboxTableIcon(False).png

Timing[edit]

Attack[edit]

Initial autocancel 1-3
Multihits 5-6, 7-23, 24-27 (rehit rate: 4)
Final hit 29-30
Ending autocancel 40-
Interruptible 52
Animation length 64
FrameIcon(Lag).png FrameIcon(Lag).png FrameIcon(Lag).png FrameIcon(Lag).png FrameIcon(Hitbox).png FrameIcon(HitboxChangeS).png FrameIcon(HitboxChangeE).png FrameIcon(Hitbox).png FrameIcon(Hitbox).png FrameIcon(Hitbox).png FrameIcon(Hitbox).png FrameIcon(Hitbox).png FrameIcon(Hitbox).png FrameIcon(Hitbox).png FrameIcon(Hitbox).png FrameIcon(Hitbox).png FrameIcon(Hitbox).png FrameIcon(Hitbox).png FrameIcon(Hitbox).png FrameIcon(Hitbox).png FrameIcon(Hitbox).png FrameIcon(Hitbox).png FrameIcon(HitboxChangeS).png FrameIcon(HitboxChangeE).png FrameIcon(Hitbox).png FrameIcon(Hitbox).png FrameIcon(Hitbox).png FrameIcon(Lag).png FrameIcon(Hitbox).png FrameIcon(Hitbox).png FrameIcon(Lag).png FrameIcon(Lag).png FrameIcon(Lag).png FrameIcon(Lag).png FrameIcon(Lag).png FrameIcon(Lag).png FrameIcon(Lag).png FrameIcon(Lag).png FrameIcon(Lag).png FrameIcon(Lag).png FrameIcon(Lag).png FrameIcon(Lag).png FrameIcon(Lag).png FrameIcon(Lag).png FrameIcon(Lag).png FrameIcon(Lag).png FrameIcon(Lag).png FrameIcon(Lag).png FrameIcon(Lag).png FrameIcon(Lag).png FrameIcon(Lag).png FrameIcon(Interruptible).png FrameIcon(Interruptible).png FrameIcon(Interruptible).png FrameIcon(Interruptible).png FrameIcon(Interruptible).png FrameIcon(Interruptible).png FrameIcon(Interruptible).png FrameIcon(Interruptible).png FrameIcon(Interruptible).png FrameIcon(Interruptible).png FrameIcon(Interruptible).png FrameIcon(Interruptible).png FrameIcon(Interruptible).png
FrameIcon(Autocancel).png FrameIcon(Autocancel).png FrameIcon(Autocancel).png FrameIcon(Blank).png FrameIcon(Blank).png FrameIcon(Blank).png FrameIcon(Blank).png FrameIcon(Blank).png FrameIcon(Blank).png FrameIcon(Blank).png FrameIcon(Blank).png FrameIcon(Blank).png FrameIcon(Blank).png FrameIcon(Blank).png FrameIcon(Blank).png FrameIcon(Blank).png FrameIcon(Blank).png FrameIcon(Blank).png FrameIcon(Blank).png FrameIcon(Blank).png FrameIcon(Blank).png FrameIcon(Blank).png FrameIcon(Blank).png FrameIcon(Blank).png FrameIcon(Blank).png FrameIcon(Blank).png FrameIcon(Blank).png FrameIcon(Blank).png FrameIcon(Blank).png FrameIcon(Blank).png FrameIcon(Blank).png FrameIcon(Blank).png FrameIcon(Blank).png FrameIcon(Blank).png FrameIcon(Blank).png FrameIcon(Blank).png FrameIcon(Blank).png FrameIcon(Blank).png FrameIcon(Blank).png FrameIcon(Autocancel).png FrameIcon(Autocancel).png FrameIcon(Autocancel).png FrameIcon(Autocancel).png FrameIcon(Autocancel).png FrameIcon(Autocancel).png FrameIcon(Autocancel).png FrameIcon(Autocancel).png FrameIcon(Autocancel).png FrameIcon(Autocancel).png FrameIcon(Autocancel).png FrameIcon(Autocancel).png FrameIcon(Autocancel).png FrameIcon(Autocancel).png FrameIcon(Autocancel).png FrameIcon(Autocancel).png FrameIcon(Autocancel).png FrameIcon(Autocancel).png FrameIcon(Autocancel).png FrameIcon(Autocancel).png FrameIcon(Autocancel).png FrameIcon(Autocancel).png FrameIcon(Autocancel).png FrameIcon(Autocancel).png FrameIcon(Autocancel).png

Landing lag[edit]

Interruptible 13
Animation length 19
FrameIcon(Lag).png FrameIcon(Lag).png FrameIcon(Lag).png FrameIcon(Lag).png FrameIcon(Lag).png FrameIcon(Lag).png FrameIcon(Lag).png FrameIcon(Lag).png FrameIcon(Lag).png FrameIcon(Lag).png FrameIcon(Lag).png FrameIcon(Lag).png FrameIcon(Interruptible).png FrameIcon(Interruptible).png FrameIcon(Interruptible).png FrameIcon(Interruptible).png FrameIcon(Interruptible).png FrameIcon(Interruptible).png FrameIcon(Interruptible).png
Legend (1 square = 1 frame)
Lag
Lag time
Hitbox
Hitbox
FrameIcon(HitboxChangeS).pngFrameIcon(HitboxChangeE).png
Hitbox change
Auto-canceling
Autocancel
Interruptibility
Interruptible