Super Smash Bros. Melee

Fox (SSBM)/Neutral special: Difference between revisions

From SmashWiki, the Super Smash Bros. wiki
Jump to navigationJump to search
(→‎Overview: Changed minor wordage and fixed confusing tenses, as well as changing links to more appropriate articles. Also added a 2nd paragraph talking about its use racking up damage on stunned opponents, as well as for shield pressure.)
No edit summary
 
Line 5: Line 5:
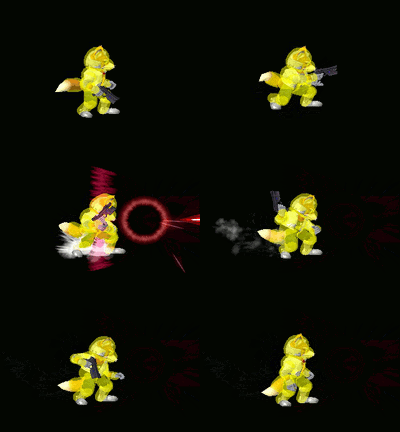
[[File:Fox Neutral Special Hitbox Melee.gif|thumb|The hitbox of Fox's Blaster, used on the ground.]]
[[File:Fox Neutral Special Hitbox Melee.gif|thumb|The hitbox of Fox's Blaster, used on the ground.]]
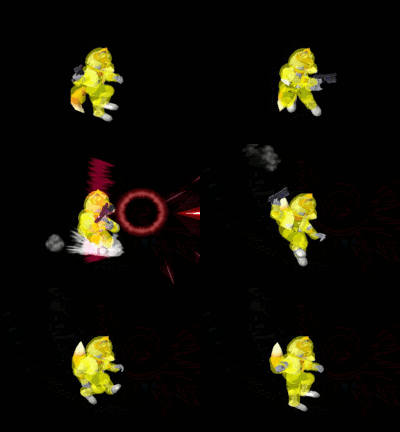
[[File:Fox Neutral Special Hitbox Aerial Melee.gif|thumb|The hitbox of Fox's Blaster, used in the air.]]
[[File:Fox Neutral Special Hitbox Aerial Melee.gif|thumb|The hitbox of Fox's Blaster, used in the air.]]
Fox's '''[[Blaster (Fox)|blaster]]''' fires red lasers at his opponents. The effects of the shots have changed from its [[Fox (SSB)/Neutral special|Smash 64 incarnation]], having a faster fire rate and an increased projectile speed, but no [[hitstun]] or ability to [[flinch]] opponents, making it unable to stop [[approach]]es or combo into other moves such as jab or up-smash. However, players can still make use of its long range to [[projectile camp]], potentially racking up damage from a distance. Fox can also perform the [[short hop laser]] technique so he can draw his blaster quicker and reduce the [[ending lag]]; he can also move around slightly while doing so. Fox can perform other similar techniques, including [[short hop double laser]], [[ledgehopped double laser]], and [[wavelanded laser]], albeit requiring consistently fast reflexes to do due to Fox's very quick [[short hop]].
Fox's '''[[Blaster (Fox)|blaster]]''' fires red lasers at his opponents. The effects of the shots have changed from its [[Fox (SSB)/Neutral special|Smash 64 incarnation]], having a faster fire rate and an increased projectile speed, but no [[hitstun]] or ability to [[flinch]] opponents, making it unable to stop [[approach]]es or combo into other moves such as jab or up-smash. However, players can still make use of its long range to [[projectile camp]], potentially racking up damage from a distance. Fox can also perform the [[short hop laser]] technique so he can draw his blaster quicker and reduce the [[ending lag]]; he can also move around slightly while doing so. Fox can perform other similar techniques, including [[short hop double laser]], [[ledgehopped double laser]], and [[wavelanded laser]], albeit requiring consistently landing tight inputs due to Fox's very quick [[short hop]].


In some instances, the lack of hitstun and flinch can actually be of benefit to Fox. In instances where inflicting those states would make the opponent actionable, such as a [[Shield#Shield_breaking|shield break]] or missed [[rest]], fox can rack up percent using the blaster before hitting them with a combo starter or finishing them off with a kill move. The move can also assist in getting that shield break, considering that, when unstaled, it deals 7 frames of shield stun, meaning that, if the move is done frame perfectly, Fox can be (+3) on shield.
The lack of flinching means that should the opponent be incapacitated somehow, such as a [[shield break]] or [[Rest]], Fox can rack up several Blaster shots worth of damage before preparing his [[punish]] of choice. The move can also assist in getting that shield break, considering that it deals 7 frames of shield stun unstaled, which is +3 frame advantage if the move is done frame perfectly.


==Hitboxes==
==Hitboxes==

Latest revision as of 09:52, June 30, 2024

This article is about the hitbox visualization in Super Smash Bros. Melee. For the move itself, see Blaster (Fox).

Overview[edit]

The hitbox of Fox's Blaster, used on the ground.
The hitbox of Fox's Blaster, used in the air.

Fox's blaster fires red lasers at his opponents. The effects of the shots have changed from its Smash 64 incarnation, having a faster fire rate and an increased projectile speed, but no hitstun or ability to flinch opponents, making it unable to stop approaches or combo into other moves such as jab or up-smash. However, players can still make use of its long range to projectile camp, potentially racking up damage from a distance. Fox can also perform the short hop laser technique so he can draw his blaster quicker and reduce the ending lag; he can also move around slightly while doing so. Fox can perform other similar techniques, including short hop double laser, ledgehopped double laser, and wavelanded laser, albeit requiring consistently landing tight inputs due to Fox's very quick short hop.

The lack of flinching means that should the opponent be incapacitated somehow, such as a shield break or Rest, Fox can rack up several Blaster shots worth of damage before preparing his punish of choice. The move can also assist in getting that shield break, considering that it deals 7 frames of shield stun unstaled, which is +3 frame advantage if the move is done frame perfectly.

Hitboxes[edit]

ID Part Damage SD Angle BK KS FKV Radius Bone Offset Clang Rebound Effect G A Sound Blockable Reflectable Absorbable
0 0 3% 0 Sakurai angle 0 0 0 1.1718 0 0.0 0.0 -0.7812 HitboxTableIcon(NoClang).png HitboxTableIcon(NoRebound).png Normal (effect) HitboxTableIcon(GroundedTrue).png HitboxTableIcon(AerialTrue).png M Punch HitboxTableIcon(Blockable).png HitboxTableIcon(Reflectable).png HitboxTableIcon(Absorbable).png
1 0 3% 0 Sakurai angle 0 0 0 1.1718 0 0.0 0.0 -3.644298 HitboxTableIcon(NoClang).png HitboxTableIcon(NoRebound).png Normal (effect) HitboxTableIcon(GroundedTrue).png HitboxTableIcon(AerialTrue).png M Punch HitboxTableIcon(Blockable).png HitboxTableIcon(Reflectable).png HitboxTableIcon(Absorbable).png
2 0 3% 0 Sakurai angle 0 0 0 1.1718 0 0.0 0.0 -6.507396 HitboxTableIcon(NoClang).png HitboxTableIcon(NoRebound).png Normal (effect) HitboxTableIcon(GroundedTrue).png HitboxTableIcon(AerialTrue).png M Punch HitboxTableIcon(Blockable).png HitboxTableIcon(Reflectable).png HitboxTableIcon(Absorbable).png
3 0 3% 0 Sakurai angle 0 0 0 1.5624 0 0.0 0.0 -14.0616 HitboxTableIcon(NoClang).png HitboxTableIcon(NoRebound).png Normal (effect) HitboxTableIcon(GroundedTrue).png HitboxTableIcon(AerialTrue).png M Punch HitboxTableIcon(Blockable).png HitboxTableIcon(Reflectable).png HitboxTableIcon(Absorbable).png

Timing[edit]

Ground[edit]

First loop frame 7
Repeat window 4-16
Shot 12-45
Last loop frame 16
Animation length 40
FrameIcon(Blank).png FrameIcon(Blank).png FrameIcon(Blank).png FrameIcon(Blank).png FrameIcon(Blank).png FrameIcon(Blank).png FrameIcon(Blank).png FrameIcon(Blank).png FrameIcon(Blank).png FrameIcon(Blank).png FrameIcon(Blank).png FrameIcon(Hitbox).png FrameIcon(Hitbox).png FrameIcon(Hitbox).png FrameIcon(Hitbox).png FrameIcon(Hitbox).png FrameIcon(Hitbox).png FrameIcon(Hitbox).png FrameIcon(Hitbox).png FrameIcon(Hitbox).png FrameIcon(Hitbox).png FrameIcon(Hitbox).png FrameIcon(Hitbox).png FrameIcon(Hitbox).png FrameIcon(Hitbox).png FrameIcon(Hitbox).png FrameIcon(Hitbox).png FrameIcon(Hitbox).png FrameIcon(Hitbox).png FrameIcon(Hitbox).png FrameIcon(Hitbox).png FrameIcon(Hitbox).png FrameIcon(Hitbox).png FrameIcon(Hitbox).png FrameIcon(Hitbox).png FrameIcon(Hitbox).png FrameIcon(Hitbox).png FrameIcon(Hitbox).png FrameIcon(Hitbox).png FrameIcon(Hitbox).png FrameIcon(Hitbox).png FrameIcon(Hitbox).png FrameIcon(Hitbox).png FrameIcon(Hitbox).png FrameIcon(Hitbox).png
FrameIcon(Lag).png FrameIcon(Lag).png FrameIcon(Lag).png FrameIcon(Lag).png FrameIcon(Lag).png FrameIcon(LagLoopS).png FrameIcon(LagLoopE).png FrameIcon(Lag).png FrameIcon(Lag).png FrameIcon(Lag).png FrameIcon(LagPropS).png FrameIcon(LagPropE).png FrameIcon(Lag).png FrameIcon(Lag).png FrameIcon(Lag).png FrameIcon(LagLoopS).png FrameIcon(LagLoopE).png FrameIcon(Lag).png FrameIcon(Lag).png FrameIcon(Lag).png FrameIcon(Lag).png FrameIcon(Lag).png FrameIcon(Lag).png FrameIcon(Lag).png FrameIcon(Lag).png FrameIcon(Lag).png FrameIcon(Lag).png FrameIcon(Lag).png FrameIcon(Lag).png FrameIcon(Lag).png FrameIcon(Lag).png FrameIcon(Lag).png FrameIcon(Lag).png FrameIcon(Lag).png FrameIcon(Lag).png FrameIcon(Lag).png FrameIcon(Lag).png FrameIcon(Lag).png FrameIcon(Lag).png FrameIcon(Lag).png FrameIcon(Blank).png FrameIcon(Blank).png FrameIcon(Blank).png FrameIcon(Blank).png FrameIcon(Blank).png
FrameIcon(Blank).png FrameIcon(Blank).png FrameIcon(Blank).png FrameIcon(Continuable).png FrameIcon(Continuable).png FrameIcon(ContinuableLoopS).png FrameIcon(ContinuableLoopE).png FrameIcon(Continuable).png FrameIcon(Continuable).png FrameIcon(Continuable).png FrameIcon(Continuable).png FrameIcon(Continuable).png FrameIcon(Continuable).png FrameIcon(Continuable).png FrameIcon(Continuable).png FrameIcon(Continuable).png FrameIcon(Continuable).png FrameIcon(Continuable).png FrameIcon(Continuable).png FrameIcon(Continuable).png FrameIcon(ContinuableLoopS).png FrameIcon(BlankLoopE).png FrameIcon(Blank).png FrameIcon(Blank).png FrameIcon(Blank).png FrameIcon(Blank).png FrameIcon(Blank).png FrameIcon(Blank).png FrameIcon(Blank).png FrameIcon(Blank).png FrameIcon(Blank).png FrameIcon(Blank).png FrameIcon(Blank).png FrameIcon(Blank).png FrameIcon(Blank).png FrameIcon(Blank).png FrameIcon(Blank).png FrameIcon(Blank).png FrameIcon(Blank).png FrameIcon(Blank).png FrameIcon(Blank).png FrameIcon(Blank).png FrameIcon(Blank).png FrameIcon(Blank).png FrameIcon(Blank).png

Air[edit]

First loop frame 4
Repeat window 4-14
Shot 10-43
Last loop frame 14
Animation length 36
FrameIcon(Blank).png FrameIcon(Blank).png FrameIcon(Blank).png FrameIcon(Blank).png FrameIcon(Blank).png FrameIcon(Blank).png FrameIcon(Blank).png FrameIcon(Blank).png FrameIcon(Blank).png FrameIcon(Hitbox).png FrameIcon(Hitbox).png FrameIcon(Hitbox).png FrameIcon(Hitbox).png FrameIcon(Hitbox).png FrameIcon(Hitbox).png FrameIcon(Hitbox).png FrameIcon(Hitbox).png FrameIcon(Hitbox).png FrameIcon(Hitbox).png FrameIcon(Hitbox).png FrameIcon(Hitbox).png FrameIcon(Hitbox).png FrameIcon(Hitbox).png FrameIcon(Hitbox).png FrameIcon(Hitbox).png FrameIcon(Hitbox).png FrameIcon(Hitbox).png FrameIcon(Hitbox).png FrameIcon(Hitbox).png FrameIcon(Hitbox).png FrameIcon(Hitbox).png FrameIcon(Hitbox).png FrameIcon(Hitbox).png FrameIcon(Hitbox).png FrameIcon(Hitbox).png FrameIcon(Hitbox).png FrameIcon(Hitbox).png FrameIcon(Hitbox).png FrameIcon(Hitbox).png FrameIcon(Hitbox).png FrameIcon(Hitbox).png FrameIcon(Hitbox).png FrameIcon(Hitbox).png
FrameIcon(Lag).png FrameIcon(Lag).png FrameIcon(Lag).png FrameIcon(LagLoopS).png FrameIcon(LagLoopE).png FrameIcon(Lag).png FrameIcon(Lag).png FrameIcon(Lag).png FrameIcon(LagPropS).png FrameIcon(LagPropE).png FrameIcon(Lag).png FrameIcon(Lag).png FrameIcon(Lag).png FrameIcon(LagLoopS).png FrameIcon(LagLoopE).png FrameIcon(Lag).png FrameIcon(Lag).png FrameIcon(Lag).png FrameIcon(Lag).png FrameIcon(Lag).png FrameIcon(Lag).png FrameIcon(Lag).png FrameIcon(Lag).png FrameIcon(Lag).png FrameIcon(Lag).png FrameIcon(Lag).png FrameIcon(Lag).png FrameIcon(Lag).png FrameIcon(Lag).png FrameIcon(Lag).png FrameIcon(Lag).png FrameIcon(Lag).png FrameIcon(Lag).png FrameIcon(Lag).png FrameIcon(Lag).png FrameIcon(Lag).png FrameIcon(Blank).png FrameIcon(Blank).png FrameIcon(Blank).png FrameIcon(Blank).png FrameIcon(Blank).png FrameIcon(Blank).png FrameIcon(Blank).png
FrameIcon(Blank).png FrameIcon(Blank).png FrameIcon(Blank).png FrameIcon(ContinuableLoopS).png FrameIcon(ContinuableLoopE).png FrameIcon(Continuable).png FrameIcon(Continuable).png FrameIcon(Continuable).png FrameIcon(Continuable).png FrameIcon(Continuable).png FrameIcon(Continuable).png FrameIcon(Continuable).png FrameIcon(Continuable).png FrameIcon(ContinuableLoopS).png FrameIcon(BlankLoopE).png FrameIcon(Blank).png FrameIcon(Blank).png FrameIcon(Blank).png FrameIcon(Blank).png FrameIcon(Blank).png FrameIcon(Blank).png FrameIcon(Blank).png FrameIcon(Blank).png FrameIcon(Blank).png FrameIcon(Blank).png FrameIcon(Blank).png FrameIcon(Blank).png FrameIcon(Blank).png FrameIcon(Blank).png FrameIcon(Blank).png FrameIcon(Blank).png FrameIcon(Blank).png FrameIcon(Blank).png FrameIcon(Blank).png FrameIcon(Blank).png FrameIcon(Blank).png FrameIcon(Blank).png FrameIcon(Blank).png FrameIcon(Blank).png FrameIcon(Blank).png FrameIcon(Blank).png FrameIcon(Blank).png FrameIcon(Blank).png
Legend (1 square = 1 frame)
Lag
Lag time
Hitbox
Hitbox
FrameIcon(BlankLoopS).pngFrameIcon(BlankLoopE).png
Loop point
FrameIcon(Continuable).png
Continuable
FrameIcon(BlankPropS).pngFrameIcon(BlankPropE).png
Prop event

Similar moves[edit]