Super Smash Bros. Melee

Luigi (SSBM)/Dash attack: Difference between revisions

From SmashWiki, the Super Smash Bros. wiki
Jump to navigationJump to search
m (Toning down wording)
Line 1: Line 1:
{{ArticleIcons|ssbm=y}}
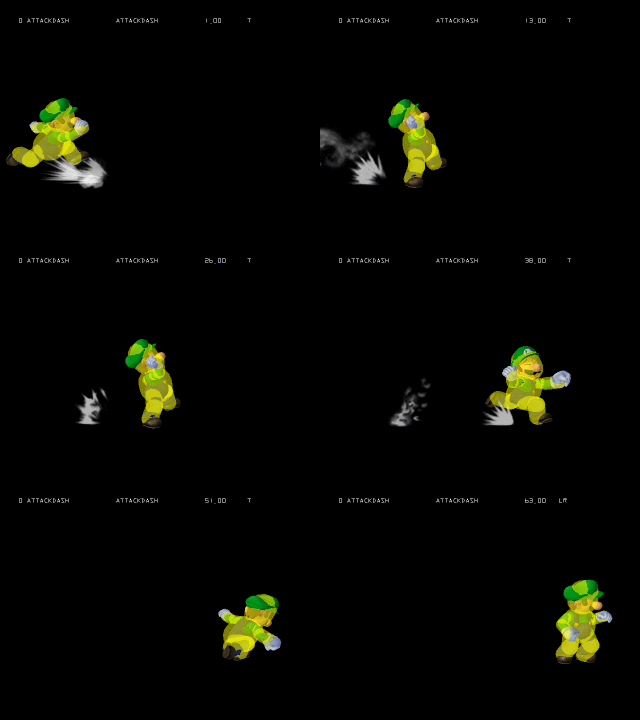
[[File:LuigiDashAttackSSBM.gif|thumb|400px|Hitbox visualization showing Luigi's dash attack.]]
[[File:LuigiDashAttackSSBM.gif|thumb|400px|Hitbox visualization showing Luigi's dash attack.]]
{{competitive expertise}}
==Overview==
==Overview==
Luigi dashes forward whilst throwing childish, pathetic punches. While the move is fast and is disjointed, the positives end there. The moves damage output is merely fine assuming all the hits connect, and the extremely high end lag and low hitstun makes the move extremely unsafe on hit, allowing Luigi to be easily punished or grabbed. This leaves the move with practically non-existent usage in serious settings.
Luigi dashes forward while throwing several weak punches. While the move is fast and slightly disjointed, its damage output is only decent if all the hits connect. The extremely high end lag and low hitstun makes the move extremely unsafe on hit, allowing Luigi to be easily punished or grabbed. This leaves the move with practically no usage in serious settings.


==Hitboxes==
==Hitboxes==

Revision as of 18:11, August 25, 2022

Hitbox visualization showing Luigi's dash attack.

Overview

Luigi dashes forward while throwing several weak punches. While the move is fast and slightly disjointed, its damage output is only decent if all the hits connect. The extremely high end lag and low hitstun makes the move extremely unsafe on hit, allowing Luigi to be easily punished or grabbed. This leaves the move with practically no usage in serious settings.

Hitboxes

ID Part Damage SD Angle BK KS FKV Radius Bone Offset Clang Rebound Effect G A Sound
Hits 1-6
0 0 2% 0 Sakurai angle 2 100 0 3.906 0 0.0 7.812 7.812 HitboxTableIcon(Clang).png HitboxTableIcon(Rebound).png Normal (effect) HitboxTableIcon(GroundedTrue).png HitboxTableIcon(AerialTrue).png M Shell
1 0 2% 0 Sakurai angle 2 100 0 3.1248 5 0.0 0.0 0.0 HitboxTableIcon(Clang).png HitboxTableIcon(Rebound).png Normal (effect) HitboxTableIcon(GroundedTrue).png HitboxTableIcon(AerialTrue).png M Shell

Timing

Hitboxes 4, 10, 16, 22, 29, 37
Interruptible 59
Animation length 63
FrameIcon(Lag).png FrameIcon(Lag).png FrameIcon(Lag).png FrameIcon(Hitbox).png FrameIcon(Lag).png FrameIcon(Lag).png FrameIcon(Lag).png FrameIcon(Lag).png FrameIcon(Lag).png FrameIcon(Hitbox).png FrameIcon(Lag).png FrameIcon(Lag).png FrameIcon(Lag).png FrameIcon(Lag).png FrameIcon(Lag).png FrameIcon(Hitbox).png FrameIcon(Lag).png FrameIcon(Lag).png FrameIcon(Lag).png FrameIcon(Lag).png FrameIcon(Lag).png FrameIcon(Hitbox).png FrameIcon(Lag).png FrameIcon(Lag).png FrameIcon(Lag).png FrameIcon(Lag).png FrameIcon(Lag).png FrameIcon(Lag).png FrameIcon(Hitbox).png FrameIcon(Lag).png FrameIcon(Lag).png FrameIcon(Lag).png FrameIcon(Lag).png FrameIcon(Lag).png FrameIcon(Lag).png FrameIcon(Lag).png FrameIcon(Hitbox).png FrameIcon(Lag).png FrameIcon(Lag).png FrameIcon(Lag).png FrameIcon(Lag).png FrameIcon(Lag).png FrameIcon(Lag).png FrameIcon(Lag).png FrameIcon(Lag).png FrameIcon(Lag).png FrameIcon(Lag).png FrameIcon(Lag).png FrameIcon(Lag).png FrameIcon(Lag).png FrameIcon(Lag).png FrameIcon(Lag).png FrameIcon(Lag).png FrameIcon(Lag).png FrameIcon(Lag).png FrameIcon(Lag).png FrameIcon(Lag).png FrameIcon(Lag).png FrameIcon(Lag).png FrameIcon(Interruptible).png FrameIcon(Interruptible).png FrameIcon(Interruptible).png FrameIcon(Interruptible).png
Legend (1 square = 1 frame)
Lag
Lag time
Hitbox
Hitbox
Interruptibility
Interruptible