Super Smash Bros. 4

Bayonetta (SSB4)/Neutral attack/Hit 1: Difference between revisions

From SmashWiki, the Super Smash Bros. wiki
Jump to navigationJump to search
(Description added.)
Tag: Mobile edit
 
Line 3: Line 3:


==Overview==
==Overview==
Performs a forward strike. Since it's active on frame 9, it is the third slowest [[neutral attack]] in the game, behind {{SSB4|King Dedede}} and {{SSB4|Zelda}}'s. The next inputs would be [[Bayonetta (SSB4)/Neutral attack/Hit 2|another hit]], then [[Bayonetta (SSB4)/Neutral attack/Hit 3|another]], before an [[Bayonetta (SSB4)/Neutral attack/Infinite|infinite attack]].
Performs a forward strike which combos into the following neutral attacks. Since it's active on frame 9, it is the third slowest [[neutral attack]] in the game, behind {{SSB4|King Dedede}} and {{SSB4|Zelda}}'s. The next inputs would be [[Bayonetta (SSB4)/Neutral attack/Hit 2|another hit]], then [[Bayonetta (SSB4)/Neutral attack/Hit 3|another]], before an [[Bayonetta (SSB4)/Neutral attack/Infinite|infinite attack]].
 
==Hitboxes==
==Hitboxes==
{{SSB4HitboxTableHeader}}

Latest revision as of 11:17, February 15, 2022

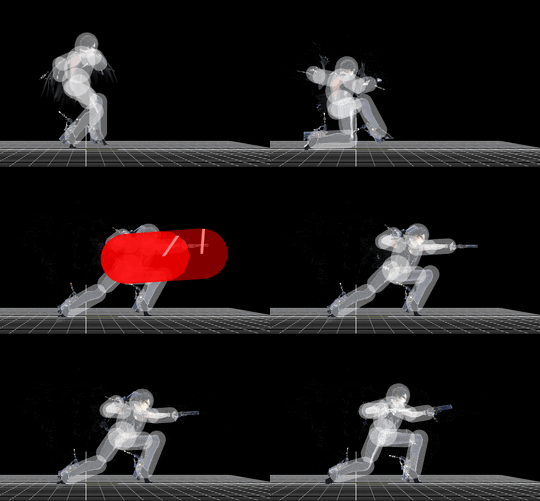
Hitbox visualization showing Bayonetta's first jab.

Overview[edit]

Performs a forward strike which combos into the following neutral attacks. Since it's active on frame 9, it is the third slowest neutral attack in the game, behind King Dedede and Zelda's. The next inputs would be another hit, then another, before an infinite attack.

Hitboxes[edit]

ID Part Damage SD Angle BK KS FKV Radius Bone Offset SDIx T% Clang Rebound Type Effect G A Sound Direct
0 0 1.5% 0 AngleIcon55.png 45 25 0 4.0 0 0.0 to -6.0 0.0 1.5 0.2x 1.0x 0% HitboxTableIcon(Clang).png HitboxTableIcon(Rebound).png Hand (type) Normal (effect) HitboxTableIcon(GroundedTrue).png HitboxTableIcon(AerialFalse).png S Punch SpecialsDirect.png
1 0 1.5% 0 AngleIcon55.png 30 25 0 4.0 0 0.0 to -6.0 0.0 1.5 0.2x 1.0x 0% HitboxTableIcon(Clang).png HitboxTableIcon(Rebound).png Hand (type) Normal (effect) HitboxTableIcon(GroundedFalse).png HitboxTableIcon(AerialTrue).png S Punch SpecialsDirect.png
2 0 1.5% 0 AngleIcon85.png 42 25 0 4.0 0 6.0 to -6.0 0.0 1.5 0.2x 1.0x 0% HitboxTableIcon(Clang).png HitboxTableIcon(Rebound).png Hand (type) Normal (effect) HitboxTableIcon(GroundedTrue).png HitboxTableIcon(AerialTrue).png S Punch SpecialsDirect.png
All hitboxes use weight-independent knockback.

Timing[edit]

Hitboxes 9-12
Earliest continuable 15
Interruptible 26
Animation length 53
FrameIcon(Lag).png FrameIcon(Lag).png FrameIcon(Lag).png FrameIcon(Lag).png FrameIcon(Lag).png FrameIcon(Lag).png FrameIcon(Lag).png FrameIcon(Lag).png FrameIcon(Hitbox).png FrameIcon(Hitbox).png FrameIcon(Hitbox).png FrameIcon(Hitbox).png FrameIcon(Lag).png FrameIcon(LagContinuableS).png FrameIcon(LagContinuableE).png FrameIcon(Lag).png FrameIcon(Lag).png FrameIcon(Lag).png FrameIcon(Lag).png FrameIcon(Lag).png FrameIcon(Lag).png FrameIcon(Lag).png FrameIcon(Lag).png FrameIcon(Lag).png FrameIcon(Lag).png FrameIcon(Interruptible).png FrameIcon(Interruptible).png FrameIcon(Interruptible).png FrameIcon(Interruptible).png FrameIcon(Interruptible).png FrameIcon(Interruptible).png FrameIcon(Interruptible).png FrameIcon(Interruptible).png FrameIcon(Interruptible).png FrameIcon(Interruptible).png FrameIcon(Interruptible).png FrameIcon(Interruptible).png FrameIcon(Interruptible).png FrameIcon(Interruptible).png FrameIcon(Interruptible).png FrameIcon(Interruptible).png FrameIcon(Interruptible).png FrameIcon(Interruptible).png FrameIcon(Interruptible).png FrameIcon(Interruptible).png FrameIcon(Interruptible).png FrameIcon(Interruptible).png FrameIcon(Interruptible).png FrameIcon(Interruptible).png FrameIcon(Interruptible).png FrameIcon(Interruptible).png FrameIcon(Interruptible).png FrameIcon(Interruptible).png
Legend (1 square = 1 frame)
Lag
Lag time
Hitbox
Hitbox
FrameIcon(BlankContinuableS).pngFrameIcon(BlankContinuableE).png
Earliest continuable point
Interruptibility
Interruptible