Hero (SSBU)/Neutral attack/Hit 1: Difference between revisions
(Added an overview.) |
m (→Overview: noted jab transition.) |
||
| Line 3: | Line 3: | ||
==Overview== | ==Overview== | ||
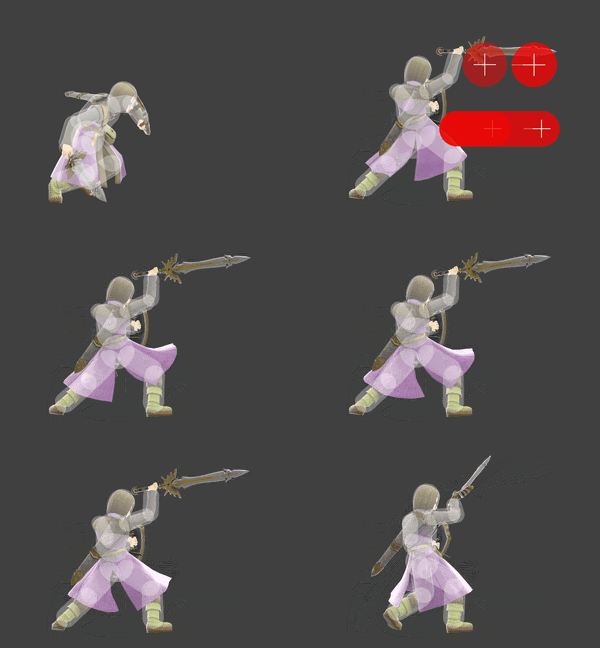
An upward slash. Being frame 6, this is among the slowest [[neutral attack]]s in the game, but also {{SSBU|Hero}}'s fastest normal attack. It recovers 2.4 MP for Hero on hit, and 2.856 MP on shield. Given it will connect into the rest of the neutral attack combo, this move is important for gaining MP for Hero throughout the game. | An upward slash. Being frame 6, this is among the slowest [[neutral attack]]s in the game, but also {{SSBU|Hero}}'s fastest normal attack. It recovers 2.4 MP for Hero on hit, and 2.856 MP on shield. Given it will connect into the rest of the neutral attack combo, this move is important for gaining MP for Hero throughout the game. It transitions to [[Hero (SSBU)/Neutral attack/Hit 2|Hit 2]] on frame 9. | ||
This is tied with Hit 2 for Hero's safest neutral attack on [[shield]], at -15. If spaced, it can be safe against characters with poor [[out of shield]] options. However, due to the poor shield data on Hero's end, simple options such as [[Climhazzard]] will usually cause issues with attempting to mix up opponents. On hit, however, it has exceptional qualities, being -2 at 0%. As a result, it has strong mixup potential. It becomes neutral on hit at 50%, before becoming + at 75% onwards. | This is tied with Hit 2 for Hero's safest neutral attack on [[shield]], at -15. If spaced, it can be safe against characters with poor [[out of shield]] options. However, due to the poor shield data on Hero's end, simple options such as [[Climhazzard]] will usually cause issues with attempting to mix up opponents. On hit, however, it has exceptional qualities, being -2 at 0%. As a result, it has strong mixup potential. It becomes neutral on hit at 50%, before becoming + at 75% onwards. | ||
With [[Oomph]], Hit 1 becomes more + on hit, allowing for potential loops into itself at around 115%. While frame perfect and limited by Oomph's time, it will become easier as the opponent's [[percentage]] increases. At 100%, Oomph will allow for Hero to get a [[Hero (SSBU)/Grab|grab]], and leads to a [[KO]] confirm with [[Hero (SSBU)/Up throw|up throw]] at 150%. [[Psyche Up]] has similar qualities, usually being more + on hit in most instances compared to Oomph, leading to quicker grabs. Using this move to confirm a grab, a few pummels and a throw can usually lead to an upwards of 20 MP gained back, and a strong advantage state. | With [[Oomph]], Hit 1 becomes more + on hit, allowing for potential loops into itself at around 115%. While frame perfect and limited by Oomph's time, it will become easier as the opponent's [[percentage]] increases. At 100%, Oomph will allow for Hero to get a [[Hero (SSBU)/Grab|grab]], and leads to a [[KO]] confirm with [[Hero (SSBU)/Up throw|up throw]] at 150%. [[Psyche Up]] has similar qualities, usually being more + on hit in most instances compared to Oomph, leading to quicker grabs. Using this move to confirm a grab, a few pummels and a throw can usually lead to an upwards of 20 MP gained back, and a strong advantage state. | ||
==Hitboxes== | ==Hitboxes== | ||
Revision as of 19:14, May 8, 2020
Overview
An upward slash. Being frame 6, this is among the slowest neutral attacks in the game, but also Hero's fastest normal attack. It recovers 2.4 MP for Hero on hit, and 2.856 MP on shield. Given it will connect into the rest of the neutral attack combo, this move is important for gaining MP for Hero throughout the game. It transitions to Hit 2 on frame 9.
This is tied with Hit 2 for Hero's safest neutral attack on shield, at -15. If spaced, it can be safe against characters with poor out of shield options. However, due to the poor shield data on Hero's end, simple options such as Climhazzard will usually cause issues with attempting to mix up opponents. On hit, however, it has exceptional qualities, being -2 at 0%. As a result, it has strong mixup potential. It becomes neutral on hit at 50%, before becoming + at 75% onwards.
With Oomph, Hit 1 becomes more + on hit, allowing for potential loops into itself at around 115%. While frame perfect and limited by Oomph's time, it will become easier as the opponent's percentage increases. At 100%, Oomph will allow for Hero to get a grab, and leads to a KO confirm with up throw at 150%. Psyche Up has similar qualities, usually being more + on hit in most instances compared to Oomph, leading to quicker grabs. Using this move to confirm a grab, a few pummels and a throw can usually lead to an upwards of 20 MP gained back, and a strong advantage state.
Hitboxes
Timing
| Hitboxes | 6-7 |
|---|---|
| Earliest continuable | 9 |
| Interruptible | 26 |
| Animation length | 47 |
Lag time |
Hitbox |
Earliest continuable point |
Interruptible |
|
