Mario (SSB4)/Back throw: Difference between revisions
From SmashWiki, the Super Smash Bros. wiki
Jump to navigationJump to search
Serpent King (talk | contribs) No edit summary |
Serpent King (talk | contribs) |
||
| Line 6: | Line 6: | ||
==Hitboxes== | ==Hitboxes== | ||
{| | ===Throw=== | ||
{{SSB4ThrowTableHeader}} | |||
| | {{SSB4ThrowTableRow | ||
| | |id=0 | ||
|damage=11% | |||
|angle=45 | |||
|bk=70 | |||
|ks=66 | |||
|fkv=0 | |||
|bn=0 | |||
|type=Throwing | |||
|sfx=None | |||
|slvl=S | |||
}} | |||
{{SSB4ThrowTableRow | |||
|id=1 | |||
|damage=3% | |||
|angle=361 | |||
|bk=40 | |||
|ks=100 | |||
|fkv=0 | |||
|bn=0 | |||
|type=Throwing | |||
|sfx=None | |||
|slvl=S | |||
}} | |||
|} | |||
===Collateral=== | |||
{{SSB4HitboxTableHeader|stretch=y}} | |||
{{SSB4HitboxTableRow | |||
|id=0 | |||
|part=0 | |||
|damage=8% | |||
|angle=50 | |||
|bk=100 | |||
|ks=70 | |||
|fkv=0 | |||
|r=4.0 | |||
|bn=3 | |||
|xpos=2.5 | |||
|ypos=15.0 | |||
|clang=f | |||
|rebound=f | |||
|type=Throwing | |||
|sfx=Kick | |||
|slvl=M | |||
|xstretch=2.5 | |||
|ystretch=8.0 | |||
}} | |||
|} | |} | ||
Revision as of 13:02, February 4, 2018
Overview
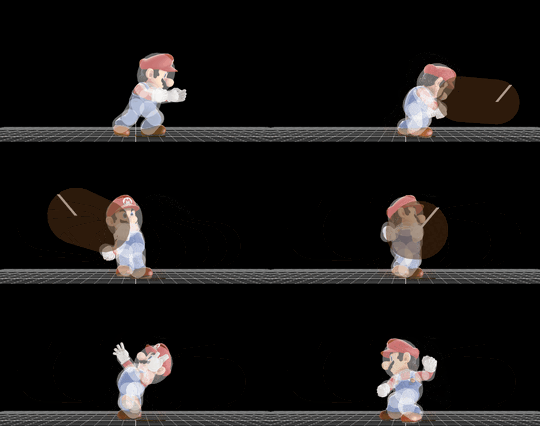
Mario spins around with the opponent three times and then throws them. The animation is based on how he threw Bowser in Super Mario 64. Can KO some heavyweight characters starting at 150% without rage.
Hitboxes
Throw
| ID | Damage | Angle | BK | KS | FKV | Bone | FFx | Type | Effect | Sound | |
|---|---|---|---|---|---|---|---|---|---|---|---|
| 0 | 11% | Standard | 70 | 66 | 0 | 0 | None | ||||
| 1 | 3% | Standard | 40 | 100 | 0 | 0 | None | ||||
Collateral
| ID | Part | Damage | SD | Angle | BK | KS | FKV | Radius | Bone | Offset | SDIx | H× | T% | Clang | Rebound | Type | Effect | G | A | Sound | Direct | Stretch | ||||
|---|---|---|---|---|---|---|---|---|---|---|---|---|---|---|---|---|---|---|---|---|---|---|---|---|---|---|
| 0 | 0 | 8% | 0 | 100 | 70 | 0 | 4.0 | 3 | 2.5 | 15.0 | 0.0 | 1.0x | 1.0x | 0% | 2.5 | 8.0 | 0.0 | |||||||||
|

