Double-Edge Dance: Difference between revisions
From SmashWiki, the Super Smash Bros. wiki
Jump to navigationJump to search
Squishyfrog (talk | contribs) No edit summary |
mNo edit summary |
||
| Line 3: | Line 3: | ||
|name=Double-Edge Dance | |name=Double-Edge Dance | ||
|image=[[File:Roy's Double Edge Dance Move.jpg|200px]] | |image=[[File:Roy's Double Edge Dance Move.jpg|200px]] | ||
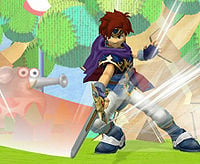
|caption= | |caption=Roy performing one of the slashes of the move. | ||
|user=[[Roy]] | |user=[[Roy]] | ||
|universe=[[Fire Emblem (universe)|Fire Emblem]] | |universe=[[Fire Emblem (universe)|Fire Emblem]] | ||
Revision as of 14:34, October 1, 2011
| Double-Edge Dance | |
|---|---|
 Roy performing one of the slashes of the move. | |
| User | Roy |
| Universe | Fire Emblem |
Double-Edge Dance, often abbreviated DED, is Roy's side special move. After the initial forward+B, the player can input up to 3 more combinations of a direction (forward, down, up, or neutral) and B to create a combo of up to four hits. This move is often considered one of Roy's best. Neutral creates the same attack as forward during this combo, and the second strike only has moves for neutral/forward and up (down is the same as neutral/forward). This attack is the clone of Marth´s Dancing Blade.
Notes/Strategies
- The first two hits of the four hit combo come out no matter how fast the player presses the buttons. For the third and fourth hits, the player must wait a few frames in between button presses or else Roy will not perform the attacks. Due to this, the opponent can counter-attack or roll away after the first and second hits if they manage to shield or crouch cancel them.
- If the player inputs up+B as the third hit of the DED, it will perform a meteor smash. A useful combination when the player has got their opponent near the edge is forward+B, up+B, up+B. The second up+B is a mini launcher that sets up for the meteor smash. However, if the opponent is expecting the move, it is easily meteor cancelled.
- Using forward+B as the third hit of the DED provides more knockback than the other third hits. All of the fourth hits are even higher knockback, with the exception of the down+b. The down+B, however is useful against crouch-cancelers and also helps to eat away a shield