Super Smash Bros. Ultimate

Ice Climbers (SSBU)/Forward throw: Difference between revisions

From SmashWiki, the Super Smash Bros. wiki
Jump to navigationJump to search
m (Competitive expertise no longer needed!)
(→‎Overview: Correction)
 
Line 10: Line 10:
The leader of the duo puts on a "No Nonsense" expression and swats the target aside, swinging their mallet like a golf club. It deals average damage for a throw, with high base knockback but very little knockback scaling. It offers no combo, damage racking, or [[Tech-chasing|tech chase]] prowess, either, making for a thoroughly unimpressive throw.


When landing a grab while [[Desynching|desynced]], the partner can be made to buffer a smash attack as the leader throws the opponent, greatly enhancing their damage and launch power. Combining a forward throw with an [[Ice Climbers (SSBU)/Forward smash|f-smash]] turns the otherwise very weak throw into a devastating kill move, with forward-throw-forward-smash being their strongest. (While the [[Ice Climbers (SSBU)/Back throw|back throw]] variant releases opponents at a closer point to the blast zone, the forward throw variant has hitlag and a longer animation, allowing the partner climber to charge their [[Ice Climbers (SSBU)/Forward smash|f-smash]] for a moment before the throw connects and KO earlier) F-throw-f-smash's slower startup makes it easier to time, but also easier to DI.
When landing a grab while [[Desyncing|desynced]], the partner can be made to buffer a smash attack as the leader throws the opponent, greatly enhancing their damage and launch power. Combining a forward throw with an [[Ice Climbers (SSBU)/Forward smash|f-smash]] turns the otherwise very weak throw into a devastating kill move, with forward-throw-forward-smash being their strongest. (While the [[Ice Climbers (SSBU)/Back throw|back throw]] variant releases opponents at a closer point to the blast zone, the forward throw variant has hitlag and a longer animation, allowing the partner climber to charge their [[Ice Climbers (SSBU)/Forward smash|f-smash]] for a moment before the throw connects and KO earlier) F-throw-f-smash's slower startup makes it easier to time, but also easier to DI.


Through a tight window, the leader's forward throw can put an opponent in just the right spot for the partner's [[Ice Climbers (SSBU)/Forward aerial|forward air]] to finish them off. While spiking an opponent off the stage is usually the most desirable position, converting to a [[Ice Climbers (SSBU)/Forward aerial|forward aerial]] still has its merits onstage, as with many [[Spike|spikes]], the low knockback and high hitstun can allow for easy combo extensions and even a slew of kill confirms.
At the edge of the stage, the leader's forward throw can put an opponent in just the right spot for the partner's [[Ice Climbers (SSBU)/Forward aerial|forward air]] to finish them off. While spiking an opponent off the stage is usually the most desirable position, converting to a [[Ice Climbers (SSBU)/Forward aerial|forward aerial]] still has its merits onstage, as with many [[Spike|spikes]], the low knockback and high hitstun can allow for easy combo extensions and even a slew of kill confirms.


While the Ice Climbers' forward throw is normally not at all worth the risk of [[Grab|grabbing]], its utility is increased tenfold with the help of a partner and some [[Desynching|desyncing]].
While the Ice Climbers' forward throw is normally not at all worth the risk of [[Grab|grabbing]], its utility is increased tenfold with the help of a partner and some desyncing.


==Throw and Hitbox Data==

Latest revision as of 11:27, September 5, 2024

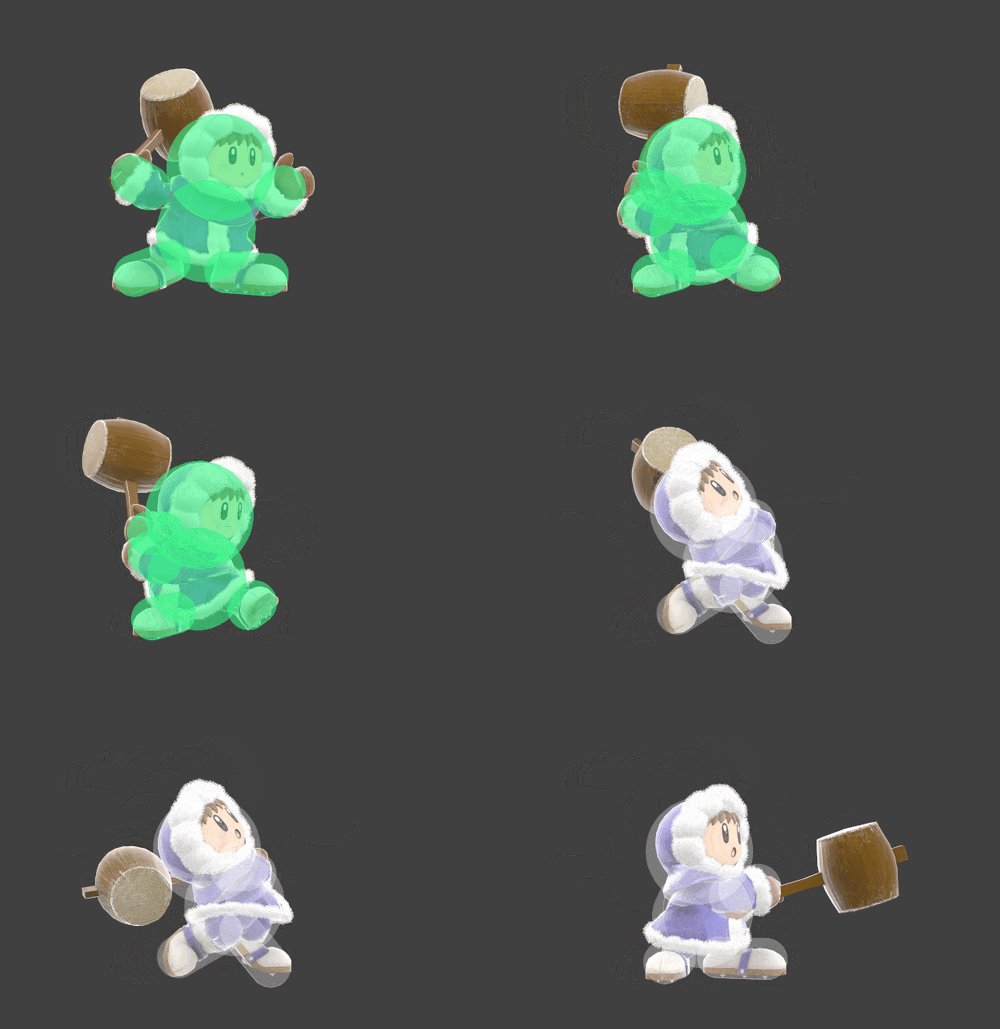
Ice Climbers forward throw hurtbox and hitbox visualization
PopoFThrowSSBU.gif

Overview[edit]

The leader of the duo puts on a "No Nonsense" expression and swats the target aside, swinging their mallet like a golf club. It deals average damage for a throw, with high base knockback but very little knockback scaling. It offers no combo, damage racking, or tech chase prowess, either, making for a thoroughly unimpressive throw.

When landing a grab while desynced, the partner can be made to buffer a smash attack as the leader throws the opponent, greatly enhancing their damage and launch power. Combining a forward throw with an f-smash turns the otherwise very weak throw into a devastating kill move, with forward-throw-forward-smash being their strongest. (While the back throw variant releases opponents at a closer point to the blast zone, the forward throw variant has hitlag and a longer animation, allowing the partner climber to charge their f-smash for a moment before the throw connects and KO earlier) F-throw-f-smash's slower startup makes it easier to time, but also easier to DI.

At the edge of the stage, the leader's forward throw can put an opponent in just the right spot for the partner's forward air to finish them off. While spiking an opponent off the stage is usually the most desirable position, converting to a forward aerial still has its merits onstage, as with many spikes, the low knockback and high hitstun can allow for easy combo extensions and even a slew of kill confirms.

While the Ice Climbers' forward throw is normally not at all worth the risk of grabbing, its utility is increased tenfold with the help of a partner and some desyncing.

Throw and Hitbox Data[edit]

ID Part Rehit rate Damage SD Angle Angle type BK KS FKV Set weight Radius Bone Offset SDI× T% Clang Rebound Effect Type G A Sound Direct Hit bits Hit part Blockable Reflectable Absorbable Flinchless No GFX Heedless
Hitbox
0 0 0 3.0% 0 Sakurai angle Forward 50 60 0 HitboxTableIcon(False).png 5.0 top 0.0 6.5 10.0 1.2× 1.0× 0% HitboxTableIcon(NoClang).png HitboxTableIcon(NoRebound).png Normal (effect) Hammer (type) HitboxTableIcon(GroundedTrue).png HitboxTableIcon(AerialTrue).png M Kick SpecialsDirect.png All All HitboxTableIcon(Blockable).png HitboxTableIcon(Unreflectable).png HitboxTableIcon(Unabsorbable).png HitboxTableIcon(False).png HitboxTableIcon(False).png HitboxTableIcon(False).png
Kind ID Damage Angle Angle type BK KS FKV Effect Type Sound
Throw
Throw 0 5.0% AngleIcon45.png Forward 70 60 0 0.0× Normal (effect) Throwing (type) S None
Break 0 3.0% Sakurai angle Forward 40 100 0 0.0× Normal (effect) Throwing (type) S None

Timing[edit]

Invincibility 1-25
Hitbox 24
Throw Release 25
Interruptible 50
Animation length 64
FrameIcon(Lag).png FrameIcon(Lag).png FrameIcon(Lag).png FrameIcon(Lag).png FrameIcon(Lag).png FrameIcon(Lag).png FrameIcon(Lag).png FrameIcon(Lag).png FrameIcon(Lag).png FrameIcon(Lag).png FrameIcon(Lag).png FrameIcon(Lag).png FrameIcon(Lag).png FrameIcon(Lag).png FrameIcon(Lag).png FrameIcon(Lag).png FrameIcon(Lag).png FrameIcon(Lag).png FrameIcon(Lag).png FrameIcon(Lag).png FrameIcon(Lag).png FrameIcon(Lag).png FrameIcon(Lag).png FrameIcon(HitboxThrowS).png FrameIcon(LagThrowE).png FrameIcon(Lag).png FrameIcon(Lag).png FrameIcon(Lag).png FrameIcon(Lag).png FrameIcon(Lag).png FrameIcon(Lag).png FrameIcon(Lag).png FrameIcon(Lag).png FrameIcon(Lag).png FrameIcon(Lag).png FrameIcon(Lag).png FrameIcon(Lag).png FrameIcon(Lag).png FrameIcon(Lag).png FrameIcon(Lag).png FrameIcon(Lag).png FrameIcon(Lag).png FrameIcon(Lag).png FrameIcon(Lag).png FrameIcon(Lag).png FrameIcon(Lag).png FrameIcon(Lag).png FrameIcon(Lag).png FrameIcon(Lag).png FrameIcon(Interruptible).png FrameIcon(Interruptible).png FrameIcon(Interruptible).png FrameIcon(Interruptible).png FrameIcon(Interruptible).png FrameIcon(Interruptible).png FrameIcon(Interruptible).png FrameIcon(Interruptible).png FrameIcon(Interruptible).png FrameIcon(Interruptible).png FrameIcon(Interruptible).png FrameIcon(Interruptible).png FrameIcon(Interruptible).png FrameIcon(Interruptible).png FrameIcon(Interruptible).png
FrameIcon(Invincible).png FrameIcon(Invincible).png FrameIcon(Invincible).png FrameIcon(Invincible).png FrameIcon(Invincible).png FrameIcon(Invincible).png FrameIcon(Invincible).png FrameIcon(Invincible).png FrameIcon(Invincible).png FrameIcon(Invincible).png FrameIcon(Invincible).png FrameIcon(Invincible).png FrameIcon(Invincible).png FrameIcon(Invincible).png FrameIcon(Invincible).png FrameIcon(Invincible).png FrameIcon(Invincible).png FrameIcon(Invincible).png FrameIcon(Invincible).png FrameIcon(Invincible).png FrameIcon(Invincible).png FrameIcon(Invincible).png FrameIcon(Invincible).png FrameIcon(Invincible).png FrameIcon(Invincible).png FrameIcon(Vulnerable).png FrameIcon(Vulnerable).png FrameIcon(Vulnerable).png FrameIcon(Vulnerable).png FrameIcon(Vulnerable).png FrameIcon(Vulnerable).png FrameIcon(Vulnerable).png FrameIcon(Vulnerable).png FrameIcon(Vulnerable).png FrameIcon(Vulnerable).png FrameIcon(Vulnerable).png FrameIcon(Vulnerable).png FrameIcon(Vulnerable).png FrameIcon(Vulnerable).png FrameIcon(Vulnerable).png FrameIcon(Vulnerable).png FrameIcon(Vulnerable).png FrameIcon(Vulnerable).png FrameIcon(Vulnerable).png FrameIcon(Vulnerable).png FrameIcon(Vulnerable).png FrameIcon(Vulnerable).png FrameIcon(Vulnerable).png FrameIcon(Vulnerable).png FrameIcon(Vulnerable).png FrameIcon(Vulnerable).png FrameIcon(Vulnerable).png FrameIcon(Vulnerable).png FrameIcon(Vulnerable).png FrameIcon(Vulnerable).png FrameIcon(Vulnerable).png FrameIcon(Vulnerable).png FrameIcon(Vulnerable).png FrameIcon(Vulnerable).png FrameIcon(Vulnerable).png FrameIcon(Vulnerable).png FrameIcon(Vulnerable).png FrameIcon(Vulnerable).png FrameIcon(Vulnerable).png
Legend (1 square = 1 frame)
Lag
Lag time
Hitbox
Hitbox
FrameIcon(Vulnerable).png
Vulnerable
Invincibility
Invincible
ThrowThrow
Throw point
Interruptibility
Interruptible