Super Smash Bros. Ultimate

Ice Climbers (SSBU)/Down tilt: Difference between revisions

From SmashWiki, the Super Smash Bros. wiki
Jump to navigationJump to search
(→‎Overview: Continuing to elaborate...)
m (→‎Overview: links.)
Line 8: Line 8:
The move clips the ledge if positioned right, and its high speed, disjoint, and semi-spike launch angle make it a fairly safe and very dangerous two-framing option. What's more, the extra swing from the 2nd Climber works as a built-in 2nd try if the leader swings too early.


Depending on how much the 2nd Climber's attack is delayed (via desyncing) this can make the move much safer than it would be otherwise, and even gives it some use in setting up tech chases. But it doesn't seem to have much use in desyncs outside of that.
Depending on how much the 2nd Climber's attack is delayed (via [[Desynching|desyncing]]) this can make the move much safer than it would be otherwise, and even gives it some use in setting up tech chases. But it doesn't seem to have much use in [[Desynching|desyncs]] outside of that.


Even with only one of the two, down tilt still serves as a passable poking and gimping tool, and a desirable move when used in a pair.
Even with only one of the two, down tilt still serves as a passable poking and [[Gimp|gimping]] tool, and a desirable move when used in a pair.


==Hitboxes==
==Hitboxes==

Revision as of 20:03, May 9, 2024

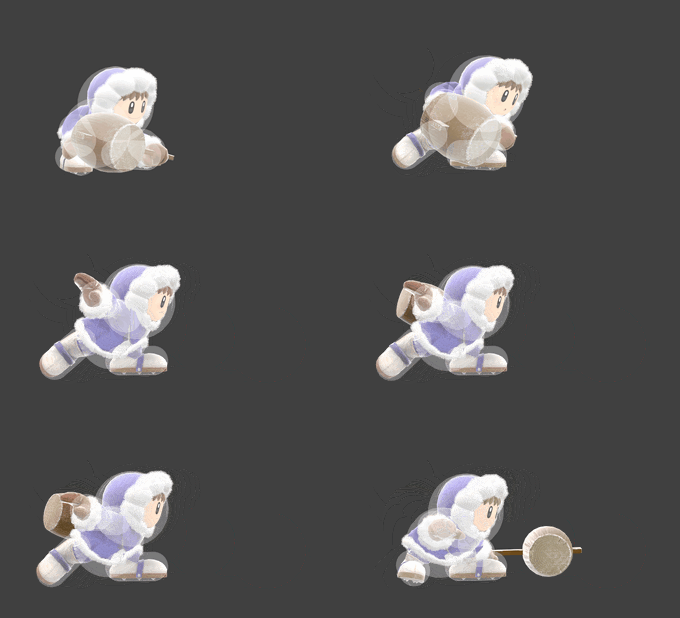
Hitbox visualization showing Popo's down tilt.
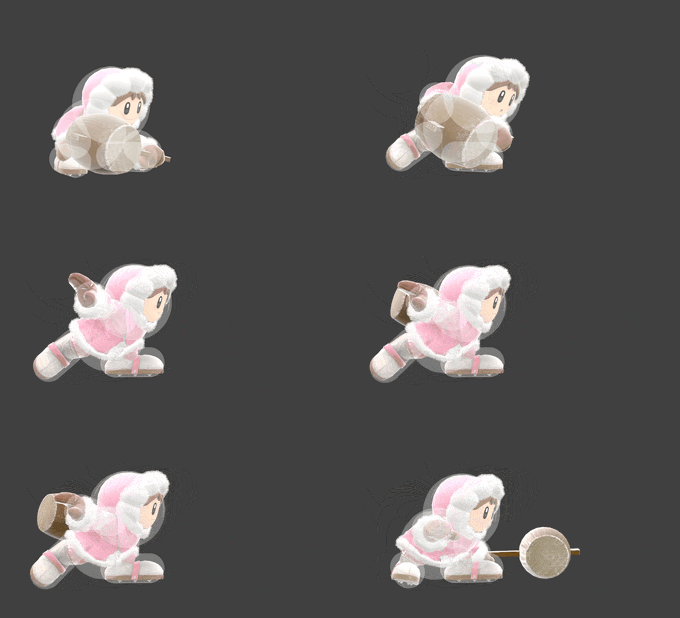
Hitbox visualization showing Nana's down tilt.
Competitive.png This article or section may require competitive expertise.
You can discuss this issue on the talk page or edit this page to improve it.

Overview

Each of the duo performs an outward sweeping attack with their mallet. It sports quick startup, decent activity, and solid damage output. With moderate range, knockback, and ending lag to boot. While the move lacks combo potential and significant KO potency, it's fairly easy to poke shields with, and sends opponents diagonally downward, making it useful as a means of pressuring the enemy and setting up edgeguards.

The move clips the ledge if positioned right, and its high speed, disjoint, and semi-spike launch angle make it a fairly safe and very dangerous two-framing option. What's more, the extra swing from the 2nd Climber works as a built-in 2nd try if the leader swings too early.

Depending on how much the 2nd Climber's attack is delayed (via desyncing) this can make the move much safer than it would be otherwise, and even gives it some use in setting up tech chases. But it doesn't seem to have much use in desyncs outside of that.

Even with only one of the two, down tilt still serves as a passable poking and gimping tool, and a desirable move when used in a pair.

Hitboxes

ID Part Rehit rate Damage SD Angle Angle type BK KS FKV Set weight Radius Bone Offset SDI× T% Clang Rebound Effect Type G A Sound Direct Hit bits Hit part Blockable Reflectable Absorbable Flinchless No GFX Heedless
Leader
0 0 0 6.0% 0 AngleIcon20.png Forward 40 100 0 HitboxTableIcon(False).png 3.0 havel 0.0 -1.0 0.0 1.0× 1.0× 40% HitboxTableIcon(Clang).png HitboxTableIcon(Rebound).png Normal (effect) Hammer (type) HitboxTableIcon(GroundedTrue).png HitboxTableIcon(AerialTrue).png M Punch SpecialsDirect.png All All HitboxTableIcon(Blockable).png HitboxTableIcon(Unreflectable).png HitboxTableIcon(Unabsorbable).png HitboxTableIcon(False).png HitboxTableIcon(False).png HitboxTableIcon(False).png
1 0 0 6.0% 0 AngleIcon20.png Forward 40 100 0 HitboxTableIcon(False).png 3.0 havel 0.0 4.0 0.0 1.0× 1.0× 40% HitboxTableIcon(Clang).png HitboxTableIcon(Rebound).png Normal (effect) Hammer (type) HitboxTableIcon(GroundedTrue).png HitboxTableIcon(AerialTrue).png M Punch SpecialsDirect.png All All HitboxTableIcon(Blockable).png HitboxTableIcon(Unreflectable).png HitboxTableIcon(Unabsorbable).png HitboxTableIcon(False).png HitboxTableIcon(False).png HitboxTableIcon(False).png
2 0 0 6.0% 0 AngleIcon20.png Forward 40 100 0 HitboxTableIcon(False).png 4.0 havel 0.0 8.0 0.0 1.0× 1.0× 40% HitboxTableIcon(Clang).png HitboxTableIcon(Rebound).png Normal (effect) Hammer (type) HitboxTableIcon(GroundedTrue).png HitboxTableIcon(AerialTrue).png M Punch SpecialsDirect.png All All HitboxTableIcon(Blockable).png HitboxTableIcon(Unreflectable).png HitboxTableIcon(Unabsorbable).png HitboxTableIcon(False).png HitboxTableIcon(False).png HitboxTableIcon(False).png
Partner
0 0 0 4.5% 0 AngleIcon20.png Forward 40 100 0 HitboxTableIcon(False).png 3.0 havel 0.0 -1.0 0.0 1.0× 1.0× 40% HitboxTableIcon(Clang).png HitboxTableIcon(Rebound).png Normal (effect) Hammer (type) HitboxTableIcon(GroundedTrue).png HitboxTableIcon(AerialTrue).png M Punch SpecialsDirect.png All All HitboxTableIcon(Blockable).png HitboxTableIcon(Unreflectable).png HitboxTableIcon(Unabsorbable).png HitboxTableIcon(False).png HitboxTableIcon(False).png HitboxTableIcon(False).png
1 0 0 4.5% 0 AngleIcon20.png Forward 40 100 0 HitboxTableIcon(False).png 3.0 havel 0.0 4.0 0.0 1.0× 1.0× 40% HitboxTableIcon(Clang).png HitboxTableIcon(Rebound).png Normal (effect) Hammer (type) HitboxTableIcon(GroundedTrue).png HitboxTableIcon(AerialTrue).png M Punch SpecialsDirect.png All All HitboxTableIcon(Blockable).png HitboxTableIcon(Unreflectable).png HitboxTableIcon(Unabsorbable).png HitboxTableIcon(False).png HitboxTableIcon(False).png HitboxTableIcon(False).png
2 0 0 4.5% 0 AngleIcon20.png Forward 40 100 0 HitboxTableIcon(False).png 4.0 havel 0.0 8.0 0.0 1.0× 1.0× 40% HitboxTableIcon(Clang).png HitboxTableIcon(Rebound).png Normal (effect) Hammer (type) HitboxTableIcon(GroundedTrue).png HitboxTableIcon(AerialTrue).png M Punch SpecialsDirect.png All All HitboxTableIcon(Blockable).png HitboxTableIcon(Unreflectable).png HitboxTableIcon(Unabsorbable).png HitboxTableIcon(False).png HitboxTableIcon(False).png HitboxTableIcon(False).png

Timing

Hitboxes 8-11
Interruptible 31
Animation length 34
FrameIcon(Lag).png FrameIcon(Lag).png FrameIcon(Lag).png FrameIcon(Lag).png FrameIcon(Lag).png FrameIcon(Lag).png FrameIcon(Lag).png FrameIcon(Hitbox).png FrameIcon(Hitbox).png FrameIcon(Hitbox).png FrameIcon(Hitbox).png FrameIcon(Lag).png FrameIcon(Lag).png FrameIcon(Lag).png FrameIcon(Lag).png FrameIcon(Lag).png FrameIcon(Lag).png FrameIcon(Lag).png FrameIcon(Lag).png FrameIcon(Lag).png FrameIcon(Lag).png FrameIcon(Lag).png FrameIcon(Lag).png FrameIcon(Lag).png FrameIcon(Lag).png FrameIcon(Lag).png FrameIcon(Lag).png FrameIcon(Lag).png FrameIcon(Lag).png FrameIcon(Lag).png FrameIcon(Interruptible).png FrameIcon(Interruptible).png FrameIcon(Interruptible).png FrameIcon(Interruptible).png
Legend (1 square = 1 frame)
Lag
Lag time
Hitbox
Hitbox
Interruptibility
Interruptible

Trivia

  • The move has a 40% trip chance that can only happen on slants due to the launch angle.