Welcome to SmashWiki! Log in or create an account and join the community, and don't forget to read this first!
Notices
The Skill parameter has been removed from Smasher infoboxes, and in its place are the new "Best historical ranking" and "Best tournament result" parameters. SmashWiki needs help adding these new parameters to Smasher infoboxes, refer to the guidelines here for what should be included in these new parameters.
When adding results to Smasher pages, include each tournament's entrant number in addition to the player's placement, and use the {{Trn}} template with the matching game specified. Please also fix old results on Smasher pages that do not abide to this standard. Refer to our Smasher article guidelines to see how results tables should be formatted.
Check out our project page for ongoing projects that SmashWiki needs help with.
Super Smash Bros. Ultimate

Bowser Jr. (SSBU)/Up smash: Difference between revisions

From SmashWiki, the Super Smash Bros. wiki
Jump to navigationJump to search
m (Removed protection from "Bowser Jr. (SSBU)/Up smash": Bot: Unprotecting a list of files)
m (Added update history)
Line 3: Line 3:
{{competitive expertise}}
==Overview==
==Overview==
==Update History==
'''{{GameIcon|ssbu}} {{SSBU|3.1.0}}'''
*{{buff|Up smash's last hit has more base knockback (32 → 38).}}
==Hitboxes==
==Hitboxes==
{{UltimateHitboxTableHeader}}
{{HitboxTableTitle|Hit 1|24}}
! {{rollover|Rehit|If given, hitbox can hit the opponent again after x frames|y}}
{{HitboxTableTitle|Hit 1|25}}
{{UltimateHitboxTableRow
|id=0
|id=0
Line 27: Line 31:
|a=f
|a=f
}}
}}
{{HitboxTableTitle|Multihits (early)|24}}
{{HitboxTableTitle|Multihits (early)|25}}
{{UltimateHitboxTableRow
|id=0
|id=0
Line 49: Line 53:
|g=f
|g=f
}}
}}
|3 frames
{{UltimateHitboxTableRow
|id=1
|id=1
Line 70: Line 75:
|g=f
|g=f
}}
}}
|3 frames
{{UltimateHitboxTableRow
|id=2
|id=2
Line 91: Line 97:
|a=f
|a=f
}}
}}
{{HitboxTableTitle|Multihits (late)|24}}
|3 frames
{{HitboxTableTitle|Multihits (late)|25}}
{{UltimateHitboxTableRow
|id=0
|id=0
Line 113: Line 120:
|slvl=S
|slvl=S
}}
}}
|3 frames
{{UltimateHitboxTableRow
|id=1
|id=1
Line 134: Line 142:
|g=f
|g=f
}}
}}
|3 frames
{{UltimateHitboxTableRow
|id=2
|id=2
Line 155: Line 164:
|a=f
|a=f
}}
}}
{{HitboxTableTitle|Final hit|24}}
|3 frames
{{HitboxTableTitle|Final hit|25}}
{{UltimateHitboxTableRow
|id=0
|id=0
Line 169: Line 179:
|ypos=24.5 to 22.5
|ypos=24.5 to 22.5
|zpos=-4.0 to 5.0
|zpos=-4.0 to 5.0
|ff=1.0
|ff=1.8
|type=Weapon
|type=Weapon
|effect=Slash
|effect=Slash

Revision as of 14:06, July 8, 2020

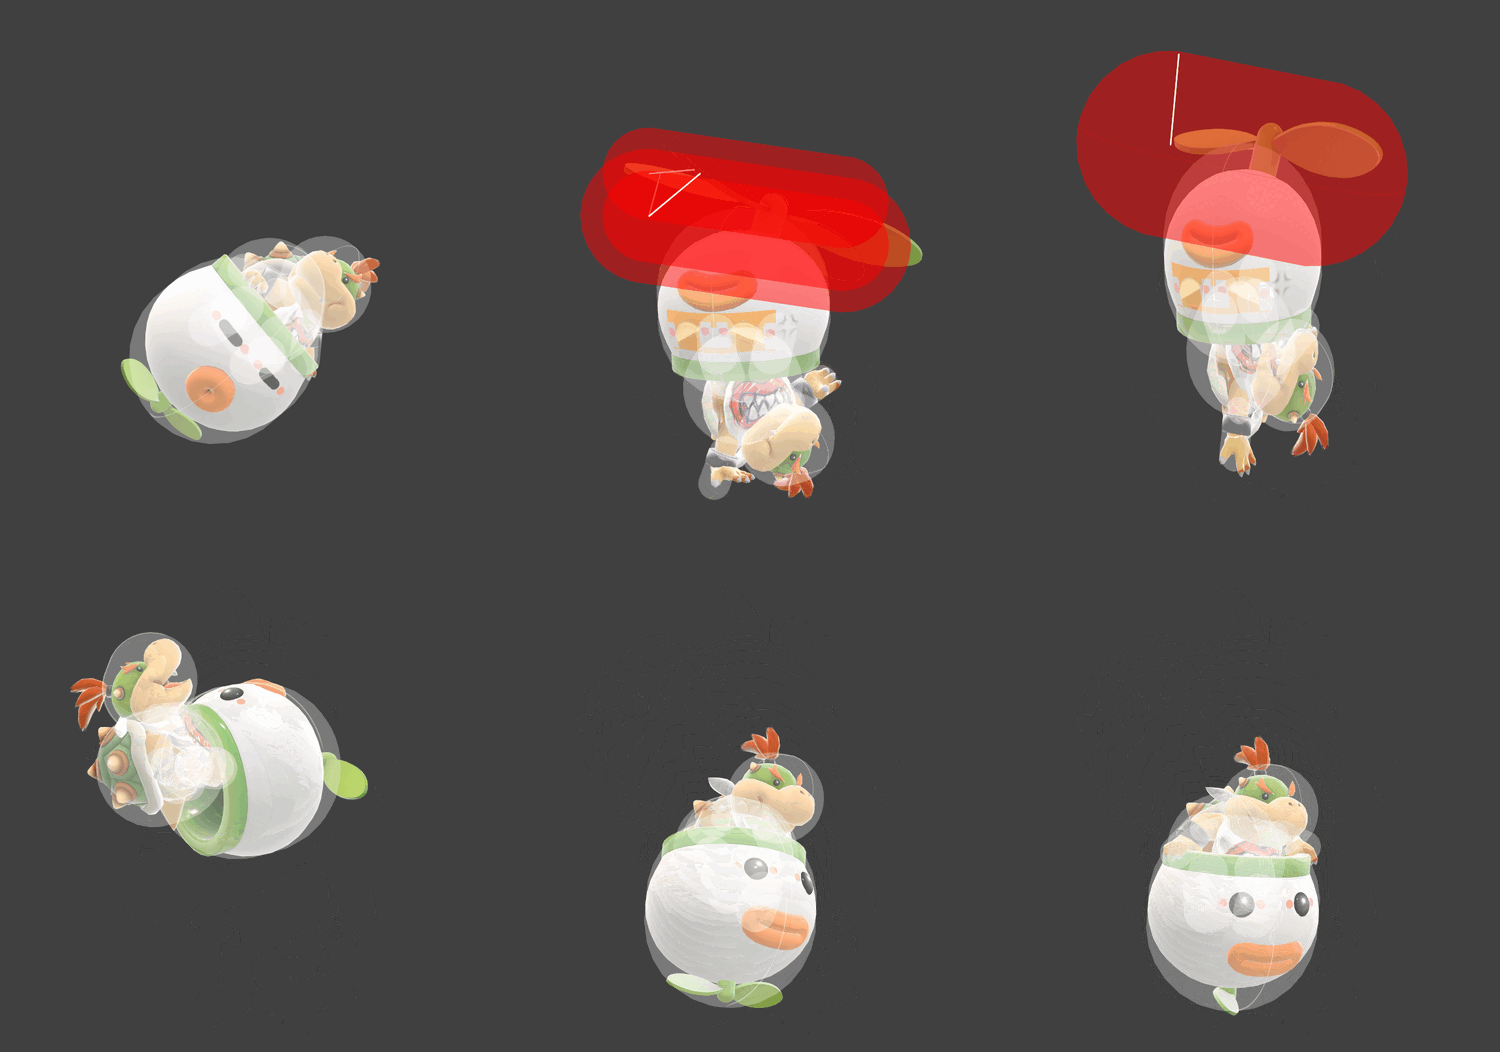
Hitbox visualization showing Bowser Jr.'s up smash.
Competitive.png This article or section may require competitive expertise.
You can discuss this issue on the talk page or edit this page to improve it.

Overview

Update History

Super Smash Bros. Ultimate 3.1.0

  • Buff Up smash's last hit has more base knockback (32 → 38).

Hitboxes

ID Part Rehit rate Damage SD Angle Angle type BK KS FKV Set weight Radius Bone Offset SDI× T% Clang Rebound Effect Type G A Sound Direct Hit bits Hit part Blockable Reflectable Absorbable Flinchless No GFX Heedless Rehit
Hit 1
0 1 0 1.0% 0 AngleIcon102.png Standard 0 100 80 HitboxTableIcon(False).png 4.5 top 0.0 10.0 -5.0 to 5.0 1.0× 1.0× 0% HitboxTableIcon(Clang).png HitboxTableIcon(Rebound).png Slash (effect) Weapon (type) HitboxTableIcon(GroundedTrue).png HitboxTableIcon(AerialFalse).png S Slash SpecialsDirect.png All All HitboxTableIcon(Blockable).png HitboxTableIcon(Unreflectable).png HitboxTableIcon(Unabsorbable).png HitboxTableIcon(False).png HitboxTableIcon(False).png HitboxTableIcon(False).png
Multihits (early)
0 0 3 1.3% 0 AngleIcon120.png Standard 0 100 18 HitboxTableIcon(False).png 2.5 top 0.0 18.0 to 16.0 -4.0 to 7.0 0.6× 1.0× 0% HitboxTableIcon(Clang).png HitboxTableIcon(Rebound).png Slash (effect) Weapon (type) HitboxTableIcon(GroundedFalse).png HitboxTableIcon(AerialTrue).png S Slash SpecialsDirect.png All All HitboxTableIcon(Blockable).png HitboxTableIcon(Unreflectable).png HitboxTableIcon(Unabsorbable).png HitboxTableIcon(False).png HitboxTableIcon(False).png HitboxTableIcon(False).png 3 frames
1 0 3 1.3% 0 AngleIcon190.png Standard 0 100 20 HitboxTableIcon(False).png 2.5 top 0.0 21.0 to 19.0 -4.0 to 7.0 0.6× 1.0× 0% HitboxTableIcon(Clang).png HitboxTableIcon(Rebound).png Slash (effect) Weapon (type) HitboxTableIcon(GroundedFalse).png HitboxTableIcon(AerialTrue).png S Slash SpecialsDirect.png All All HitboxTableIcon(Blockable).png HitboxTableIcon(Unreflectable).png HitboxTableIcon(Unabsorbable).png HitboxTableIcon(False).png HitboxTableIcon(False).png HitboxTableIcon(False).png 3 frames
2 0 3 1.3% 0 AngleIcon140.png Standard 0 100 50 HitboxTableIcon(False).png 4.0 top 0.0 18.0 to 16.0 -4.0 to 7.0 0.6× 1.0× 0% HitboxTableIcon(Clang).png HitboxTableIcon(Rebound).png Slash (effect) Weapon (type) HitboxTableIcon(GroundedTrue).png HitboxTableIcon(AerialFalse).png S Slash SpecialsDirect.png All All HitboxTableIcon(Blockable).png HitboxTableIcon(Unreflectable).png HitboxTableIcon(Unabsorbable).png HitboxTableIcon(False).png HitboxTableIcon(False).png HitboxTableIcon(False).png 3 frames
Multihits (late)
0 1 3 1.0% 0 AngleIcon120.png Standard 0 100 35 HitboxTableIcon(False).png 4.6 top 0.0 19.0 to 17.0 -4.0 to 7.0 1.0× 1.0× 0% HitboxTableIcon(Clang).png HitboxTableIcon(Rebound).png Slash (effect) Weapon (type) HitboxTableIcon(GroundedTrue).png HitboxTableIcon(AerialTrue).png S Slash SpecialsDirect.png All All HitboxTableIcon(Blockable).png HitboxTableIcon(Unreflectable).png HitboxTableIcon(Unabsorbable).png HitboxTableIcon(False).png HitboxTableIcon(False).png HitboxTableIcon(False).png 3 frames
1 0 3 1.3% 0 AngleIcon190.png Standard 0 100 20 HitboxTableIcon(False).png 2.5 top 0.0 21.0 to 19.0 -4.0 to 7.0 0.6× 1.0× 0% HitboxTableIcon(Clang).png HitboxTableIcon(Rebound).png Slash (effect) Weapon (type) HitboxTableIcon(GroundedFalse).png HitboxTableIcon(AerialTrue).png S Slash SpecialsDirect.png All All HitboxTableIcon(Blockable).png HitboxTableIcon(Unreflectable).png HitboxTableIcon(Unabsorbable).png HitboxTableIcon(False).png HitboxTableIcon(False).png HitboxTableIcon(False).png 3 frames
2 0 3 1.3% 0 AngleIcon140.png Standard 0 100 50 HitboxTableIcon(False).png 4.0 top 0.0 18.0 to 16.0 -4.0 to 7.0 0.6× 1.0× 0% HitboxTableIcon(Clang).png HitboxTableIcon(Rebound).png Slash (effect) Weapon (type) HitboxTableIcon(GroundedTrue).png HitboxTableIcon(AerialFalse).png S Slash SpecialsDirect.png All All HitboxTableIcon(Blockable).png HitboxTableIcon(Unreflectable).png HitboxTableIcon(Unabsorbable).png HitboxTableIcon(False).png HitboxTableIcon(False).png HitboxTableIcon(False).png 3 frames
Final hit
0 0 0 6.0% 0 AngleIcon85.png Standard 38 175 0 HitboxTableIcon(False).png 5.5 top 0.0 24.5 to 22.5 -4.0 to 5.0 1.8× 1.0× 0% HitboxTableIcon(Clang).png HitboxTableIcon(Rebound).png Slash (effect) Weapon (type) HitboxTableIcon(GroundedTrue).png HitboxTableIcon(AerialTrue).png L Slash SpecialsDirect.png All All HitboxTableIcon(Blockable).png HitboxTableIcon(Unreflectable).png HitboxTableIcon(Unabsorbable).png HitboxTableIcon(False).png HitboxTableIcon(False).png HitboxTableIcon(False).png

Timing

Charges between 4-5
Hit 1 7-8
Multihits (early) 9-17
Multihits (late) 18
Final hit 22-23
Interruptible 54
Animation length 65
FrameIcon(Lag).png FrameIcon(Lag).png FrameIcon(Lag).png FrameIcon(LagChargeS).png FrameIcon(LagChargeE).png FrameIcon(Lag).png FrameIcon(Hitbox).png FrameIcon(HitboxChangeS).png FrameIcon(HitboxChangeE).png FrameIcon(Hitbox).png FrameIcon(Hitbox).png FrameIcon(Hitbox).png FrameIcon(Hitbox).png FrameIcon(Hitbox).png FrameIcon(Hitbox).png FrameIcon(Hitbox).png FrameIcon(HitboxChangeS).png FrameIcon(HitboxChangeE).png FrameIcon(Lag).png FrameIcon(Lag).png FrameIcon(Lag).png FrameIcon(Hitbox).png FrameIcon(Hitbox).png FrameIcon(Lag).png FrameIcon(Lag).png FrameIcon(Lag).png FrameIcon(Lag).png FrameIcon(Lag).png FrameIcon(Lag).png FrameIcon(Lag).png FrameIcon(Lag).png FrameIcon(Lag).png FrameIcon(Lag).png FrameIcon(Lag).png FrameIcon(Lag).png FrameIcon(Lag).png FrameIcon(Lag).png FrameIcon(Lag).png FrameIcon(Lag).png FrameIcon(Lag).png FrameIcon(Lag).png FrameIcon(Lag).png FrameIcon(Lag).png FrameIcon(Lag).png FrameIcon(Lag).png FrameIcon(Lag).png FrameIcon(Lag).png FrameIcon(Lag).png FrameIcon(Lag).png FrameIcon(Lag).png FrameIcon(Lag).png FrameIcon(Lag).png FrameIcon(Lag).png FrameIcon(Interruptible).png FrameIcon(Interruptible).png FrameIcon(Interruptible).png FrameIcon(Interruptible).png FrameIcon(Interruptible).png FrameIcon(Interruptible).png FrameIcon(Interruptible).png FrameIcon(Interruptible).png FrameIcon(Interruptible).png FrameIcon(Interruptible).png FrameIcon(Interruptible).png FrameIcon(Interruptible).png
Legend (1 square = 1 frame)
Lag
Lag time
ChargeCharge
Charge interval
Hitbox
Hitbox
FrameIcon(HitboxChangeS).pngFrameIcon(HitboxChangeE).png
Hitbox change
Interruptibility
Interruptible