Ness (SSB4)/Down throw: Difference between revisions
From SmashWiki, the Super Smash Bros. wiki
Jump to navigationJump to search
UltraNessDX (talk | contribs) No edit summary |
SuperSqank (talk | contribs) No edit summary |
||
| Line 2: | Line 2: | ||
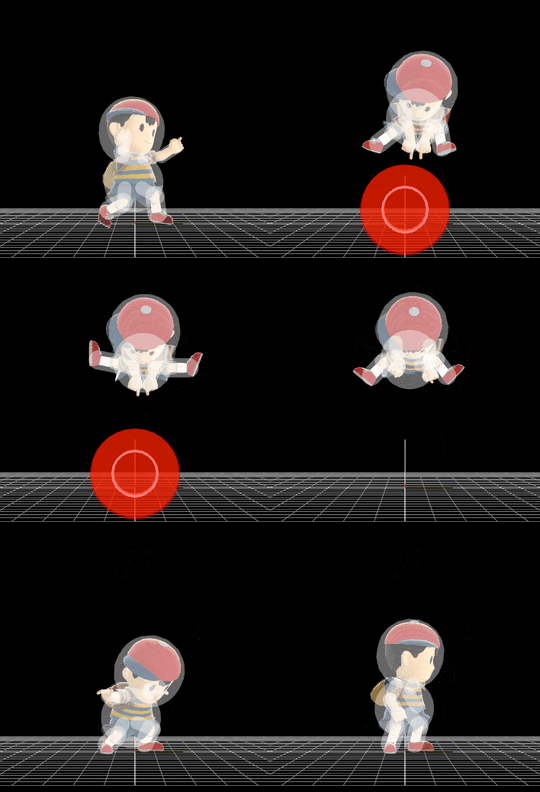
[[File:NussThrowDown.gif|thumb|270px|Hitbox visualization showing Ness's down throw.]] | [[File:NussThrowDown.gif|thumb|270px|Hitbox visualization showing Ness's down throw.]] | ||
{{competitive expertise}} | {{competitive expertise}} | ||
==Overview== | ==Overview== | ||
| Line 8: | Line 7: | ||
Throws the opponent diagonally forward. Combos into forward aerial and up aerial at lower percents, and leaves the opponent open to juggling at higher percents. | Throws the opponent diagonally forward. Combos into forward aerial and up aerial at lower percents, and leaves the opponent open to juggling at higher percents. | ||
==Throw and Hitbox Data== | |||
=== | ===Hitboxes=== | ||
Loops five times. | Loops five times. | ||
| Line 67: | Line 60: | ||
|} | |} | ||
===Throw=== | |||
{{SSB4ThrowTableHeader}} | |||
{{SSB4ThrowTableRow | |||
|id=0 | |||
|damage=4% | |||
|af=3 | |||
|angle=70 | |||
|bk=70 | |||
|ks=80 | |||
|fkv=0 | |||
|bn=0 | |||
|noff=true | |||
|trip=0 | |||
|type=Throwing | |||
|effect=Normal | |||
|slvl=S | |||
|sfx=None | |||
}} | |||
{{SSB4ThrowTableRow | |||
|id=1 | |||
|damage=3% | |||
|af=3 | |||
|angle=361 | |||
|bk=60 | |||
|ks=100 | |||
|fkv=0 | |||
|bn=0 | |||
|noff=true | |||
|trip=0 | |||
|type=Throwing | |||
|effect=Normal | |||
|slvl=S | |||
|sfx=None | |||
}} | |||
|} | |||
==Timing== | |||
{|class="wikitable" | |||
!Invincibility | |||
|1-8 | |||
|- | |||
!Hitbox | |||
|10-13, 14-17, 18-21, 22-25, 26-29 | |||
|- | |||
!Throw Release | |||
|30 | |||
|- | |||
!Animation length | |||
|49 | |||
|- | |||
!Interruptible | |||
|50 | |||
|} | |||
{{FrameStripStart}} | |||
{{FrameStrip|t=Lag|c=9}}{{FrameStrip|t=Hitbox|c=4|e=HitboxChangeS}}{{FrameStrip|t=Hitbox|c=4|s=HitboxChangeE|e=HitboxChangeS}}{{FrameStrip|t=Hitbox|c=4|s=HitboxChangeE|e=HitboxChangeS}}{{FrameStrip|t=Hitbox|c=4|s=HitboxChangeE|e=HitboxChangeS}}{{FrameStrip|t=Hitbox|c=4|s=HitboxChangeE|e=HitboxThrowS}}{{FrameStrip|t=Lag|c=20|s=LagThrowE}} | |||
|- | |||
{{FrameStrip|t=Invincible|c=8}}{{FrameStrip|t=Vulnerable|c=41}} | |||
{{FrameStripEnd}} | |||
{{FrameIconLegend|lag=y|hitbox=y|hitboxchange=y|throw=y|vulnerable=y|invincible=y}} | |||
{{MvSubNavNess|g=SSB4}} | {{MvSubNavNess|g=SSB4}} | ||
[[Category:Ness (SSB4)]] | [[Category:Ness (SSB4)]] | ||
[[Category:Down throws (SSB4)]] | [[Category:Down throws (SSB4)]] | ||
Revision as of 07:14, June 19, 2020
Overview
Throws the opponent diagonally forward. Combos into forward aerial and up aerial at lower percents, and leaves the opponent open to juggling at higher percents.
Throw and Hitbox Data
Hitboxes
Loops five times.
Throw
| ID | Damage | Angle | BK | KS | FKV | Bone | FFx | Type | Effect | Sound | |
|---|---|---|---|---|---|---|---|---|---|---|---|
| 0 | 4% | Forwards | 70 | 80 | 0 | 0 | None | ||||
| 1 | 3% | Forwards | 60 | 100 | 0 | 0 | None | ||||
Timing
| Invincibility | 1-8 |
|---|---|
| Hitbox | 10-13, 14-17, 18-21, 22-25, 26-29 |
| Throw Release | 30 |
| Animation length | 49 |
| Interruptible | 50 |
Lag time |
Hitbox |
Hitbox change |
Vulnerable |
Invincible |
Throw point |
|

