Hero (SSBU)/Neutral attack/Hit 1: Difference between revisions
Raul Retana (talk | contribs) m (Added hitstun) |
No edit summary |
||
| (One intermediate revision by one other user not shown) | |||
| Line 12: | Line 12: | ||
==Hitboxes== | ==Hitboxes== | ||
The scripts only specify hitstun modifiers for the ID 0, 1, and 3 hitboxes, but they apply to all hitboxes [[Hitstun#List of moves with hitstun modifiers|due to a glitch]]. | |||
{{UltimateHitboxTableHeader}} | {{UltimateHitboxTableHeader}} | ||
! Hitstun | ! Hitstun | ||
| Line 18: | Line 19: | ||
|damage=3.0% | |damage=3.0% | ||
|angle=361 | |angle=361 | ||
|af=3 | |||
|bk=25 | |bk=25 | ||
|ks=25 | |ks=25 | ||
| Line 37: | Line 39: | ||
|damage=3.0% | |damage=3.0% | ||
|angle=180 | |angle=180 | ||
|af=3 | |||
|bk=20 | |bk=20 | ||
|ks=15 | |ks=15 | ||
| Line 50: | Line 53: | ||
|sfx=Slash | |sfx=Slash | ||
|slvl=S | |slvl=S | ||
|hitbits=Fighter only | |||
}} | }} | ||
|'''+7''' frames | |'''+7''' frames | ||
| Line 56: | Line 60: | ||
|damage=3.0% | |damage=3.0% | ||
|angle=361 | |angle=361 | ||
|af=3 | |||
|bk=20 | |bk=20 | ||
|ks=15 | |ks=15 | ||
| Line 70: | Line 75: | ||
|slvl=S | |slvl=S | ||
}} | }} | ||
|— | |||
{{UltimateHitboxTableRow | {{UltimateHitboxTableRow | ||
|id=3 | |id=3 | ||
|damage=3.0% | |damage=3.0% | ||
|angle=180 | |angle=180 | ||
|af=3 | |||
|bk=15 | |bk=15 | ||
|ks=15 | |ks=15 | ||
| Line 87: | Line 94: | ||
|sfx=Slash | |sfx=Slash | ||
|slvl=S | |slvl=S | ||
|hitbits=Fighter only | |||
}} | }} | ||
|'''+7''' frames | |'''+7''' frames | ||
| Line 93: | Line 101: | ||
|damage=3.0% | |damage=3.0% | ||
|angle=361 | |angle=361 | ||
|af=3 | |||
|bk=20 | |bk=20 | ||
|ks=15 | |ks=15 | ||
| Line 107: | Line 116: | ||
|slvl=S | |slvl=S | ||
}} | }} | ||
|— | |||
{{UltimateHitboxTableRow | {{UltimateHitboxTableRow | ||
|id=5 | |id=5 | ||
|damage=3.0% | |damage=3.0% | ||
|angle=361 | |angle=361 | ||
|af=3 | |||
|bk=25 | |bk=25 | ||
|ks=25 | |ks=25 | ||
| Line 125: | Line 136: | ||
|slvl=S | |slvl=S | ||
}} | }} | ||
|— | |||
|} | |} | ||
==Timing== | ==Timing== | ||
{|class="wikitable" | {|class="wikitable" | ||
!Hitboxes | !colspan=2|Hitboxes | ||
|6-7 | |6-7 | ||
|- | |- | ||
! | !rowspan=2|Continuability!!Held on hit or tapped | ||
|9 | |9-30 | ||
|- | |- | ||
!Interruptible | !Held without hitting | ||
|13 | |||
|- | |||
!colspan=2|Interruptible | |||
|26 | |26 | ||
|- | |- | ||
!Animation length | !colspan=2|Animation length | ||
|47 | |47 | ||
|} | |} | ||
{{FrameStripStart}} | {{FrameStripStart}} | ||
{{FrameStrip|t=Lag|c=5}}{{FrameStrip|t=Hitbox|c=2}}{{FrameStrip|t=Lag|c=1|e=LagContinuableS}}{{FrameStrip|t=Lag|c= | {{FrameStrip|t=Lag|c=5}}{{FrameStrip|t=Hitbox|c=2}}{{FrameStrip|t=Lag|c=1|e=LagContinuableS}}{{FrameStrip|t=Lag|c=4|s=LagContinuableE|e=LagContinuableS}}{{FrameStrip|t=Lag|c=13|s=LagContinuableE}}{{FrameStrip|t=Interruptible|c=22}} | ||
|- | |||
{{FrameStrip|t=Blank|c=8}}{{FrameStrip|t=Continuable|c=22}}{{FrameStrip|t=Blank|c=17}} | |||
{{FrameStripEnd}} | {{FrameStripEnd}} | ||
{{FrameIconLegend|lag=y|hitbox=y|earliestcontinuable=y|interruptible=y}} | {{FrameIconLegend|lag=y|hitbox=y|earliestcontinuable=y|continuable=y|interruptible=y}} | ||
{{MvSubNavHero|g=SSBU}} | {{MvSubNavHero|g=SSBU}} | ||
[[Category:Hero (SSBU)]] | [[Category:Hero (SSBU)]] | ||
[[Category:Neutral attacks (SSBU)]] | [[Category:Neutral attacks (SSBU)]] | ||
Latest revision as of 22:17, August 5, 2022
Overview[edit]
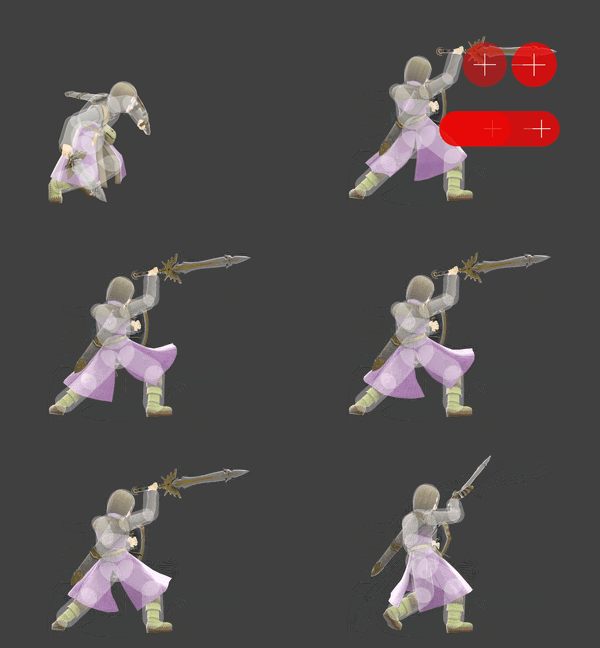
An upward slash. Being frame 6, this is among the slowest neutral attacks in the game, but also Hero's fastest normal attack. It recovers 2.4 MP for Hero on hit, and 2.856 MP on shield. Given it will connect into the rest of the neutral attack combo, this move is important for gaining MP for Hero throughout the game. It transitions to Hit 2 on frame 9.
Given the hitbox placement, this move can serve as a decent anti-air, deterring jump-ins. As a result, it isn't uncommon to see a Hero player throw the move out in neutral after dashing back. Given its FAF of 26, it is also one of Hero's safest options on whiff. However, the startup will make it worse up-close, often being out-framed.
This is tied with Hit 2 for Hero's safest neutral attack on shield, at -15. If spaced, it can be safe against characters with poor out of shield options. However, due to the poor shield data on Hero's end, simple options such as Climhazzard will usually cause issues with attempting to mix up opponents. On hit, however, it has exceptional qualities, being -2 at 0%. As a result, it has strong mixup potential. It becomes neutral on hit at 50%, before becoming + at 75% onwards.
With Oomph, Hit 1 becomes more + on hit, allowing for potential loops into itself at around 115%. While frame perfect and limited by Oomph's time, it will become easier as the opponent's percentage increases. At 100%, Oomph will allow for Hero to get a grab, and leads to a KO confirm with up throw at 150%. Psyche Up has similar qualities, usually being more + on hit in most instances compared to Oomph, leading to quicker grabs. Using this move to confirm a grab, a few pummels and a throw can usually lead to an upwards of 20 MP gained back, and a strong advantage state.
Hitboxes[edit]
The scripts only specify hitstun modifiers for the ID 0, 1, and 3 hitboxes, but they apply to all hitboxes due to a glitch.
Timing[edit]
| Hitboxes | 6-7 | |
|---|---|---|
| Continuability | Held on hit or tapped | 9-30 |
| Held without hitting | 13 | |
| Interruptible | 26 | |
| Animation length | 47 | |
Lag time |
Hitbox |
Continuable |
Earliest continuable point |
Interruptible |
|
