Bowser Jr. (SSBU)/Neutral attack/Hit 2: Difference between revisions
From SmashWiki, the Super Smash Bros. wiki
Jump to navigationJump to search
Raul Retana (talk | contribs) m (Added hitstun and update history) |
(→Timing) |
||
| (2 intermediate revisions by 2 users not shown) | |||
| Line 1: | Line 1: | ||
{{ArticleIcons|ssbu=y}} | {{ArticleIcons|ssbu=y}} | ||
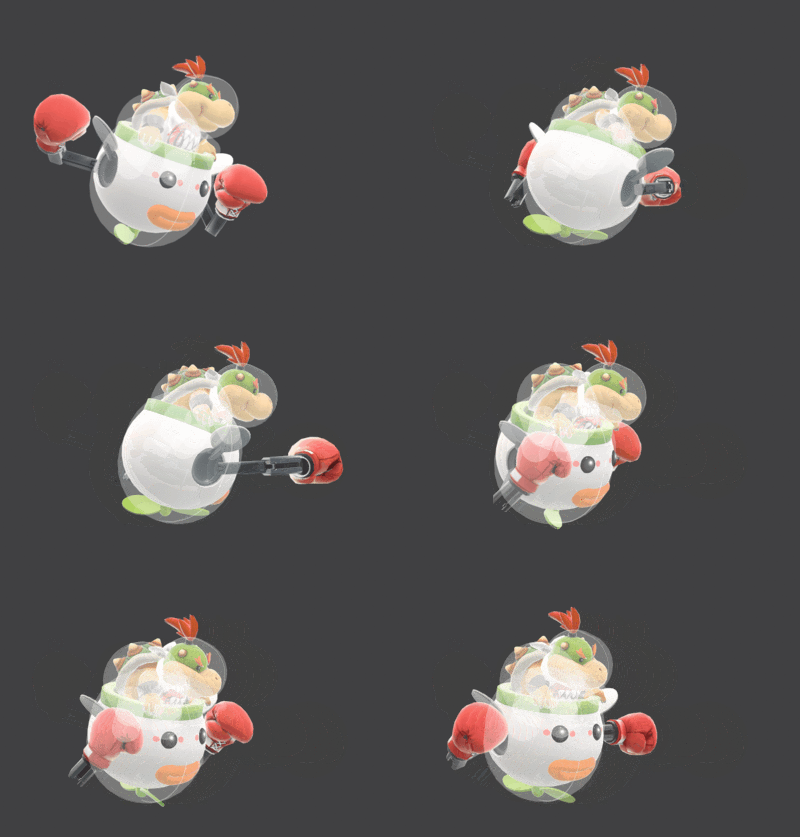
[[File:BowserJrJab2SSBU.gif|thumb|400px|Hitbox visualization showing Bowser Jr.'s second jab.]] | [[File:BowserJrJab2SSBU.gif|thumb|400px|Hitbox visualization showing Bowser Jr.'s second jab.]] | ||
==Overview== | ==Overview== | ||
The Junior Crown Car performs another jab just like the [[Bowser Jr. (SSBU)/Neutral attack/Hit 1|first jab]]. It does 2% when hit. The next and last input is [[Bowser Jr. (SSBU)/Neutral attack/Infinite|an infinite]]. | |||
==Update History== | ==Update History== | ||
'''{{GameIcon|ssbu}} {{SSBU|3.0.0}}''' | '''{{GameIcon|ssbu}} {{SSBU|3.0.0}}''' | ||
| Line 13: | Line 14: | ||
|damage=2.0% | |damage=2.0% | ||
|angle=361 | |angle=361 | ||
|af=3 | |||
|bk=25 | |bk=25 | ||
|ks=25 | |ks=25 | ||
| Line 32: | Line 34: | ||
|damage=2.0% | |damage=2.0% | ||
|angle=361 | |angle=361 | ||
|af=3 | |||
|bk=25 | |bk=25 | ||
|ks=25 | |ks=25 | ||
| Line 51: | Line 54: | ||
|damage=2.0% | |damage=2.0% | ||
|angle=361 | |angle=361 | ||
|af=3 | |||
|bk=20 | |bk=20 | ||
|ks=15 | |ks=15 | ||
| Line 67: | Line 71: | ||
|'''+3''' frames | |'''+3''' frames | ||
|} | |} | ||
==Timing== | ==Timing== | ||
Upon reaching the continuability window, the move transitions into the rapid jab if the button has been pressed at least 3 times and released at least 2 times since the neutral attack's first hit. | |||
{|class="wikitable" | {|class="wikitable" | ||
!Hitboxes | !colspan=2|Hitboxes | ||
|4-5 | |4-5 | ||
|- | |- | ||
! | !rowspan=2|Continuability!!Pressed repeatedly | ||
|6 | |6-29 | ||
|- | |||
!Held on hit | |||
|10 | |||
|- | |- | ||
!Interruptible | !colspan=2|Interruptible | ||
|30 | |30 | ||
|- | |- | ||
!Animation length | !colspan=2|Animation length | ||
|47 | |47 | ||
|} | |} | ||
{{FrameStripStart}} | {{FrameStripStart}} | ||
{{FrameStrip|t=Lag|c=3}}{{FrameStrip|t=Hitbox|c=2}}{{FrameStrip|t=Lag|c= | {{FrameStrip|t=Lag|c=3}}{{FrameStrip|t=Hitbox|c=2|e=HitboxContinuableS}}{{FrameStrip|t=Lag|c=4|s=LagContinuableE|e=LagContinuableS}}{{FrameStrip|t=Lag|c=20|s=LagContinuableE}}{{FrameStrip|t=Interruptible|c=18}} | ||
|- | |||
{{FrameStrip|t=Blank|c=5}}{{FrameStrip|t=Continuable|c=24}}{{FrameStrip|t=Blank|c=18}} | |||
{{FrameStripEnd}} | {{FrameStripEnd}} | ||
{{FrameIconLegend|lag=y|hitbox=y|earliestcontinuable=y|interruptible=y}} | {{FrameIconLegend|lag=y|hitbox=y|earliestcontinuable=y|continuable=y|interruptible=y}} | ||
{{MvSubNavBowserJr|g=SSBU}} | {{MvSubNavBowserJr|g=SSBU}} | ||
[[Category:Bowser Jr. (SSBU)]] | [[Category:Bowser Jr. (SSBU)]] | ||
[[Category:Neutral attacks (SSBU)]] | [[Category:Neutral attacks (SSBU)]] | ||
Latest revision as of 19:42, July 30, 2022
Overview[edit]
The Junior Crown Car performs another jab just like the first jab. It does 2% when hit. The next and last input is an infinite.
Update History[edit]
 Neutral attack 2 deals more hitstun, allowing it to connect into the rapid jab more reliably.
Hitboxes[edit]
Timing[edit]
Upon reaching the continuability window, the move transitions into the rapid jab if the button has been pressed at least 3 times and released at least 2 times since the neutral attack's first hit.
| Hitboxes | 4-5 | |
|---|---|---|
| Continuability | Pressed repeatedly | 6-29 |
| Held on hit | 10 | |
| Interruptible | 30 | |
| Animation length | 47 | |
Lag time |
Hitbox |
Continuable |
Earliest continuable point |
Interruptible |
|
