Simon (SSBU)/Dash attack: Difference between revisions
From SmashWiki, the Super Smash Bros. wiki
Jump to navigationJump to search
m (Protected "Simon (SSBU)/Dash attack": Bot: Protecting a list of files. ([Edit=Allow only autoconfirmed users] (indefinite) [Move=Allow only autoconfirmed users] (indefinite))) |
No edit summary |
||
| (4 intermediate revisions by 4 users not shown) | |||
| Line 1: | Line 1: | ||
{{ArticleIcons|ssbu=y}} | {{ArticleIcons|ssbu=y}} | ||
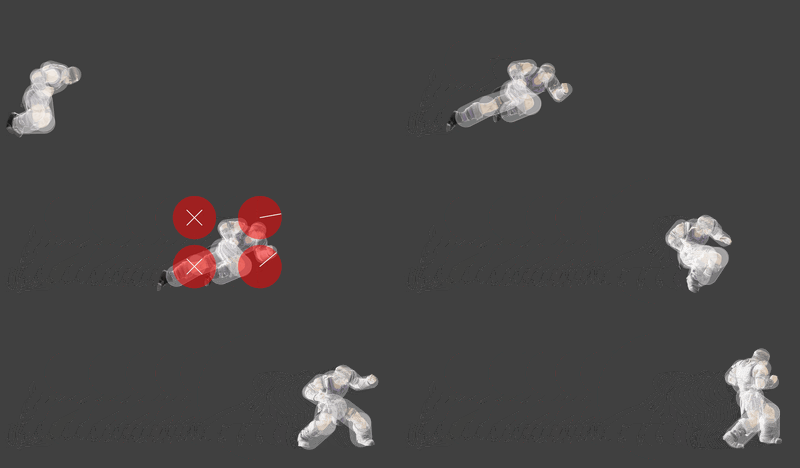
[[File:SimonDashAttack.gif|thumb| | [[File:SimonDashAttack.gif|thumb|400px|Hitbox visualization showing Simon's dash attack.]] | ||
{{competitive expertise}} | {{competitive expertise}} | ||
==Overview== | ==Overview== | ||
==Update History== | |||
'''{{GameIcon|ssbu}} {{SSBU|9.0.0}}''' | |||
*{{buff|The looping hits deal more damage (1.7% → 2%; 12% total → 13.5%).}} | |||
*{{change|The last hit has more base knockback (70 → 80), but less knockback scaling (115 → 105). This improves its KO potential near the edge, but reduces it from across the stage.}} | |||
==Hitboxes== | ==Hitboxes== | ||
{{UltimateHitboxTableHeader}} | {{UltimateHitboxTableHeader}} | ||
{{HitboxTableTitle|Hits 1-5| | {{HitboxTableTitle|Hits 1-5|50}} | ||
{{UltimateHitboxTableRow | {{UltimateHitboxTableRow | ||
|id=2 | |id=2 | ||
|damage= | |damage=2.0% | ||
|angle=10 | |angle=10 | ||
|af=1 | |||
|setweight=t | |||
|bk=55 | |bk=55 | ||
|ks=10 | |ks=10 | ||
| Line 27: | Line 33: | ||
{{UltimateHitboxTableRow | {{UltimateHitboxTableRow | ||
|id=1 | |id=1 | ||
|damage= | |damage=2.0% | ||
|angle=367 | |angle=367 | ||
|af=1 | |||
|setweight=t | |||
|bk=70 | |bk=70 | ||
|ks=10 | |ks=10 | ||
| Line 46: | Line 54: | ||
{{UltimateHitboxTableRow | {{UltimateHitboxTableRow | ||
|id=0 | |id=0 | ||
|damage= | |damage=2.0% | ||
|angle=40 | |angle=40 | ||
|af=1 | |||
|setweight=t | |||
|bk=50 | |bk=50 | ||
|ks=10 | |ks=10 | ||
| Line 65: | Line 75: | ||
{{UltimateHitboxTableRow | {{UltimateHitboxTableRow | ||
|id=3 | |id=3 | ||
|damage= | |damage=2.0% | ||
|angle=367 | |angle=367 | ||
|af=1 | |||
|setweight=t | |||
|bk=70 | |bk=70 | ||
|ks=10 | |ks=10 | ||
| Line 82: | Line 94: | ||
|rebound=f | |rebound=f | ||
}} | }} | ||
{{HitboxTableTitle|Hit 6| | {{HitboxTableTitle|Hit 6|50}} | ||
{{UltimateHitboxTableRow | {{UltimateHitboxTableRow | ||
|id=0 | |id=0 | ||
|damage=3.5% | |damage=3.5% | ||
|angle=47 | |angle=47 | ||
|bk= | |af=3 | ||
|ks= | |bk=80 | ||
|ks=105 | |||
|fkv=0 | |fkv=0 | ||
|r=11.5 | |r=11.5 | ||
| Line 103: | Line 116: | ||
}} | }} | ||
|} | |} | ||
==Timing== | ==Timing== | ||
{|class="wikitable" | {|class="wikitable" | ||
Latest revision as of 18:50, January 24, 2022
Overview[edit]
Update History[edit]
 The looping hits deal more damage (1.7% → 2%; 12% total → 13.5%).
 The last hit has more base knockback (70 → 80), but less knockback scaling (115 → 105). This improves its KO potential near the edge, but reduces it from across the stage.
Hitboxes[edit]
Timing[edit]
| Hits 1-5 | 10-11, 13-14, 16-17, 19-20, 22-23 |
|---|---|
| Hit 6 | 25-26 |
| Interruptible | 55 |
| Animation length | 58 |
Lag time |
Hitbox |
Interruptible |
|

