Super Smash Bros. Ultimate

Ganondorf (SSBU)/Down aerial: Difference between revisions

From SmashWiki, the Super Smash Bros. wiki
Jump to navigationJump to search
mNo edit summary
m (→‎Overview: grammar)
Tag: Mobile edit
 
(6 intermediate revisions by 6 users not shown)
Line 2: Line 2:
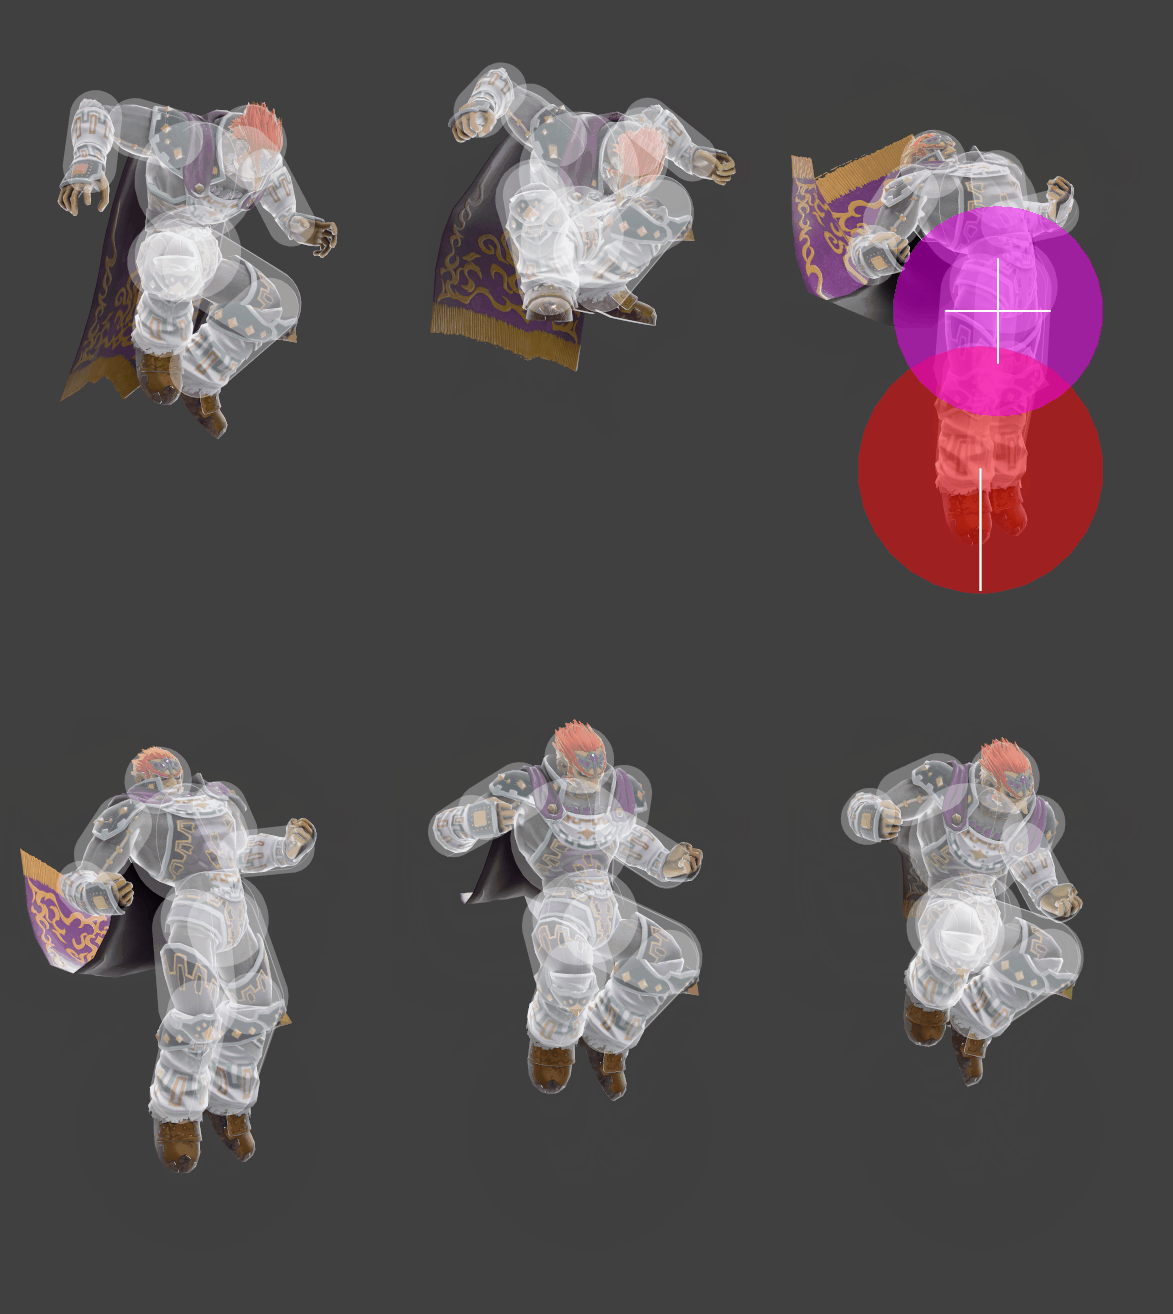
[[File:GanondorfDAirSSBU.gif|thumb|450px|Hitbox visualization showing Ganondorf's down aerial.]]
[[File:GanondorfDAirSSBU.gif|thumb|450px|Hitbox visualization showing Ganondorf's down aerial.]]
==Overview==
==Overview==
Ganondorf stomps below him with electricity. The sweetspot is a powerful [[meteor smash]].
Ganondorf stomps below him with electricity. It is his slowest aerial, but also his deadliest, with the [[Sweet spot (hitbox)|sweetspot]] often being a guaranteed kill offstage, and the [[sourspot]] around Ganondorf's chest still killing earlier than both his [[../Forward aerial|forward]] and [[../Back aerial|back aerial]]. It is able to start [[combo|combos]] at low percent, with [[../Neutral attack|jab]] and [[../Grab|grab]] being the main follow-ups, and at later percent with any aerial. It is also Ganondorf's prime [[kill confirm]] starter when followed up with [[../Forward aerial|forward aerial]], [[../Back aerial|back aerial]], or [[../Up smash|up smash]], though the latter require a precise [[fast fall]]. It can also be combined with [[../Side special|Flame Choke]], covering neutral [[tech]] when on the ground and both neutral and [[Floor attack|getup attack]] with the aerial version. Its usage as an [[out of shield]] is niche, although it can be very effective against [[Dash attack|dash attacks]] or repeated use of [[down tilt]], such as against {{SSBU|R.O.B}}.
 
However, it is often outclassed in its edgeguarding role by [[../Neutral aerial|neutral aerial]] which lasts longer and cover more space with way less endlag, making Ganondorf less vulnerable if the move doesnt connect. Its use cases are also almost nonexistent in neutral due to its long startup and mediocre horizontal range, making it a very high risk high reward option limited to [[read|reads]] and setplay.
 
==Hitboxes==
==Hitboxes==
{{UltimateHitboxTableHeader}}
Line 70: Line 73:
===Landing lag===
===Landing lag===
{|class="wikitable"
{|class="wikitable"
!Interruptible
|17
|-
!Animation length
!Animation length
|16
|26
|}
|}


{{FrameStripStart}}
{{FrameStripStart}}
{{FrameStrip|t=Lag|c=16}}
{{FrameStrip|t=Lag|c=16}}{{FrameStrip|t=Interruptible|c=10}}
{{FrameStripEnd}}
{{FrameStripEnd}}


Latest revision as of 02:27, September 5, 2024

Hitbox visualization showing Ganondorf's down aerial.

Overview[edit]

Ganondorf stomps below him with electricity. It is his slowest aerial, but also his deadliest, with the sweetspot often being a guaranteed kill offstage, and the sourspot around Ganondorf's chest still killing earlier than both his forward and back aerial. It is able to start combos at low percent, with jab and grab being the main follow-ups, and at later percent with any aerial. It is also Ganondorf's prime kill confirm starter when followed up with forward aerial, back aerial, or up smash, though the latter require a precise fast fall. It can also be combined with Flame Choke, covering neutral tech when on the ground and both neutral and getup attack with the aerial version. Its usage as an out of shield is niche, although it can be very effective against dash attacks or repeated use of down tilt, such as against R.O.B.

However, it is often outclassed in its edgeguarding role by neutral aerial which lasts longer and cover more space with way less endlag, making Ganondorf less vulnerable if the move doesnt connect. Its use cases are also almost nonexistent in neutral due to its long startup and mediocre horizontal range, making it a very high risk high reward option limited to reads and setplay.

Hitboxes[edit]

ID Part Rehit rate Damage SD Angle Angle type BK KS FKV Set weight Radius Bone Offset SDI× T% Clang Rebound Effect Type G A Sound Direct Hit bits Hit part Blockable Reflectable Absorbable Flinchless No GFX Heedless
0 0 0 19.0% 0 AngleIcon270.png Standard 20 100 0 HitboxTableIcon(False).png 7.0 top 0.0 1.0 0.0 1.0× 1.0× 0% HitboxTableIcon(Clang).png HitboxTableIcon(Rebound).png Electric (effect) Foot (type) HitboxTableIcon(GroundedTrue).png HitboxTableIcon(AerialTrue).png L Fire SpecialsDirect.png All All HitboxTableIcon(Blockable).png HitboxTableIcon(Unreflectable).png HitboxTableIcon(Unabsorbable).png HitboxTableIcon(False).png HitboxTableIcon(False).png HitboxTableIcon(False).png
1 0 0 17.0% 0 Sakurai angle Standard 20 100 0 HitboxTableIcon(False).png 6.0 top 0.0 10.0 1.0 1.0× 1.0× 0% HitboxTableIcon(Clang).png HitboxTableIcon(Rebound).png Electric (effect) Foot (type) HitboxTableIcon(GroundedTrue).png HitboxTableIcon(AerialTrue).png L Fire SpecialsDirect.png All All HitboxTableIcon(Blockable).png HitboxTableIcon(Unreflectable).png HitboxTableIcon(Unabsorbable).png HitboxTableIcon(False).png HitboxTableIcon(False).png HitboxTableIcon(False).png

Timing[edit]

Attack[edit]

Initial autocancel 1-3
Hitboxes 16-18
Ending autocancel 32-
Interruptible 45
Animation length 59
FrameIcon(Lag).png FrameIcon(Lag).png FrameIcon(Lag).png FrameIcon(Lag).png FrameIcon(Lag).png FrameIcon(Lag).png FrameIcon(Lag).png FrameIcon(Lag).png FrameIcon(Lag).png FrameIcon(Lag).png FrameIcon(Lag).png FrameIcon(Lag).png FrameIcon(Lag).png FrameIcon(Lag).png FrameIcon(Lag).png FrameIcon(Hitbox).png FrameIcon(Hitbox).png FrameIcon(Hitbox).png FrameIcon(Lag).png FrameIcon(Lag).png FrameIcon(Lag).png FrameIcon(Lag).png FrameIcon(Lag).png FrameIcon(Lag).png FrameIcon(Lag).png FrameIcon(Lag).png FrameIcon(Lag).png FrameIcon(Lag).png FrameIcon(Lag).png FrameIcon(Lag).png FrameIcon(Lag).png FrameIcon(Lag).png FrameIcon(Lag).png FrameIcon(Lag).png FrameIcon(Lag).png FrameIcon(Lag).png FrameIcon(Lag).png FrameIcon(Lag).png FrameIcon(Lag).png FrameIcon(Lag).png FrameIcon(Lag).png FrameIcon(Lag).png FrameIcon(Lag).png FrameIcon(Lag).png FrameIcon(Interruptible).png FrameIcon(Interruptible).png FrameIcon(Interruptible).png FrameIcon(Interruptible).png FrameIcon(Interruptible).png FrameIcon(Interruptible).png FrameIcon(Interruptible).png FrameIcon(Interruptible).png FrameIcon(Interruptible).png FrameIcon(Interruptible).png FrameIcon(Interruptible).png FrameIcon(Interruptible).png FrameIcon(Interruptible).png FrameIcon(Interruptible).png FrameIcon(Interruptible).png
FrameIcon(Autocancel).png FrameIcon(Autocancel).png FrameIcon(Autocancel).png FrameIcon(Blank).png FrameIcon(Blank).png FrameIcon(Blank).png FrameIcon(Blank).png FrameIcon(Blank).png FrameIcon(Blank).png FrameIcon(Blank).png FrameIcon(Blank).png FrameIcon(Blank).png FrameIcon(Blank).png FrameIcon(Blank).png FrameIcon(Blank).png FrameIcon(Blank).png FrameIcon(Blank).png FrameIcon(Blank).png FrameIcon(Blank).png FrameIcon(Blank).png FrameIcon(Blank).png FrameIcon(Blank).png FrameIcon(Blank).png FrameIcon(Blank).png FrameIcon(Blank).png FrameIcon(Blank).png FrameIcon(Blank).png FrameIcon(Blank).png FrameIcon(Blank).png FrameIcon(Blank).png FrameIcon(Blank).png FrameIcon(Autocancel).png FrameIcon(Autocancel).png FrameIcon(Autocancel).png FrameIcon(Autocancel).png FrameIcon(Autocancel).png FrameIcon(Autocancel).png FrameIcon(Autocancel).png FrameIcon(Autocancel).png FrameIcon(Autocancel).png FrameIcon(Autocancel).png FrameIcon(Autocancel).png FrameIcon(Autocancel).png FrameIcon(Autocancel).png FrameIcon(Autocancel).png FrameIcon(Autocancel).png FrameIcon(Autocancel).png FrameIcon(Autocancel).png FrameIcon(Autocancel).png FrameIcon(Autocancel).png FrameIcon(Autocancel).png FrameIcon(Autocancel).png FrameIcon(Autocancel).png FrameIcon(Autocancel).png FrameIcon(Autocancel).png FrameIcon(Autocancel).png FrameIcon(Autocancel).png FrameIcon(Autocancel).png FrameIcon(Autocancel).png

Landing lag[edit]

Interruptible 17
Animation length 26
FrameIcon(Lag).png FrameIcon(Lag).png FrameIcon(Lag).png FrameIcon(Lag).png FrameIcon(Lag).png FrameIcon(Lag).png FrameIcon(Lag).png FrameIcon(Lag).png FrameIcon(Lag).png FrameIcon(Lag).png FrameIcon(Lag).png FrameIcon(Lag).png FrameIcon(Lag).png FrameIcon(Lag).png FrameIcon(Lag).png FrameIcon(Lag).png FrameIcon(Interruptible).png FrameIcon(Interruptible).png FrameIcon(Interruptible).png FrameIcon(Interruptible).png FrameIcon(Interruptible).png FrameIcon(Interruptible).png FrameIcon(Interruptible).png FrameIcon(Interruptible).png FrameIcon(Interruptible).png FrameIcon(Interruptible).png
Legend (1 square = 1 frame)
Lag
Lag time
Hitbox
Hitbox
Auto-canceling
Autocancel
Interruptibility
Interruptible