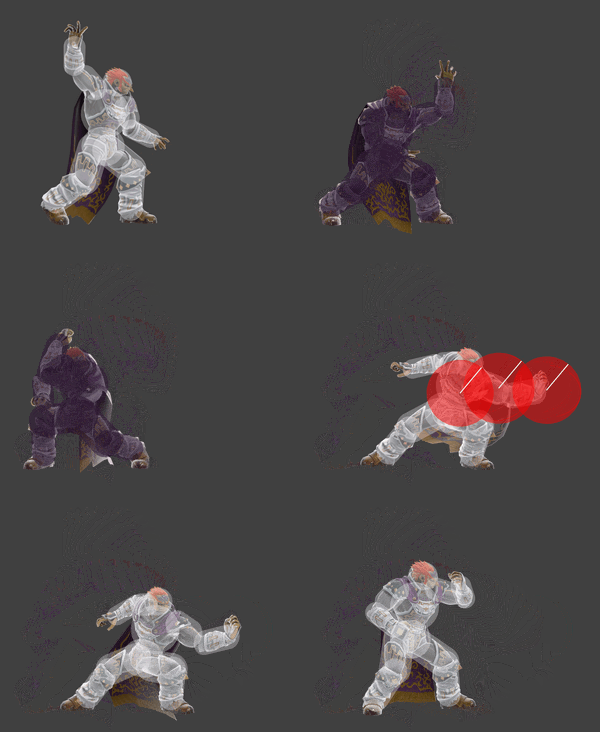
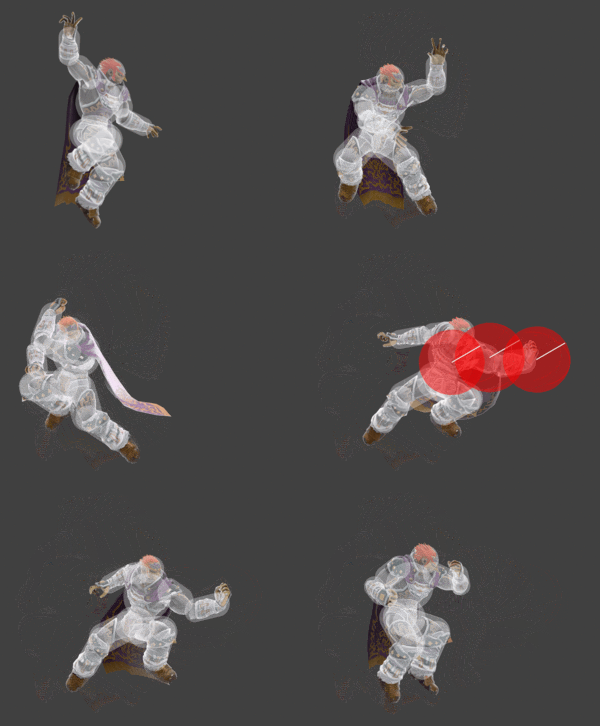
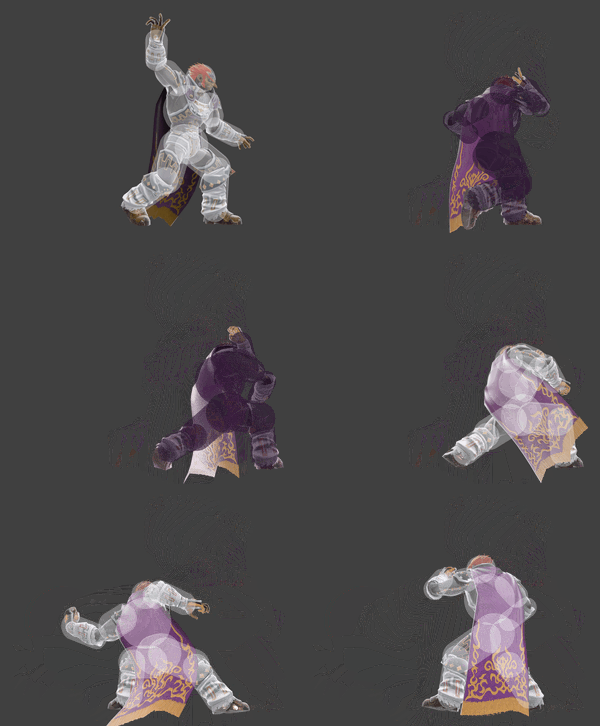
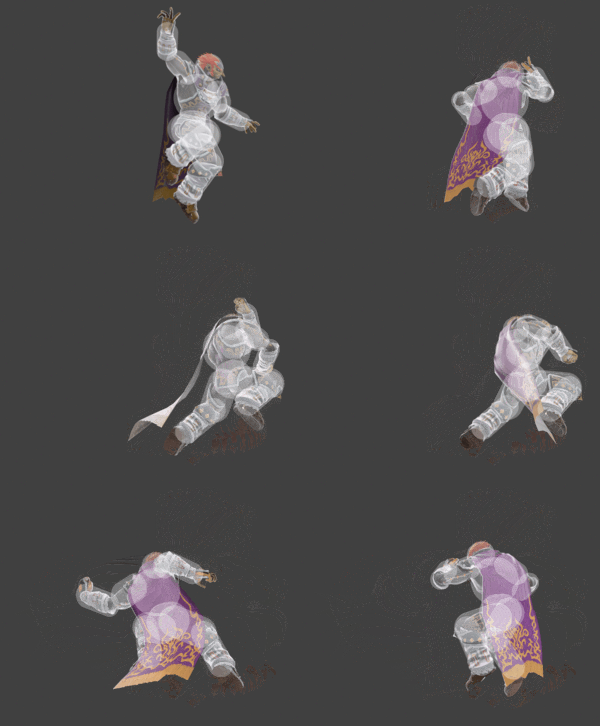
Ganondorf (SSBU)/Neutral special: Difference between revisions
(New Page: {{ArticleIcons|ssbu=y}} {{competitive expertise}} {| class="wikitable" style="float:right; margin:4pt;" |- !colspan=5| Ganondorf neutral special hitbox visualizations. |- ! Grounded ||...) |
m (Undid edit by 123.203.69.221: 1v1 and freshness) Tag: Undo |
||
| (14 intermediate revisions by 8 users not shown) | |||
| Line 1: | Line 1: | ||
{{ArticleIcons|ssbu=y}} | {{ArticleIcons|ssbu=y}} | ||
{{ | {{disambig2|the hitbox visualization in ''[[Super Smash Bros. Ultimate]]''|the move itself|Warlock Punch}} | ||
{| class="wikitable" style="float:right; margin:4pt;" | {| class="wikitable" style="float:right; margin:4pt;" | ||
|- | |- | ||
!colspan= | !colspan=2| Ganondorf neutral special hitbox visualizations. | ||
|- | |- | ||
! Grounded || Aerial | ! Grounded || Aerial | ||
| Line 9: | Line 9: | ||
| |[[File:GanondorfNSpecialGroundedSSBU.gif|300px]] || [[File:GanondorfNSpecialAerialSSBU.gif|300px]] | | |[[File:GanondorfNSpecialGroundedSSBU.gif|300px]] || [[File:GanondorfNSpecialAerialSSBU.gif|300px]] | ||
|- | |- | ||
! Grounded reversed || Aerial | ! Grounded reversed || Aerial reversed | ||
|- | |- | ||
| |[[File:GanondorfNSpecialGroundedReversedSSBU.gif|300px]] || [[File:GanondorfNSpecialAerialReversedSSBU.gif|300px]] | | |[[File:GanondorfNSpecialGroundedReversedSSBU.gif|300px]] || [[File:GanondorfNSpecialAerialReversedSSBU.gif|300px]] | ||
| Line 15: | Line 15: | ||
==Overview== | ==Overview== | ||
Ganondorf charges darkness into his left hand before delivering a devastating back-handed punch. | Ganondorf charges darkness into his left hand before delivering a devastating back-handed punch. This move may be appealing to use due to it being among the strongest attacks in the game, though its potential is dashed due to its considerable startup and endlag. Despite dealing heavy shield damage and Ganon being able to reverse the attack, nearby opponents who are conservative with their shield play will likely be able to punish him and follow up. This will cause him to be put in a disadvantage state, causing him to waste momentum. As a result, most players consider this attack to be his worst special move, and by extension, his worst move overall. | ||
==Hitboxes== | ==Hitboxes== | ||
Landing any hitbox produces a [[Special Zoom]]. | |||
===Grounded=== | |||
{{UltimateHitboxTableHeader}} | {{UltimateHitboxTableHeader}} | ||
{{HitboxTableTitle| | {{HitboxTableTitle|Normal|50}} | ||
{{UltimateHitboxTableRow | {{UltimateHitboxTableRow | ||
|id=0 | |id=0 | ||
|damage=30.0% | |damage=30.0% | ||
|angle=50 | |angle=50 | ||
|af=3 | |||
|bk=120 | |bk=120 | ||
|ks=46 | |ks=46 | ||
| Line 41: | Line 46: | ||
|damage=30.0% | |damage=30.0% | ||
|angle=50 | |angle=50 | ||
|af=3 | |||
|bk=120 | |bk=120 | ||
|ks=46 | |ks=46 | ||
| Line 56: | Line 62: | ||
}} | }} | ||
{{UltimateHitboxTableRow | {{UltimateHitboxTableRow | ||
|id= | |id=2 | ||
|damage=30.0% | |damage=30.0% | ||
|angle=50 | |angle=50 | ||
|af=3 | |||
|bk=120 | |bk=120 | ||
|ks=46 | |ks=46 | ||
| Line 73: | Line 80: | ||
|slvl=L | |slvl=L | ||
}} | }} | ||
{{HitboxTableTitle| | {{HitboxTableTitle|Reversed|50}} | ||
{{UltimateHitboxTableRow | {{UltimateHitboxTableRow | ||
|id=0 | |id=0 | ||
|damage= | |damage=37.0% | ||
|angle= | |angle=361 | ||
|af=3 | |||
|bk=30 | |bk=30 | ||
|ks=100 | |ks=100 | ||
| Line 94: | Line 102: | ||
{{UltimateHitboxTableRow | {{UltimateHitboxTableRow | ||
|id=1 | |id=1 | ||
|damage= | |damage=37.0% | ||
|angle= | |angle=361 | ||
|af=3 | |||
|bk=30 | |bk=30 | ||
|ks=100 | |ks=100 | ||
| Line 111: | Line 120: | ||
}} | }} | ||
{{UltimateHitboxTableRow | {{UltimateHitboxTableRow | ||
|id= | |id=2 | ||
|damage= | |damage=37.0% | ||
|angle= | |angle=361 | ||
|af=3 | |||
|bk=30 | |bk=30 | ||
|ks=100 | |ks=100 | ||
| Line 128: | Line 138: | ||
|slvl=L | |slvl=L | ||
}} | }} | ||
{{HitboxTableTitle| | |} | ||
===Aerial=== | |||
{{UltimateHitboxTableHeader}} | |||
{{HitboxTableTitle|Normal|50}} | |||
{{UltimateHitboxTableRow | {{UltimateHitboxTableRow | ||
|id=0 | |id=0 | ||
|damage= | |damage=38.0% | ||
|angle= | |angle=30 | ||
|af=3 | |||
|bk=30 | |bk=30 | ||
|ks=100 | |ks=100 | ||
| Line 149: | Line 164: | ||
{{UltimateHitboxTableRow | {{UltimateHitboxTableRow | ||
|id=1 | |id=1 | ||
|damage= | |damage=38.0% | ||
|angle= | |angle=30 | ||
|af=3 | |||
|bk=30 | |bk=30 | ||
|ks=100 | |ks=100 | ||
| Line 166: | Line 182: | ||
}} | }} | ||
{{UltimateHitboxTableRow | {{UltimateHitboxTableRow | ||
|id= | |id=2 | ||
|damage= | |damage=38.0% | ||
|angle= | |angle=30 | ||
|af=3 | |||
|bk=30 | |bk=30 | ||
|ks=100 | |ks=100 | ||
| Line 183: | Line 200: | ||
|slvl=L | |slvl=L | ||
}} | }} | ||
{{HitboxTableTitle| | {{HitboxTableTitle|Reversed|50}} | ||
{{UltimateHitboxTableRow | {{UltimateHitboxTableRow | ||
|id=0 | |id=0 | ||
|damage=40.0% | |damage=40.0% | ||
|angle=30 | |angle=30 | ||
|af=3 | |||
|bk=40 | |bk=40 | ||
|ks=100 | |ks=100 | ||
| Line 206: | Line 224: | ||
|damage=40.0% | |damage=40.0% | ||
|angle=30 | |angle=30 | ||
|af=3 | |||
|bk=40 | |bk=40 | ||
|ks=100 | |ks=100 | ||
| Line 221: | Line 240: | ||
}} | }} | ||
{{UltimateHitboxTableRow | {{UltimateHitboxTableRow | ||
|id= | |id=2 | ||
|damage=40.0% | |damage=40.0% | ||
|angle=30 | |angle=30 | ||
|af=3 | |||
|bk=40 | |bk=40 | ||
|ks=100 | |ks=100 | ||
| Line 239: | Line 259: | ||
}} | }} | ||
|} | |} | ||
===Differences for {{SSBU|Kirby}}'s [[Copy Ability]]=== | |||
*{{change|The hitboxes have different offsets (2.4u → 1.5u (ID 0 X offset), 0u/1u/1u → 1.1u/-0.3u/-0.4u (ID 1 X/Y/Z), 5u/0u/0u → 1u/-4u/1u (ID 2 X/Y/Z)), better matching Kirby's proportions.}} | |||
**{{change|The reverse versions' ID 0 and 2 hitboxes are also assigned to the opposite [[bone]]s ("shoulderl"/"arml" → "shoulderr"/"armr"), due to Kirby having [[stance mirroring]] unlike Ganondorf.}} | |||
==Timing== | ==Timing== | ||
=== | ===Normal=== | ||
The move can be reversed on frame 11. For the aerial version, the control stick is checked on frame 66 to apply vertical momentum in the chosen direction. | |||
{|class="wikitable" | {|class="wikitable" | ||
!Super | !Super armor (grounded only) | ||
|11-67 | |11-67 | ||
|- | |- | ||
| Line 255: | Line 281: | ||
|} | |} | ||
{{FrameStripStart}} | {{FrameStripStart}} | ||
!Hitboxes {{FrameStrip|t=Lag|c=69}}{{FrameStrip|t=Hitbox|c=4}}{{FrameStrip|t=Lag|c=44}}{{FrameStrip|t=Interruptible|c=13}} | |||
|- | |- | ||
!Grounded only {{FrameStrip|t=Vulnerable|c=10}}{{FrameStrip|t=Armour|c=57}}{{FrameStrip|t=Vulnerable|c=63}} | |||
{{FrameStripEnd}} | {{FrameStripEnd}} | ||
===Reversed=== | ===Reversed=== | ||
For the aerial version, the control stick is checked on frame 76 to apply vertical momentum in the chosen direction. | |||
{|class="wikitable" | {|class="wikitable" | ||
!Super | !Transition start | ||
|21- | |11 | ||
|- | |||
!Turnaround | |||
|21 | |||
|- | |||
!Super armor (grounded only) | |||
|21-74 | |||
|- | |- | ||
!Hitbox | !Hitbox | ||
| Line 275: | Line 308: | ||
|} | |} | ||
{{FrameStripStart}} | {{FrameStripStart}} | ||
!Hitboxes {{FrameStrip|t=Lag|c=10|e=LagStateS}}{{FrameStrip|t=Lag|c=10|s=LagStateE|e=LagStateS}}{{FrameStrip|t=Lag|c=59|s=LagStateE}}{{FrameStrip|t=Hitbox|c=4}}{{FrameStrip|t=Lag|c=44}}{{FrameStrip|t=Interruptible|c=13}} | |||
|- | |- | ||
!Grounded only {{FrameStrip|t=Vulnerable|c=10|e=VulnerableStateS}}{{FrameStrip|t=Vulnerable|c=10|s=VulnerableStateE}}{{FrameStrip|t=Armour|c=54}}{{FrameStrip|t=Vulnerable|c=66}} | |||
{{FrameStripEnd}} | {{FrameStripEnd}} | ||
{{FrameIconLegend|lag=y|hitbox=y|interruptible=y|vulnerable=y|armour=y}} | {{FrameIconLegend|lag=y|hitbox=y|interruptible=y|vulnerable=y|armour=y|state=y}} | ||
==Parameters== | |||
===Move=== | |||
{|class="wikitable" | |||
!Momentum forward | |||
|0.8 | |||
|- | |||
!Vertical boost in midair by stick input | |||
|0.5 | |||
|- | |||
!Travel angle with vertical boost | |||
|45° | |||
|} | |||
===Special Zoom=== | |||
{|class="wikitable" | |||
!Duration | |||
|40 frames (Ganondorf)<br>35 frames (Kirby) | |||
|- | |||
!Slowdown magnitude | |||
|2 | |||
|- | |||
!Zoom rate | |||
|4 (Ganondorf)<br>3.5 (Kirby) | |||
|- | |||
!Time before zoom | |||
|3 frames | |||
|- | |||
!Background duration (non-1v1) | |||
|30 frames | |||
|} | |||
{{MvSubNavGanondorf|g=SSBU}} | {{MvSubNavGanondorf|g=SSBU}} | ||
Latest revision as of 20:35, December 31, 2022
| Ganondorf neutral special hitbox visualizations. | |
|---|---|
| Grounded | Aerial |
 |

|
| Grounded reversed | Aerial reversed |
 |

|
Overview[edit]
Ganondorf charges darkness into his left hand before delivering a devastating back-handed punch. This move may be appealing to use due to it being among the strongest attacks in the game, though its potential is dashed due to its considerable startup and endlag. Despite dealing heavy shield damage and Ganon being able to reverse the attack, nearby opponents who are conservative with their shield play will likely be able to punish him and follow up. This will cause him to be put in a disadvantage state, causing him to waste momentum. As a result, most players consider this attack to be his worst special move, and by extension, his worst move overall.
Hitboxes[edit]
Landing any hitbox produces a Special Zoom.
Grounded[edit]
Aerial[edit]
Differences for Kirby's Copy Ability[edit]
 The hitboxes have different offsets (2.4u → 1.5u (ID 0 X offset), 0u/1u/1u → 1.1u/-0.3u/-0.4u (ID 1 X/Y/Z), 5u/0u/0u → 1u/-4u/1u (ID 2 X/Y/Z)), better matching Kirby's proportions.
 The reverse versions' ID 0 and 2 hitboxes are also assigned to the opposite bones ("shoulderl"/"arml" → "shoulderr"/"armr"), due to Kirby having stance mirroring unlike Ganondorf.
Timing[edit]
Normal[edit]
The move can be reversed on frame 11. For the aerial version, the control stick is checked on frame 66 to apply vertical momentum in the chosen direction.
| Super armor (grounded only) | 11-67 |
|---|---|
| Hitbox | 70-73 |
| Interruptible | 118 |
| Animation length | 130 |
| Hitboxes | ||||||||||||||||||||||||||||||||||||||||||||||||||||||||||||||||||||||||||||||||||||||||||||||||||||||||||||||||||||||||||||||||||
|---|---|---|---|---|---|---|---|---|---|---|---|---|---|---|---|---|---|---|---|---|---|---|---|---|---|---|---|---|---|---|---|---|---|---|---|---|---|---|---|---|---|---|---|---|---|---|---|---|---|---|---|---|---|---|---|---|---|---|---|---|---|---|---|---|---|---|---|---|---|---|---|---|---|---|---|---|---|---|---|---|---|---|---|---|---|---|---|---|---|---|---|---|---|---|---|---|---|---|---|---|---|---|---|---|---|---|---|---|---|---|---|---|---|---|---|---|---|---|---|---|---|---|---|---|---|---|---|---|---|---|
| Grounded only |
Reversed[edit]
For the aerial version, the control stick is checked on frame 76 to apply vertical momentum in the chosen direction.
| Transition start | 11 |
|---|---|
| Turnaround | 21 |
| Super armor (grounded only) | 21-74 |
| Hitbox | 80-83 |
| Interruptible | 128 |
| Animation length | 140 |
| Hitboxes | ||||||||||||||||||||||||||||||||||||||||||||||||||||||||||||||||||||||||||||||||||||||||||||||||||||||||||||||||||||||||||||||||||||||||||||
|---|---|---|---|---|---|---|---|---|---|---|---|---|---|---|---|---|---|---|---|---|---|---|---|---|---|---|---|---|---|---|---|---|---|---|---|---|---|---|---|---|---|---|---|---|---|---|---|---|---|---|---|---|---|---|---|---|---|---|---|---|---|---|---|---|---|---|---|---|---|---|---|---|---|---|---|---|---|---|---|---|---|---|---|---|---|---|---|---|---|---|---|---|---|---|---|---|---|---|---|---|---|---|---|---|---|---|---|---|---|---|---|---|---|---|---|---|---|---|---|---|---|---|---|---|---|---|---|---|---|---|---|---|---|---|---|---|---|---|---|---|
| Grounded only |
Lag time |
Hitbox |
Vulnerable |
State change |
Armour |
Interruptible |
Parameters[edit]
Move[edit]
| Momentum forward | 0.8 |
|---|---|
| Vertical boost in midair by stick input | 0.5 |
| Travel angle with vertical boost | 45° |
Special Zoom[edit]
| Duration | 40 frames (Ganondorf) 35 frames (Kirby) |
|---|---|
| Slowdown magnitude | 2 |
| Zoom rate | 4 (Ganondorf) 3.5 (Kirby) |
| Time before zoom | 3 frames |
| Background duration (non-1v1) | 30 frames |
|