Ness (SSB4)/Down throw: Difference between revisions
From SmashWiki, the Super Smash Bros. wiki
Jump to navigationJump to search
UltraNessDX (talk | contribs) No edit summary |
SuperSqank (talk | contribs) m (→Update history) |
||
| (5 intermediate revisions by 2 users not shown) | |||
| Line 2: | Line 2: | ||
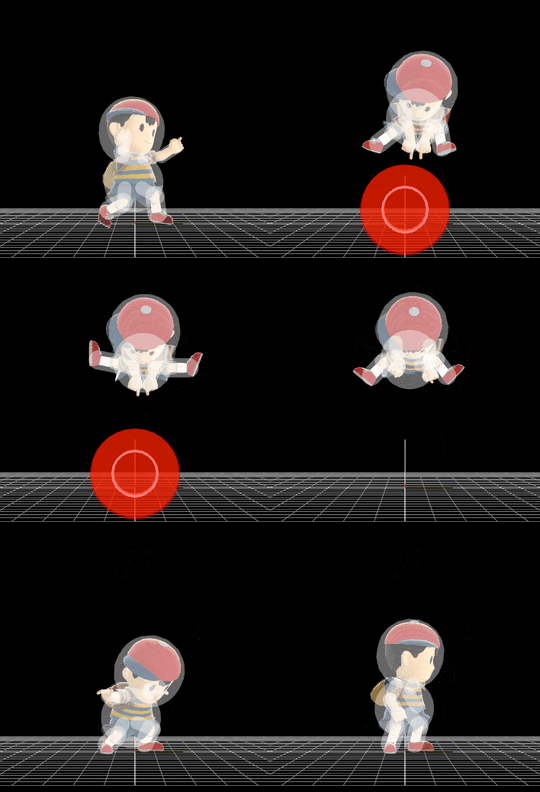
[[File:NussThrowDown.gif|thumb|270px|Hitbox visualization showing Ness's down throw.]] | [[File:NussThrowDown.gif|thumb|270px|Hitbox visualization showing Ness's down throw.]] | ||
{{competitive expertise}} | {{competitive expertise}} | ||
==Overview== | ==Overview== | ||
Ness shoves his opponent into the ground, produces 5 fire rings which attack the opponent and then he throws the opponent diagonally forward. Combos into forward aerial and up aerial at lower percents, and leaves the opponent open to juggling at higher percents. | |||
==Update history== | |||
In the initial release of the game, down throw was identical to its ''Brawl'' counterpart, much like all of Ness' other throws. This made it a powerful combo throw regardless of the opponent's percent. This was quickly changed in update [[1.0.4]] however, as the fire hits deal less damage and the throw deals more knockback at higher percents, reducing its damage racking potential, as well as its followup potential at higher percents. | |||
'''{{GameIcon|ssb4-3ds}} [[1.0.4]]/{{GameIcon|ssb4-wiiu}} 1.0.1''' | |||
*{{nerf|The fire hits deal less damage (1% → 0.6%), making the throw deal less damage overall (9% → 7%).}} | |||
{| | *{{nerf|Down throw deals more knockback (90 (base), 30 (scaling) → 70/80), significantly hindering its followup potential at higher percents.}} | ||
|- | |||
| | |||
== | ==Throw and Hitbox Data== | ||
===Hitboxes=== | |||
Loops five times. | Loops five times. | ||
| Line 67: | Line 65: | ||
|} | |} | ||
===Throw=== | |||
{{SSB4ThrowTableHeader}} | |||
{{SSB4ThrowTableRow | |||
|id=0 | |||
|damage=4% | |||
|af=3 | |||
|angle=70 | |||
|bk=70 | |||
|ks=80 | |||
|fkv=0 | |||
|bn=0 | |||
|noff=true | |||
|trip=0 | |||
|type=Throwing | |||
|effect=Normal | |||
|slvl=S | |||
|sfx=None | |||
}} | |||
{{SSB4ThrowTableRow | |||
|id=1 | |||
|damage=3% | |||
|af=3 | |||
|angle=361 | |||
|bk=60 | |||
|ks=100 | |||
|fkv=0 | |||
|bn=0 | |||
|noff=true | |||
|trip=0 | |||
|type=Throwing | |||
|effect=Normal | |||
|slvl=S | |||
|sfx=None | |||
}} | |||
|} | |||
==Timing== | |||
{|class="wikitable" | |||
!Invincibility | |||
|1-18 | |||
|- | |||
!Hitboxes | |||
|10-13, 14-17, 18-21, 22-25, 26-29 | |||
|- | |||
!Throw Release | |||
|30 | |||
|- | |||
!Animation length | |||
|49 | |||
|- | |||
!Interruptible | |||
|50 | |||
|} | |||
{{FrameStripStart}} | |||
{{FrameStrip|t=Lag|c=9}}{{FrameStrip|t=Hitbox|c=4|e=HitboxChangeS}}{{FrameStrip|t=Hitbox|c=4|s=HitboxChangeE|e=HitboxChangeS}}{{FrameStrip|t=Hitbox|c=4|s=HitboxChangeE|e=HitboxChangeS}}{{FrameStrip|t=Hitbox|c=4|s=HitboxChangeE|e=HitboxChangeS}}{{FrameStrip|t=Hitbox|c=4|s=HitboxChangeE|e=HitboxThrowS}}{{FrameStrip|t=Lag|c=20|s=LagThrowE}} | |||
|- | |||
{{FrameStrip|t=Invincible|c=18}}{{FrameStrip|t=Vulnerable|c=31}} | |||
{{FrameStripEnd}} | |||
{{FrameIconLegend|lag=y|hitbox=y|hitboxchange=y|throw=y|vulnerable=y|invincible=y}} | |||
{{MvSubNavNess|g=SSB4}} | {{MvSubNavNess|g=SSB4}} | ||
[[Category:Ness (SSB4)]] | [[Category:Ness (SSB4)]] | ||
[[Category:Down throws (SSB4)]] | [[Category:Down throws (SSB4)]] | ||
Latest revision as of 06:40, February 12, 2023
Overview[edit]
Ness shoves his opponent into the ground, produces 5 fire rings which attack the opponent and then he throws the opponent diagonally forward. Combos into forward aerial and up aerial at lower percents, and leaves the opponent open to juggling at higher percents.
Update history[edit]
In the initial release of the game, down throw was identical to its Brawl counterpart, much like all of Ness' other throws. This made it a powerful combo throw regardless of the opponent's percent. This was quickly changed in update 1.0.4 however, as the fire hits deal less damage and the throw deals more knockback at higher percents, reducing its damage racking potential, as well as its followup potential at higher percents.
![]() 1.0.4/
1.0.4/![]() 1.0.1
1.0.1
 The fire hits deal less damage (1% → 0.6%), making the throw deal less damage overall (9% → 7%).
 Down throw deals more knockback (90 (base), 30 (scaling) → 70/80), significantly hindering its followup potential at higher percents.
Throw and Hitbox Data[edit]
Hitboxes[edit]
Loops five times.
Throw[edit]
| ID | Damage | Angle | BK | KS | FKV | Bone | FFx | Type | Effect | Sound | |
|---|---|---|---|---|---|---|---|---|---|---|---|
| 0 | 4% | Forwards | 70 | 80 | 0 | 0 | None | ||||
| 1 | 3% | Forwards | 60 | 100 | 0 | 0 | None | ||||
Timing[edit]
| Invincibility | 1-18 |
|---|---|
| Hitboxes | 10-13, 14-17, 18-21, 22-25, 26-29 |
| Throw Release | 30 |
| Animation length | 49 |
| Interruptible | 50 |
Lag time |
Hitbox |
Hitbox change |
Vulnerable |
Invincible |
Throw point |
|

