Super Smash Bros. Melee

Fox (SSBM)/Neutral special: Difference between revisions

From SmashWiki, the Super Smash Bros. wiki
Jump to navigationJump to search
No edit summary
Line 15: Line 15:
|ks=0
|ks=0
|fkv=0
|fkv=0
|r=1.2
|r=300
|bn=0
|bn=0
|zpos=-0.8
|zpos=-200
|clang=0
|clang=0
|rebound=0
|rebound=0
Line 35: Line 35:
|ks=0
|ks=0
|fkv=0
|fkv=0
|r=1.2
|r=300
|bn=0
|bn=0
|zpos=-3.732
|zpos=-933
|clang=0
|clang=0
|rebound=0
|rebound=0
Line 55: Line 55:
|ks=0
|ks=0
|fkv=0
|fkv=0
|r=1.2
|r=300
|bn=0
|bn=0
|zpos=-6.664
|zpos=-1666
|clang=0
|clang=0
|rebound=0
|rebound=0
Line 75: Line 75:
|ks=0
|ks=0
|fkv=0
|fkv=0
|r=1.6
|r=400
|bn=0
|bn=0
|zpos=-14.4
|zpos=-3600
|clang=0
|clang=0
|rebound=0
|rebound=0

Revision as of 14:36, March 21, 2014

Overview

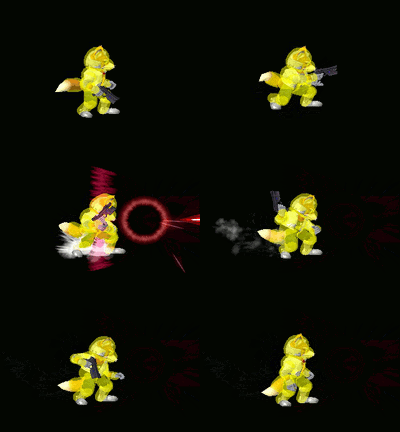
The hitbox of Fox's Blaster, used on the ground.
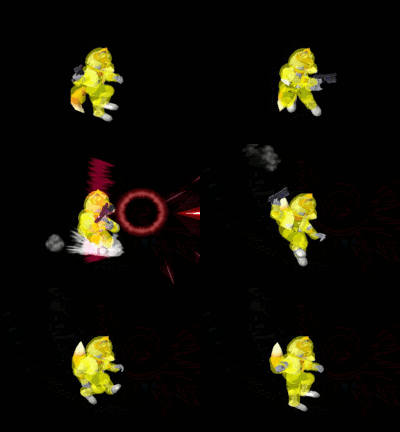
The hitbox of Fox's Blaster, used in the air.

Fox's Blaster can fire red lasers at opponents. The effects of the shots have changed from Smash 64, having a faster firing rate and an increased traveling speed of the lasers, but the blaster has no hitstun or ability to flinch opponents, making it unable to stop approaches. However, players can still make use of its long range to projectile camp, potentially racking up damage from a distance. Fox can also perform the short hop laser technique so he can draw his blaster quicker and reduce the ending lag; he can also move around slightly while doing so. Other similar techniques include short hop double laser, ledgehopped double laser, and wavelanded laser, albeit requiring consistently fast reflexes to do due to Fox's very quick short hop.

Hitboxes

ID Part Damage SD Angle BK KS FKV Radius Bone Offset Clang Rebound Effect G A Sound Blockable Reflectable Absorbable
0 0 3% 0 Sakurai angle 0 0 0 1.1718 0 0.0 0.0 -0.7812 HitboxTableIcon(NoClang).png HitboxTableIcon(NoRebound).png Normal (effect) HitboxTableIcon(GroundedTrue).png HitboxTableIcon(AerialTrue).png S Punch HitboxTableIcon(Blockable).png HitboxTableIcon(Reflectable).png HitboxTableIcon(Absorbable).png
1 0 3% 0 Sakurai angle 0 0 0 1.1718 0 0.0 0.0 -3.644298 HitboxTableIcon(NoClang).png HitboxTableIcon(NoRebound).png Normal (effect) HitboxTableIcon(GroundedTrue).png HitboxTableIcon(AerialTrue).png S Punch HitboxTableIcon(Blockable).png HitboxTableIcon(Reflectable).png HitboxTableIcon(Absorbable).png
2 0 3% 0 Sakurai angle 0 0 0 1.1718 0 0.0 0.0 -6.507396 HitboxTableIcon(NoClang).png HitboxTableIcon(NoRebound).png Normal (effect) HitboxTableIcon(GroundedTrue).png HitboxTableIcon(AerialTrue).png S Punch HitboxTableIcon(Blockable).png HitboxTableIcon(Reflectable).png HitboxTableIcon(Absorbable).png
3 0 3% 0 Sakurai angle 0 0 0 1.5624 0 0.0 0.0 -14.0616 HitboxTableIcon(NoClang).png HitboxTableIcon(NoRebound).png Normal (effect) HitboxTableIcon(GroundedTrue).png HitboxTableIcon(AerialTrue).png S Punch HitboxTableIcon(Blockable).png HitboxTableIcon(Reflectable).png HitboxTableIcon(Absorbable).png

Timing

Ground

First loop frame 7
Repeat window 4-16
Shot 12
Last loop frame 16
Animation length 40
FrameIcon(Lag).png FrameIcon(Lag).png FrameIcon(Lag).png FrameIcon(Lag).png FrameIcon(Lag).png FrameIcon(LagLoopS).png FrameIcon(LagLoopE).png FrameIcon(Lag).png FrameIcon(Lag).png FrameIcon(Lag).png FrameIcon(LagPropS).png FrameIcon(LagPropE).png FrameIcon(Lag).png FrameIcon(Lag).png FrameIcon(Lag).png FrameIcon(LagLoopS).png FrameIcon(LagLoopE).png FrameIcon(Lag).png FrameIcon(Lag).png FrameIcon(Lag).png FrameIcon(Lag).png FrameIcon(Lag).png FrameIcon(Lag).png FrameIcon(Lag).png FrameIcon(Lag).png FrameIcon(Lag).png FrameIcon(Lag).png FrameIcon(Lag).png FrameIcon(Lag).png FrameIcon(Lag).png FrameIcon(Lag).png FrameIcon(Lag).png FrameIcon(Lag).png FrameIcon(Lag).png FrameIcon(Lag).png FrameIcon(Lag).png FrameIcon(Lag).png FrameIcon(Lag).png FrameIcon(Lag).png FrameIcon(Lag).png
FrameIcon(Blank).png FrameIcon(Blank).png FrameIcon(Blank).png FrameIcon(Continuable).png FrameIcon(Continuable).png FrameIcon(ContinuableLoopS).png FrameIcon(ContinuableLoopE).png FrameIcon(Continuable).png FrameIcon(Continuable).png FrameIcon(Continuable).png FrameIcon(Continuable).png FrameIcon(Continuable).png FrameIcon(Continuable).png FrameIcon(Continuable).png FrameIcon(Continuable).png FrameIcon(ContinuableLoopS).png FrameIcon(BlankLoopE).png FrameIcon(Blank).png FrameIcon(Blank).png FrameIcon(Blank).png FrameIcon(Blank).png FrameIcon(Blank).png FrameIcon(Blank).png FrameIcon(Blank).png FrameIcon(Blank).png FrameIcon(Blank).png FrameIcon(Blank).png FrameIcon(Blank).png FrameIcon(Blank).png FrameIcon(Blank).png FrameIcon(Blank).png FrameIcon(Blank).png FrameIcon(Blank).png FrameIcon(Blank).png FrameIcon(Blank).png FrameIcon(Blank).png FrameIcon(Blank).png FrameIcon(Blank).png FrameIcon(Blank).png FrameIcon(Blank).png

Air

First loop frame 4
Repeat window 4-14
Shot 10
Last loop frame 14
Animation length 36