Brightness: Difference between revisions
mNo edit summary |
m (→Overview) |
||
| (3 intermediate revisions by 2 users not shown) | |||
| Line 1: | Line 1: | ||
{{ArticleIcons|ultimate=y}} | {{ArticleIcons|ultimate=y}} | ||
[[File:BrightnessSSBU.jpg|thumb|200px|Brightness in ''[[Super Smash Bros. Ultimate]]'']] | [[File:BrightnessSSBU.jpg|thumb|200px|Brightness in ''[[Super Smash Bros. Ultimate]]'']] | ||
The '''Brightness''' option in the | The '''Brightness''' option in the {{uv|Super Smash Bros.}} series was first introduced in ''[[Super Smash Bros. Ultimate]]'', under the Options menu. This allows the player to adjust the brightness of the screen. | ||
== | ==Overview== | ||
In ''Ultimate'', the player can create different brightness settings for whether the [[Nintendo Switch]] is in TV-Mode or Handheld-Mode, automatically changing if the system is | In ''Ultimate'', the player can create different brightness settings for whether the [[Nintendo Switch]] is in TV-Mode or Handheld-Mode, automatically changing to the relevant option if the system is inserted into or removed from the dock. This is primarily meant to create an optimal visual experience for different types of screen and lighting conditions, as well as provide a more comfortable experience for players with vision-related conditions and disabilities. Brightness is adjusted with a slider that adjusts numerically, from 0 being darkest to 100 being brightest, with a default brightness of 50. A still image of {{SSBU|Mario}} and {{SSBU|Bowser}} fighting on {{SSBU|Battlefield}} and a greyscale spectrum of the [[Super Smash Bros. logo]] is used to easily compare different brightness settings. Pressing [[X button|X]] will reset the brightness slider to 50, and pressing [[Y button|Y]] will fullscreen the still image for a better comparison. Clicking the yellow "OK" button or pressing [[+ button|+]] will save all adjustments and apply them automatically. | ||
==Gallery== | ==Gallery== | ||
<gallery> | <gallery> | ||
BrightnessImageSSBU.jpg|The screenshot | BrightnessImageSSBU.jpg|The screenshot used for reference to test brightness. | ||
</gallery> | </gallery> | ||
Latest revision as of 21:46, October 1, 2024

The Brightness option in the Super Smash Bros. series was first introduced in Super Smash Bros. Ultimate, under the Options menu. This allows the player to adjust the brightness of the screen.
Overview[edit]
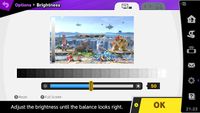
In Ultimate, the player can create different brightness settings for whether the Nintendo Switch is in TV-Mode or Handheld-Mode, automatically changing to the relevant option if the system is inserted into or removed from the dock. This is primarily meant to create an optimal visual experience for different types of screen and lighting conditions, as well as provide a more comfortable experience for players with vision-related conditions and disabilities. Brightness is adjusted with a slider that adjusts numerically, from 0 being darkest to 100 being brightest, with a default brightness of 50. A still image of Mario and Bowser fighting on Battlefield and a greyscale spectrum of the Super Smash Bros. logo is used to easily compare different brightness settings. Pressing X will reset the brightness slider to 50, and pressing Y will fullscreen the still image for a better comparison. Clicking the yellow "OK" button or pressing + will save all adjustments and apply them automatically.
Gallery[edit]
See also[edit]
