Super Smash Bros. Brawl

Sheik (SSBB)/Forward throw: Difference between revisions

From SmashWiki, the Super Smash Bros. wiki
Jump to navigationJump to search
No edit summary
 
(One intermediate revision by one other user not shown)
Line 1: Line 1:
{{ArticleIcons|ssbb=y}}
 
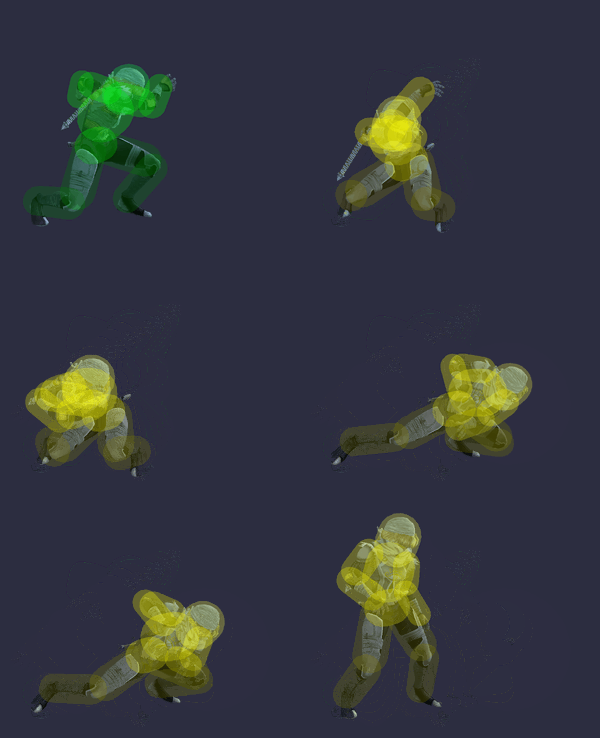
[[File:SheikFThrowSSBB.gif|thumb|300px|Hitbox visualization showing Sheik's forward throw.]]
==Overview==
==Overview==
{{competitive expertise}}
Line 38: Line 38:
|fkv=0
|fkv=0
|bn=0
|bn=0
|noff=false
|noff=true
|trip=0
|trip=0
|ff=60000
|ff=60000
Line 56: Line 56:
|fkv=0
|fkv=0
|bn=0
|bn=0
|noff=false
|noff=true
|trip=0
|trip=0
|ff=60000
|ff=60000

Latest revision as of 21:32, May 27, 2024

Hitbox visualization showing Sheik's forward throw.

Overview[edit]

Competitive.png This article or section may require competitive expertise.
You can discuss this issue on the talk page or edit this page to improve it.

Throw and Hitbox Data[edit]

Hitbox[edit]

ID Part Rehit rate Damage SD Angle BK KS FKV Radius Bone Offset SDIx T% Clang Rebound Type Effect G A Sound Direct Blockable Reflectable Absorbable Flinchless Heedless Piercing Strechy ?2 ?5 ?6 ?11 Hit Bits
0 0 0 5% 1 Sakurai angle Forwards 0 0 80 5.8 18 0.0 0.0 0.0 1.0x 1.0x 0% HitboxTableIcon(NoClang).png HitboxTableIcon(NoRebound).png Body (type) Normal (effect) HitboxTableIcon(GroundedTrue).png HitboxTableIcon(AerialTrue).png M Kick SpecialsDirect.png HitboxTableIcon(Blockable).png HitboxTableIcon(Unreflectable).png HitboxTableIcon(Unabsorbable).png HitboxTableIcon(False).png HitboxTableIcon(False).png HitboxTableIcon(False).png HitboxTableIcon(False).png HitboxTableIcon(False).png HitboxTableIcon(True).png HitboxTableIcon(False).png HitboxTableIcon(False).png 11111111111111

Throw[edit]

ID Damage Angle BK KS FKV Bone SDIx FFx T% Type Effect Sound
0 2% AngleIcon70.png Forwards 80 65 0 0 1.0x None 0% Throwing (type) Normal (effect) S None
1 3% AngleIcon60.png Forwards 40 100 0 0 1.0x None 0% Throwing (type) Normal (effect) S None

Timing[edit]

Invincibility 1-8
Hitbox 20
Throw Release 21
Animation length 39
FrameIcon(Lag).png FrameIcon(Lag).png FrameIcon(Lag).png FrameIcon(Lag).png FrameIcon(Lag).png FrameIcon(Lag).png FrameIcon(Lag).png FrameIcon(Lag).png FrameIcon(Lag).png FrameIcon(Lag).png FrameIcon(Lag).png FrameIcon(Lag).png FrameIcon(Lag).png FrameIcon(Lag).png FrameIcon(Lag).png FrameIcon(Lag).png FrameIcon(Lag).png FrameIcon(Lag).png FrameIcon(HitboxThrowS).png FrameIcon(LagThrowE).png FrameIcon(Lag).png FrameIcon(Lag).png FrameIcon(Lag).png FrameIcon(Lag).png FrameIcon(Lag).png FrameIcon(Lag).png FrameIcon(Lag).png FrameIcon(Lag).png FrameIcon(Lag).png FrameIcon(Lag).png FrameIcon(Lag).png FrameIcon(Lag).png FrameIcon(Lag).png FrameIcon(Lag).png FrameIcon(Lag).png FrameIcon(Lag).png FrameIcon(Lag).png FrameIcon(Lag).png FrameIcon(Lag).png
FrameIcon(Invincible).png FrameIcon(Invincible).png FrameIcon(Invincible).png FrameIcon(Invincible).png FrameIcon(Invincible).png FrameIcon(Invincible).png FrameIcon(Invincible).png FrameIcon(Invincible).png FrameIcon(Vulnerable).png FrameIcon(Vulnerable).png FrameIcon(Vulnerable).png FrameIcon(Vulnerable).png FrameIcon(Vulnerable).png FrameIcon(Vulnerable).png FrameIcon(Vulnerable).png FrameIcon(Vulnerable).png FrameIcon(Vulnerable).png FrameIcon(Vulnerable).png FrameIcon(Vulnerable).png FrameIcon(Vulnerable).png FrameIcon(Vulnerable).png FrameIcon(Vulnerable).png FrameIcon(Vulnerable).png FrameIcon(Vulnerable).png FrameIcon(Vulnerable).png FrameIcon(Vulnerable).png FrameIcon(Vulnerable).png FrameIcon(Vulnerable).png FrameIcon(Vulnerable).png FrameIcon(Vulnerable).png FrameIcon(Vulnerable).png FrameIcon(Vulnerable).png FrameIcon(Vulnerable).png FrameIcon(Vulnerable).png FrameIcon(Vulnerable).png FrameIcon(Vulnerable).png FrameIcon(Vulnerable).png FrameIcon(Vulnerable).png FrameIcon(Vulnerable).png
Legend (1 square = 1 frame)
Lag
Lag time
Hitbox
Hitbox
FrameIcon(Vulnerable).png
Vulnerable
Invincibility
Invincible
ThrowThrow
Throw point