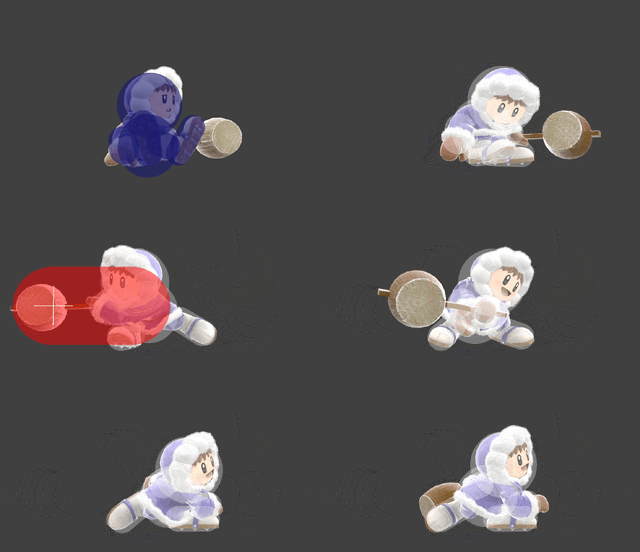
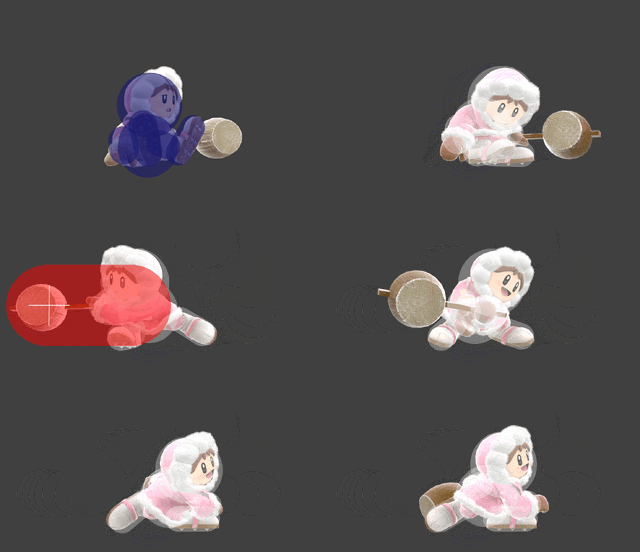
Ice Climbers (SSBU)/Floor attack (trip): Difference between revisions
From SmashWiki, the Super Smash Bros. wiki
Jump to navigationJump to search
(Created page with "{{ArticleIcons|ssbu=y}} thumb|450px|Hitbox visualization showing Popo's getup attack when tripped. File:NanaTripAttackSSBU.gif|thumb|450px|Hi...") |
m (Competitive expertise no longer needed!) |
||
| (5 intermediate revisions by 5 users not shown) | |||
| Line 1: | Line 1: | ||
{{ArticleIcons|ssbu=y}} | {{ArticleIcons|ssbu=y}} | ||
[[File:PopoTripAttackSSBU.gif|thumb| | [[File:PopoTripAttackSSBU.gif|thumb|320px|Hitbox visualization showing Popo's getup attack when tripped.]] | ||
[[File:NanaTripAttackSSBU.gif|thumb| | [[File:NanaTripAttackSSBU.gif|thumb|320px|Hitbox visualization showing Nana's getup attack when tripped.]] | ||
==Overview== | ==Overview== | ||
Each of the duo gets up and swings their mallet side to side. With the help of a partner, it can hit several times for high damage and even break shields. | |||
By tripping, the climbers can be desynced, turning a would-be opening into an opportunity. It largely invalidates moves such as [[Diddy Kong (SSBU)/Down special|Banana Peel]] and [[R.O.B. (SSBU)/Down tilt|R.O.B.'s down tilt]] because the climber that tripped can use their getup attack while counting on their teammate to cover for them with a variety of other moves. | |||
Without a partner, it seems to be your average tripped floor attack. | |||
==Hitboxes== | ==Hitboxes== | ||
===Leader=== | ===Leader=== | ||
{{UltimateHitboxTableHeader}} | {{UltimateHitboxTableHeader}} | ||
{{HitboxTableTitle|Hit 1| | {{HitboxTableTitle|Hit 1|50}} | ||
{{UltimateHitboxTableRow | {{UltimateHitboxTableRow | ||
|id=0 | |id=0 | ||
| Line 13: | Line 18: | ||
|sd=8.0 | |sd=8.0 | ||
|angle=361 | |angle=361 | ||
|bk= | |bk=60 | ||
|ks= | |ks=50 | ||
|fkv=0 | |fkv=0 | ||
|r=4.5 | |r=4.5 | ||
| Line 29: | Line 34: | ||
|rebound=f | |rebound=f | ||
}} | }} | ||
{{HitboxTableTitle|Hit 2| | {{HitboxTableTitle|Hit 2|50}} | ||
{{UltimateHitboxTableRow | {{UltimateHitboxTableRow | ||
|id=0 | |id=0 | ||
| Line 35: | Line 40: | ||
|sd=8.0 | |sd=8.0 | ||
|angle=361 | |angle=361 | ||
|bk= | |bk=60 | ||
|ks= | |ks=50 | ||
|fkv=0 | |fkv=0 | ||
|r=4.5 | |r=4.5 | ||
| Line 53: | Line 58: | ||
|} | |} | ||
===Partner=== | ===Partner=== | ||
The hitboxes have two possible X offsets depending on whether the partner is facing right or left (respectively), preventing issues with the Z-axis. | |||
{{UltimateHitboxTableHeader}} | {{UltimateHitboxTableHeader}} | ||
{{HitboxTableTitle|Hit 1| | {{HitboxTableTitle|Hit 1|50}} | ||
{{UltimateHitboxTableRow | {{UltimateHitboxTableRow | ||
|id=0 | |id=0 | ||
| Line 60: | Line 66: | ||
|sd=8.0 | |sd=8.0 | ||
|angle=361 | |angle=361 | ||
|bk= | |bk=60 | ||
|ks= | |ks=50 | ||
|fkv=0 | |fkv=0 | ||
|r=4.5 | |r=4.5 | ||
| Line 76: | Line 82: | ||
|rebound=f | |rebound=f | ||
}} | }} | ||
{{HitboxTableTitle|Hit 2| | {{HitboxTableTitle|Hit 2|50}} | ||
{{UltimateHitboxTableRow | {{UltimateHitboxTableRow | ||
|id=0 | |id=0 | ||
| Line 82: | Line 88: | ||
|sd=8.0 | |sd=8.0 | ||
|angle=361 | |angle=361 | ||
|bk= | |bk=60 | ||
|ks= | |ks=50 | ||
|fkv=0 | |fkv=0 | ||
|r=4.5 | |r=4.5 | ||
| Line 123: | Line 129: | ||
{{FrameStripEnd}} | {{FrameStripEnd}} | ||
{{FrameIconLegend|lag | {{FrameIconLegend|lag=y|hitbox=y|intangible=y|vulnerable=y|interruptible=y}} | ||
{{MvSubNavIceClimbers|g=SSBU}} | {{MvSubNavIceClimbers|g=SSBU}} | ||
[[Category:Ice Climbers (SSBU)]] | [[Category:Ice Climbers (SSBU)]] | ||
[[Category: | [[Category:Floor attacks (SSBU)]] | ||
Latest revision as of 14:07, May 23, 2024
Overview[edit]
Each of the duo gets up and swings their mallet side to side. With the help of a partner, it can hit several times for high damage and even break shields.
By tripping, the climbers can be desynced, turning a would-be opening into an opportunity. It largely invalidates moves such as Banana Peel and R.O.B.'s down tilt because the climber that tripped can use their getup attack while counting on their teammate to cover for them with a variety of other moves.
Without a partner, it seems to be your average tripped floor attack.
Hitboxes[edit]
Leader[edit]
Partner[edit]
The hitboxes have two possible X offsets depending on whether the partner is facing right or left (respectively), preventing issues with the Z-axis.
Timing[edit]
| Intangibility | 1-7 |
|---|---|
| Hit 1 | 19-20 |
| Hit 2 | 31-32 |
| Interruptible | 50 |
| Animation length | 61 |
Lag time |
Hitbox |
Vulnerable |
Intangible |
Interruptible |
|

