Super Smash Bros. Brawl

Mario (SSBB)/Down smash: Difference between revisions

From SmashWiki, the Super Smash Bros. wiki
Jump to navigationJump to search
No edit summary
 
(One intermediate revision by one other user not shown)
Line 1: Line 1:
{{ArticleIcons|ssbb=y}}
{{competitive expertise}}
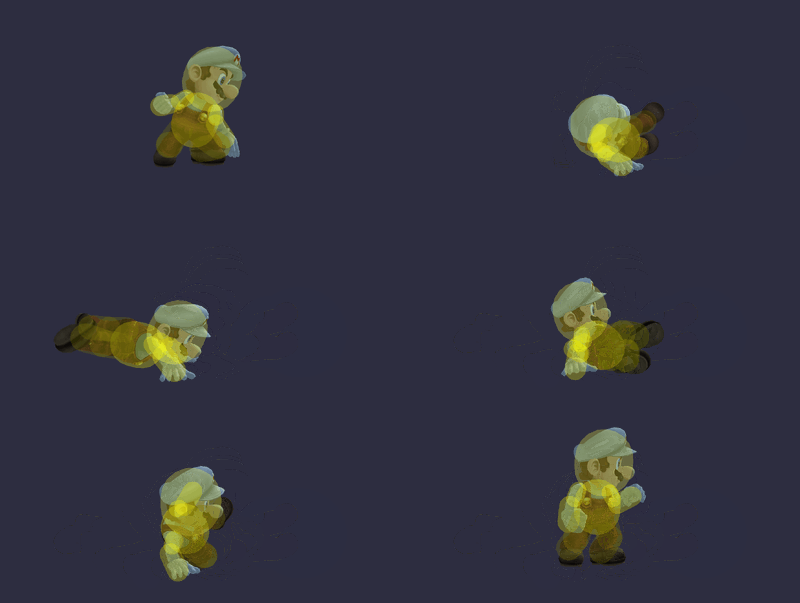
[[File:MarioDSmashSSBB.gif|thumb|400px|Hitbox visualization showing Mario's down smash.]]
==Overview==
==Overview==
==Hitboxes==
==Hitboxes==
Line 6: Line 7:
{{HitboxTableTitle|Hit 1|24}}
{{BrawlHitboxTableRow
|char=Mario
|id=0
|id=0
|damage={{ChargedSmashDmgSSBB|15}}
|damage={{ChargedSmashDmgSSBB|15}}
Line 21: Line 21:
}}
}}
{{BrawlHitboxTableRow
|char=Mario
|id=1
|id=1
|damage={{ChargedSmashDmgSSBB|15}}
|damage={{ChargedSmashDmgSSBB|15}}
Line 37: Line 36:
{{HitboxTableTitle|Hit 2|24}}
{{BrawlHitboxTableRow
|char=Mario
|id=0
|id=0
|damage={{ChargedSmashDmgSSBB|12}}
|damage={{ChargedSmashDmgSSBB|12}}
Line 52: Line 50:
}}
}}
{{BrawlHitboxTableRow
|char=Mario
|id=1
|id=1
|damage={{ChargedSmashDmgSSBB|12}}
|damage={{ChargedSmashDmgSSBB|12}}

Latest revision as of 21:28, May 21, 2024

Competitive.png This article or section may require competitive expertise.
You can discuss this issue on the talk page or edit this page to improve it.
Hitbox visualization showing Mario's down smash.

Overview[edit]

Hitboxes[edit]

ID Part Damage SD Angle BK KS FKV Radius Bone Offset SDIx T% Clang Rebound Type Effect G A Sound Direct
Hit 1
0 0 15% 0 Sakurai angle 40 73 0 4.8 0 0.0 3.6 12.0 1.0x 1.0x 0% HitboxTableIcon(Clang).png HitboxTableIcon(Rebound).png Foot (type) Normal (effect) HitboxTableIcon(GroundedTrue).png HitboxTableIcon(AerialTrue).png L Kick SpecialsDirect.png
1 0 15% 0 Sakurai angle 40 73 0 3.84 0 0.0 3.6 9.0 1.0x 1.0x 0% HitboxTableIcon(Clang).png HitboxTableIcon(Rebound).png Foot (type) Normal (effect) HitboxTableIcon(GroundedTrue).png HitboxTableIcon(AerialTrue).png L Kick SpecialsDirect.png
Hit 2
0 0 12% 0 Sakurai angle 35 75 0 4.8 0 0.0 3.6 -13.0 1.0x 1.0x 0% HitboxTableIcon(Clang).png HitboxTableIcon(Rebound).png Foot (type) Normal (effect) HitboxTableIcon(GroundedTrue).png HitboxTableIcon(AerialTrue).png M Kick SpecialsDirect.png
1 0 12% 0 Sakurai angle 35 75 0 3.84 0 0.0 3.6 -6.0 1.0x 1.0x 0% HitboxTableIcon(Clang).png HitboxTableIcon(Rebound).png Foot (type) Normal (effect) HitboxTableIcon(GroundedTrue).png HitboxTableIcon(AerialTrue).png M Kick SpecialsDirect.png

Timing[edit]

Charges between 2-3
Hit 1 5-6
Hit 2 14
Animation length 37
FrameIcon(Lag).png FrameIcon(LagChargeS).png FrameIcon(LagChargeE).png FrameIcon(Lag).png FrameIcon(Hitbox).png FrameIcon(Hitbox).png FrameIcon(Lag).png FrameIcon(Lag).png FrameIcon(Lag).png FrameIcon(Lag).png FrameIcon(Lag).png FrameIcon(Lag).png FrameIcon(Lag).png FrameIcon(Hitbox).png FrameIcon(Lag).png FrameIcon(Lag).png FrameIcon(Lag).png FrameIcon(Lag).png FrameIcon(Lag).png FrameIcon(Lag).png FrameIcon(Lag).png FrameIcon(Lag).png FrameIcon(Lag).png FrameIcon(Lag).png FrameIcon(Lag).png FrameIcon(Lag).png FrameIcon(Lag).png FrameIcon(Lag).png FrameIcon(Lag).png FrameIcon(Lag).png FrameIcon(Lag).png FrameIcon(Lag).png FrameIcon(Lag).png FrameIcon(Lag).png FrameIcon(Lag).png FrameIcon(Lag).png FrameIcon(Lag).png
Legend (1 square = 1 frame)
Lag
Lag time
ChargeCharge
Charge interval
Hitbox
Hitbox