| Welcome to SmashWiki! Log in or create an account and join the community, and don't forget to read this first! |
| Notices |
|---|
| The Skill parameter has been removed from Smasher infoboxes, and in its place are the new "Best historical ranking" and "Best tournament result" parameters. SmashWiki needs help adding these new parameters to Smasher infoboxes, refer to the guidelines here for what should be included in these new parameters. |
| When adding results to Smasher pages, include each tournament's entrant number in addition to the player's placement, and use the {{Trn}} template with the matching game specified. Please also fix old results on Smasher pages that do not abide to this standard. Refer to our Smasher article guidelines to see how results tables should be formatted. |
| Check out our project page for ongoing projects that SmashWiki needs help with. |
Luigi (SSBM)/Dash attack: Difference between revisions
No edit summary |
Omega Tyrant (talk | contribs) (→Overview: Some rewritting) |
||
| Line 2: | Line 2: | ||
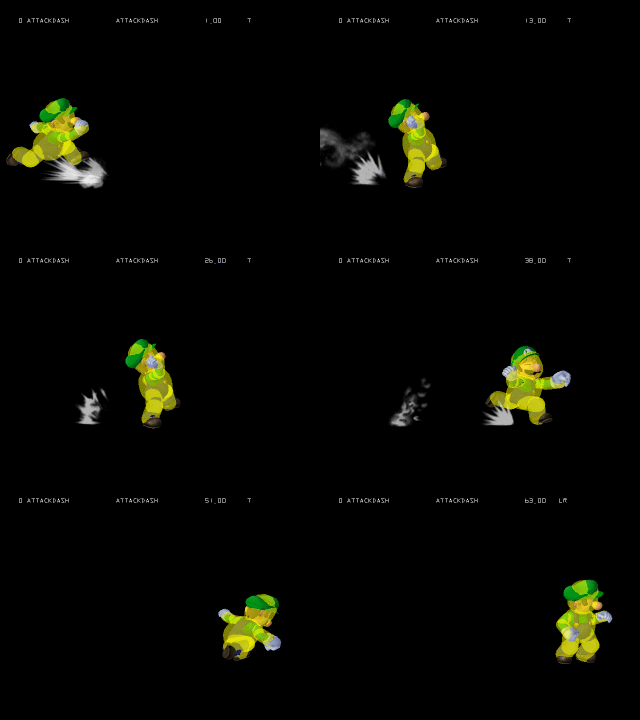
[[File:LuigiDashAttackSSBM.gif|thumb|400px|Hitbox visualization showing Luigi's dash attack.]] | [[File:LuigiDashAttackSSBM.gif|thumb|400px|Hitbox visualization showing Luigi's dash attack.]] | ||
==Overview== | ==Overview== | ||
Luigi dashes forward while throwing several weak punches. | Luigi dashes forward while throwing several weak punches. The move has very fast [[startup]] and has slightly disjointed [[hitbox]]es, but that is where its positive qualities end. In the very unlikely scenario that all of its hits connect, its [[damage]] output is only slightly above-average, dealing 11.1% fresh, but it's far more likely the opponent will be knocked out of reach for the successive hits even without [[SDI]]. Then the move's long duration and very low [[hitstun]] from its hitboxes makes it extremely unsafe on hit, allowing Luigi to be easily [[punish]]ed or [[grab]]bed when he hits someone with the move, while the move is also expectedly very unsafe on [[shield]]. The most crippling flaw is that the move's final hitbox is missing, giving it no proper [[launch]]ing hit, so the move has no [[KO]] power nor ability to put the opponent in any disadvantageous situation after hitting them with it, and farther contributes to the aforementioned issue of the move being so unsafe on hit. This all leaves the move with no practical use. | ||
==Hitboxes== | ==Hitboxes== | ||
Revision as of 17:02, May 14, 2023
Overview
Luigi dashes forward while throwing several weak punches. The move has very fast startup and has slightly disjointed hitboxes, but that is where its positive qualities end. In the very unlikely scenario that all of its hits connect, its damage output is only slightly above-average, dealing 11.1% fresh, but it's far more likely the opponent will be knocked out of reach for the successive hits even without SDI. Then the move's long duration and very low hitstun from its hitboxes makes it extremely unsafe on hit, allowing Luigi to be easily punished or grabbed when he hits someone with the move, while the move is also expectedly very unsafe on shield. The most crippling flaw is that the move's final hitbox is missing, giving it no proper launching hit, so the move has no KO power nor ability to put the opponent in any disadvantageous situation after hitting them with it, and farther contributes to the aforementioned issue of the move being so unsafe on hit. This all leaves the move with no practical use.
Hitboxes
| ID | Part | Damage | SD | Angle | BK | KS | FKV | Radius | Bone | Offset | Clang | Rebound | Effect | G | A | Sound | ||
|---|---|---|---|---|---|---|---|---|---|---|---|---|---|---|---|---|---|---|
| Hits 1-6 | ||||||||||||||||||
| 0 | 0 | 2% | 0 | 2 | 100 | 0 | 3.906 | 0 | 0.0 | 7.812 | 7.812 | |||||||
| 1 | 0 | 2% | 0 | 2 | 100 | 0 | 3.1248 | 5 | 0.0 | 0.0 | 0.0 | |||||||
Timing
| Hitboxes | 4, 10, 16, 22, 29, 37 |
|---|---|
| Interruptible | 59 |
| Animation length | 63 |
Lag time |
Hitbox |
Interruptible |
|
