Super Smash Bros. 4

Mario (SSB4)/Up special/Default: Difference between revisions

From SmashWiki, the Super Smash Bros. wiki
Jump to navigationJump to search
mNo edit summary
m (Text replacement - "|right|thumbnail" to "|thumb")
 
(4 intermediate revisions by 2 users not shown)
Line 1: Line 1:
{{ArticleIcons|ssb4=y}}
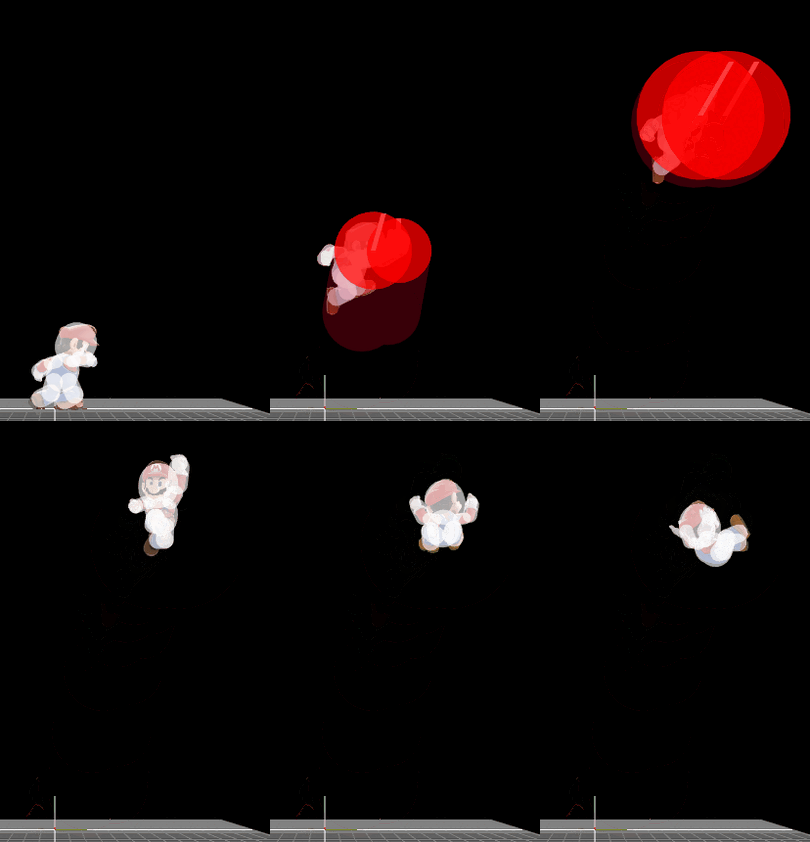
[[File:MarioSuperJumpPunch.gif|270px|right|thumbnail|Hitbox visualization of Mario's Super Jump Punch.]]
{{disambig2|the hitbox visualization in ''Super Smash Bros. 4''|the move itself|Super Jump Punch}}
[[File:MarioSuperJumpPunch.gif|270px|thumb|Hitbox visualization of Mario's Super Jump Punch.]]


==Overview==
==Overview==
Mario's up special move is a rising uppercut known as the [[Super Jump Punch]]. It deals 13% when fresh and if all hits connect. It is Mario's primary [[recovery]] move. Despite the short amount of distance it grants, it can be angled.


Due to its speed, this move is commonly used [[out of shield]], as a combo finisher or to net KOs off the upper [[blast line]]. Although the final hit is not very powerful, the fixed knockback of the earlier hits can lead to very early KOs if the move is used high up and the final hit does not connect.
Due to its speed, this move is commonly used [[out of shield]], as a combo finisher or to net KOs off the upper [[blast line]]. Although the final hit is not very powerful, the fixed knockback of the earlier hits can lead to very early KOs if only the first hit of the move connects near the upper blast zone (especially with [[rage]]).


==Hitboxes==
==Hitboxes==
Line 160: Line 161:
{{FrameStripStart}}
{{FrameStripStart}}
{{FrameStrip|t=Vulnerable|c=2}}{{FrameStrip|t=Intangible|c=4}}{{FrameStrip|t=Vulnerable|c=31}}
{{FrameStripEnd}}
===Landing lag===
{|class="wikitable"
!Animation length
|30
|}
{{FrameStripStart}}
{{FrameStrip|t=Lag|c=30}}
{{FrameStripEnd}}
{{FrameStripEnd}}


Line 166: Line 177:
{{MvSubNavMario|g=SSB4}}
[[Category:Mario (SSB4)]]
[[Category:Mario (SSB4)]]
[[Category:Special moves (SSB4)]]
[[Category:Up special moves (SSB4)]]
[[Category:Up special moves (SSB4)]]

Latest revision as of 08:17, April 12, 2023

This article is about the hitbox visualization in Super Smash Bros. 4. For the move itself, see Super Jump Punch.
Hitbox visualization of Mario's Super Jump Punch.

Overview[edit]

Mario's up special move is a rising uppercut known as the Super Jump Punch. It deals 13% when fresh and if all hits connect. It is Mario's primary recovery move. Despite the short amount of distance it grants, it can be angled.

Due to its speed, this move is commonly used out of shield, as a combo finisher or to net KOs off the upper blast line. Although the final hit is not very powerful, the fixed knockback of the earlier hits can lead to very early KOs if only the first hit of the move connects near the upper blast zone (especially with rage).

Hitboxes[edit]

ID Part Damage SD Angle BK KS FKV Radius Bone Offset SDIx T% Clang Rebound Type Effect G A Sound Direct
Hit 1
0 0 5% 0 AngleIcon70.png 0 100 130 7.0 0 5.0 6.0 0.0 1.0x 1.0x 0% HitboxTableIcon(Clang).png HitboxTableIcon(Rebound).png Hand (type) Coin (effect) HitboxTableIcon(GroundedTrue).png HitboxTableIcon(AerialTrue).png M Coin SpecialsDirect.png
1 0 5% 0 AngleIcon90.png 0 100 140 6.0 0 9.0 6.0 0.0 1.0x 1.0x 0% HitboxTableIcon(Clang).png HitboxTableIcon(Rebound).png Hand (type) Coin (effect) HitboxTableIcon(GroundedTrue).png HitboxTableIcon(AerialTrue).png M Coin SpecialsDirect.png
Hits 2-4
0 0 1% 0 AngleIcon74.png 0 100 150 6.0 0 4.5 7.0 0.0 1.0x 1.0x 0% HitboxTableIcon(Clang).png HitboxTableIcon(Rebound).png Hand (type) Coin (effect) HitboxTableIcon(GroundedTrue).png HitboxTableIcon(AerialTrue).png M Coin SpecialsDirect.png
1 0 1% 0 AngleIcon90.png 0 100 150 5.0 0 8.5 7.0 0.0 1.0x 1.0x 0% HitboxTableIcon(Clang).png HitboxTableIcon(Rebound).png Hand (type) Coin (effect) HitboxTableIcon(GroundedTrue).png HitboxTableIcon(AerialTrue).png M Coin SpecialsDirect.png
Hit 5-6
0 0 1% 0 Autolink angle (365) 0 100 90 5.5 0 4.5 7.0 0.0 1.0x 1.0x 0% HitboxTableIcon(Clang).png HitboxTableIcon(Rebound).png Hand (type) Coin (effect) HitboxTableIcon(GroundedTrue).png HitboxTableIcon(AerialTrue).png M Coin SpecialsDirect.png
1 0 1% 0 Autolink angle (365) 0 100 120 4.2 0 8.5 7.0 0.0 1.0x 1.0x 0% HitboxTableIcon(Clang).png HitboxTableIcon(Rebound).png Hand (type) Coin (effect) HitboxTableIcon(GroundedTrue).png HitboxTableIcon(AerialTrue).png M Coin SpecialsDirect.png
Hit 7
0 0 3% 0 AngleIcon60.png 52 145 0 10.0 0 4.5 7.0 0.0 1.0x 1.0x 0% HitboxTableIcon(Clang).png HitboxTableIcon(Rebound).png Hand (type) Coin (effect) HitboxTableIcon(GroundedTrue).png HitboxTableIcon(AerialTrue).png L Coin 2 SpecialsDirect.png
1 0 3% 0 AngleIcon60.png 52 145 0 10.0 0 8.5 7.0 0.0 1.0x 1.0x 0% HitboxTableIcon(Clang).png HitboxTableIcon(Rebound).png Hand (type) Coin (effect) HitboxTableIcon(GroundedTrue).png HitboxTableIcon(AerialTrue).png L Coin 2 SpecialsDirect.png

Timing[edit]

Hitboxes 3-6, 7, 8, 9, 10-11, 12-13, 14-15
Intangible 3-6
Animation length 37
FrameIcon(Lag).png FrameIcon(Lag).png FrameIcon(Hitbox).png FrameIcon(Hitbox).png FrameIcon(Hitbox).png FrameIcon(HitboxChangeS).png FrameIcon(HitboxChangeM).png FrameIcon(HitboxChangeM).png FrameIcon(HitboxChangeM).png FrameIcon(HitboxChangeE).png FrameIcon(HitboxChangeS).png FrameIcon(HitboxChangeE).png FrameIcon(HitboxChangeS).png FrameIcon(HitboxChangeE).png FrameIcon(Hitbox).png FrameIcon(Lag).png FrameIcon(Lag).png FrameIcon(Lag).png FrameIcon(Lag).png FrameIcon(Lag).png FrameIcon(Lag).png FrameIcon(Lag).png FrameIcon(Lag).png FrameIcon(Lag).png FrameIcon(Lag).png FrameIcon(Lag).png FrameIcon(Lag).png FrameIcon(Lag).png FrameIcon(Lag).png FrameIcon(Lag).png FrameIcon(Lag).png FrameIcon(Lag).png FrameIcon(Lag).png FrameIcon(Lag).png FrameIcon(Lag).png FrameIcon(Lag).png FrameIcon(Lag).png
FrameIcon(Vulnerable).png FrameIcon(Vulnerable).png FrameIcon(Intangible).png FrameIcon(Intangible).png FrameIcon(Intangible).png FrameIcon(Intangible).png FrameIcon(Vulnerable).png FrameIcon(Vulnerable).png FrameIcon(Vulnerable).png FrameIcon(Vulnerable).png FrameIcon(Vulnerable).png FrameIcon(Vulnerable).png FrameIcon(Vulnerable).png FrameIcon(Vulnerable).png FrameIcon(Vulnerable).png FrameIcon(Vulnerable).png FrameIcon(Vulnerable).png FrameIcon(Vulnerable).png FrameIcon(Vulnerable).png FrameIcon(Vulnerable).png FrameIcon(Vulnerable).png FrameIcon(Vulnerable).png FrameIcon(Vulnerable).png FrameIcon(Vulnerable).png FrameIcon(Vulnerable).png FrameIcon(Vulnerable).png FrameIcon(Vulnerable).png FrameIcon(Vulnerable).png FrameIcon(Vulnerable).png FrameIcon(Vulnerable).png FrameIcon(Vulnerable).png FrameIcon(Vulnerable).png FrameIcon(Vulnerable).png FrameIcon(Vulnerable).png FrameIcon(Vulnerable).png FrameIcon(Vulnerable).png FrameIcon(Vulnerable).png

Landing lag[edit]

Animation length 30
FrameIcon(Lag).png FrameIcon(Lag).png FrameIcon(Lag).png FrameIcon(Lag).png FrameIcon(Lag).png FrameIcon(Lag).png FrameIcon(Lag).png FrameIcon(Lag).png FrameIcon(Lag).png FrameIcon(Lag).png FrameIcon(Lag).png FrameIcon(Lag).png FrameIcon(Lag).png FrameIcon(Lag).png FrameIcon(Lag).png FrameIcon(Lag).png FrameIcon(Lag).png FrameIcon(Lag).png FrameIcon(Lag).png FrameIcon(Lag).png FrameIcon(Lag).png FrameIcon(Lag).png FrameIcon(Lag).png FrameIcon(Lag).png FrameIcon(Lag).png FrameIcon(Lag).png FrameIcon(Lag).png FrameIcon(Lag).png FrameIcon(Lag).png FrameIcon(Lag).png
Legend (1 square = 1 frame)
Lag
Lag time
Hitbox
Hitbox
FrameIcon(HitboxChangeS).pngFrameIcon(HitboxChangeE).png
Hitbox change
FrameIcon(Vulnerable).png
Vulnerable
Intangibility
Intangible